VPNFilter
Cisco Talos published an analysis on the new VPNFilter malware that targets at least 500K networking devices worldwide. The post describes how the stage 1 of the malware extracts IP coordinates from the GPS latitude and longitude fields in the EXIF information of images.
A post by Kaspersky further analysed the VPNFilter EXIF to C2 mechanism. Unfortunately all the photobucket.com galleries that were used by the malware as storage for the images have been deleted. But one hardcoded domain, toknowall[.]com, was still available and, surprisingly enough, was still serving the images that contained the GPS coordinates.
The post by Kaspersky contains pseudo code that demonstrates the extraction mechanism. I wanted to convert this code in Python to have a simple parser available in case it was needed during an incident.
Different images via toknowall[.]com
When reading the post from Kaspersky I first thought that toknowall[.]com was only serving one image. However this is not the case.
If you refresh the request http://188[.]165[.]218[.]31/manage/content/update.php you get in fact two different images. I could not detect if there is a real “sequence” how the two different images are served. It seemed that the image with the “black hair-style” seemed to be served more often than the image of “what women want”.
Note that doing a Google Image search for both images did not return a lot of useful information.


Both images contain EXIF information with GPS coordinates
Exif Byte Order                 : Little-endian (Intel, II)
GPS Latitude                    : 1193143 deg 55' 21.00"
GPS Longitude                   : 4296160226 deg 47' 54.00"

Exif Byte Order                 : Little-endian (Intel, II)
GPS Latitude                    : 1193149 deg 49' 15.00"
GPS Longitude                   : 1193060 deg 33' 42.00"
Parser for VPNfilter C2
Reading EXIF data via Python
Obviously parsing the EXIF data from Python requires us to have a module installed to read the EXIF information. There’s a Python module that can do that for you
sudo pip install exifread
Using the Python module (see further in this post for the code) to read the EXIF data results in this raw dataset.
GPS Long/Lat : [4294967178, 140, 4294967274] / [97, 30, 4294967121]
GPS Long/Lat : [14, 8, 4294967142] / [103, 24, 4294967115]
Unsigned int
The pseudo code of Kaspersky uses uint8_t. This is an unsigned integer type with a width of exactly 8 bits. You can use this in Python via ctypes, a foreign function library that provides C compatible data types.
Pseudo code to Python code
The pseudo code contains the formula that is used to convert the GPS coordinates to IP addresses. Putting the different values in a matrix provides this result
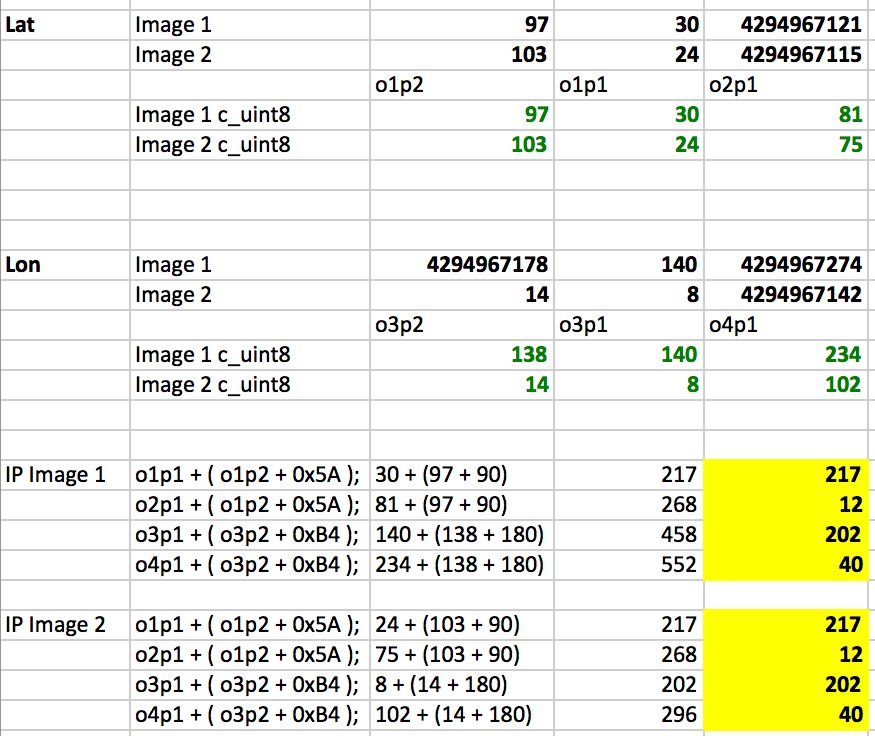
Using the above information helps us to convert the pseudo code into a Python script. The script can parse the image and is able to extract the GPS data from the EXIF information and then transform it into an IP address.
#!/usr/bin/python
# encoding: utf-8

# Extract IP coordinates from EXIF data for VPNFilter
# Koen Van Impe - 20180525
# See: https://securelist.com/vpnfilter-exif-to-c2-mechanism-analysed/85721/

from ctypes import c_uint8;
import exifread
import sys

f = open( sys.argv[1] , 'rb')
tags = exifread.process_file(f)

octet_1_2_fixed = 90  # 0x5A
octet_3_4_fixed = 180 # 0xB4

for tag in tags.keys():
  if tag == 'GPS GPSLongitude':
     gps_long = tags[tag]
     o3p2 = int(str(gps_long.__dict__["values"][0]))
     o3p1 = int(str(gps_long.__dict__["values"][1]))
     o4p1 = int(str(gps_long.__dict__["values"][2]))
  elif tag == 'GPS GPSLatitude':
     gps_lat = tags[tag]
     o1p2 = int(str(gps_lat.__dict__["values"][0]))
     o1p1 = int(str(gps_lat.__dict__["values"][1]))
     o2p1 = int(str(gps_lat.__dict__["values"][2]))

octet_1 = c_uint8( o1p1 + (o1p2 + octet_1_2_fixed) )
octet_2 = c_uint8( o2p1 + (o1p2 + octet_1_2_fixed) )
octet_3 = c_uint8( o3p1 + (o3p2 + octet_3_4_fixed) )
octet_4 = c_uint8( o4p1 + (o3p2 + octet_3_4_fixed) )

print "GPS Long/Lat : %s / %s" % (str(gps_long), str(gps_lat))
print "C2 IP: %u.%u.%u.%u" % (octet_1.value, octet_2.value, octet_3.value, octet_4.value)
This is the output
./vpnfilter-stage1-exif.py update.php.jpg
GPS Long/Lat : [4294967178, 140, 4294967274] / [97, 30, 4294967121]
C2 IP: 217.12.202.40
It is also available on Github https://github.com/cudeso/tools/tree/master/vpnfilter.

