DNS Logging
DNS logging and monitoring is important! Monitoring DNS logs allows you to analyze and detect C&C traffic and have access to crucial information to reduce the dwell time and detect breaches. Combined with Passive DNS it’s a very valuable data source to be used during incident response.
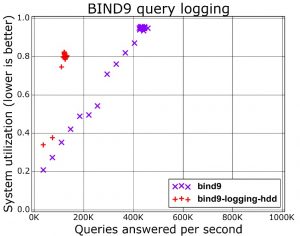
But DNS logging comes at a price. Every log operation requires the system to write out an entry to disk (besides also properly formatting the log string). This is a slow I/O-operation and limits the maximum amount of queries that your system can answer. A graph (slide 13) from a presentation from Farsight Security shows the difference of running BIND9 with or without query logging.
Another way of capturing DNS logs is via packet capture. This is a good solution if you do not have direct access to the DNS server. If you manage the DNS server then doing packet capture is not the most efficient solution though. Packet capture is in essence re-doing the same stuff as the things your DNS server is already doing, for example packet reassembly and session management. Although this approach makes it more difficult to tie individual responses to queries, as default query logging doesn’t log the responses it’s your best best to keep track of the DNS answers (for example via Bro) based on your traffic.
All this will probably not be a big issue in smaller environments but if you scale up there will be a time when you hit the system limits. Does this mean you should then give up on DNS logging? Not at all!
Dnstap
An alternative to DNS query logging is dnstap. Dnstap is a flexible, structured binary log format for DNS software that uses Protocol Buffers to encode events in an implementation-neutral format. Dnstap exists for most open source DNS servers as Bind, Knot and Unbound. The major advantage of Dnstap is demonstrated via its architecture schema.
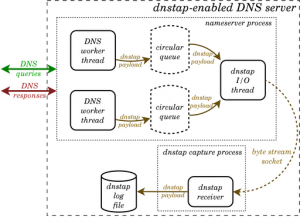
The encoding of events and writing to disk happens outside the DNS handling system on a “copy” of the DNS message. This means that slow disk performance during log operations will have less of a negative impact on the system as a whole. The generation of the messages is done from within the DNS handling system, meaning that all relevant DNS information can be included and does not need to be reconstructed from observing the traffic.
Speed isn’t the only advantage of dnstap. In case of a very high load or peak, the system can start dropping the log messages but still process the queries. Additionally, the logged information contains all the details of the request making it a treasure-cave for future research.
Unfortunately dnstap isn’t included by default in all Bind versions. Although ISC lists that dnstap will be generally available in BIND 9.11, this isn’t the case for the packages in Ubuntu 16 or Ubuntu 18. In this post I’ll walk you through how to install dnstap on Ubuntu, tested on Ubuntu 16.04 and Ubuntu 18.04.
Install dnstap on Ubuntu
Compile dnstap on Ubuntu
Dnstap relies on Google Protocol Buffers and Frame Streams. The documentation from ISC tells you how to install these packages manually but on Ubuntu you can make use of the pre-made packages.
First we’ll have to make sure we are allowed to use the universe repository and install the packages needed for compiling from source.
sudo add-apt-repository universe
sudo apt-get install build-essential libtool autoconf automake libssl-dev
Now install Protobuf, the Protobuf C compiler and Frame streams.
sudo apt-get install libprotobuf-c-dev libprotobuf-c1
sudo apt-get install protobuf-c-compiler
sudo apt-get install fstrm-bin libfstrm0 libfstrm-dev libfstrm0-dbg
Next download the latest source tgz from ISC, verify the GPG signature and if the signature is good extract the archive.
wget http://ftp.isc.org/isc/bind9/cur/9.12/bind-9.12.3-P1.tar.gz
wget http://ftp.isc.org/isc/bind9/cur/9.12/bind-9.12.3-P1.tar.gz.asc
gpg --verify bind-9.12.3-P1.tar.gz.asc
tar zxvf bind-9.12.3-P1.tar.gz ; cd bind-9.12.3-P1
Enabling dnstap within Bind is simple via –enable-dnstap. Note that the configure option below does not have support for IPv6.
./configure --enable-dnstap --sysconfdir=/etc/bind --localstatedir=/ --enable-threads --enable-largefile --with-libtool --enable-shared --enable-static --with-gnu-ld --enable-dnsrps
If the configure ran without errors, you should get an output similar to this.
===============================================================================
Configuration summary:
-------------------------------------------------------------------------------
Optional features enabled:
    Multiprocessing support (--enable-threads)
    GOST algorithm support (encoding: raw) (--with-gost)
    ECDSA algorithm support (--with-ecdsa)
    Print backtrace on crash (--enable-backtrace)
    Use symbol table for backtrace, named only (--enable-symtable)
    Cryptographic library for DNSSEC: openssl
    Dynamically loadable zone (DLZ) drivers:
        None
-------------------------------------------------------------------------------
Features disabled or unavailable on this platform:
    ...
Next you have to compile and install the binaries.
make
sudo make install
When all done you can start named. It will spew out an error in syslog of a missing config file but this is not a problem in this stage. Testing if the binary merely starts allows you to verify that it was installed successfully. If you get an error for a missing shared library run
sudo ldconfig
Other configure options that might cause a problem
- If you opted to do configure with –with-gssapi and you get an error “gssapi.h not found” then try again after installing the krb5-dev package (sudo apt-get install libkrb5-dev).
- If you want JSON statistics output, then first make sure that the JSON library is installed (sudo apt-get install libjson-c-dev).
- Include –enable-dnsrps to support RPZ from an external response policy provider.
Update 20210416 : Ubuntu 20
If you run Ubuntu 20 then follow these installation steps. In order to verify the installation package you also have to install the ISC PGP key. Visit the page at https://www.isc.org/202122pgpkey, save the key in a text file and then import it.
gpg --import 202122pgpkey
user@ubuntu20:~$ gpg --list-keys
/home/user/.gnupg/pubring.kbx
------------------------------
pub   rsa4096 2021-01-01 [SCE] [expires: 2023-02-01]
      7E1C91AC8030A5A59D1EFAB9750F3C87723E4012
uid           [ unknown] Internet Systems Consortium, Inc. (Signing key, 2021-2022) <codesign@isc.org>
Then go ahead with downloading, compiling and installing bind.
sudo add-apt-repository universe
sudo apt-get update
sudo apt-get install build-essential libtool autoconf automake libssl-dev

sudo apt-get install libuv1-dev
sudo apt-get install libnghttp2-dev
sudo apt-get install libcap-dev
sudo apt-get install libprotobuf-c-dev libprotobuf-c1
sudo apt-get install protobuf-c-compiler
sudo apt-get install fstrm-bin libfstrm0 libfstrm-dev
sudo apt-get install libprotobuf-c-dev libprotobuf-c1

mkdir bind9
cd bind9
wget http://ftp.isc.org/isc/bind9/cur/9.17/bind-9.17.11.tar.xz
wget http://ftp.isc.org/isc/bind9/cur/9.17/bind-9.17.11.tar.xz.asc
gpg --verify bind-9.17.11.tar.xz.asc

tar xvf bind-9.17.11.tar.xz
cd bind-9.17.11/
./configure --enable-dnstap --sysconfdir=/etc/bind --localstatedir=/ --enable-threads --enable-largefile --with-libtool --enable-shared --with-gnu-ld
make
sudo make install
sudo ldconfig

user@ubuntu20:~$ which named
/usr/local/sbin/named
user@ubuntu20:~$ named -v
BIND 9.17.11 (Development Release) <id:72c690d>
Prepare the environment
Before we can start the nameserver there are a couple of things we need to do to prepare the environment.
First create the user under which the DNS server will run, typically use the user bind. We also need to create the directory where bind stores its cache files etc.
sudo groupadd bind
sudo useradd bind -g bind -b /var/cache/bind -s /bin/false
sudo mkdir /var/cache/bind
sudo chgrp bind /var/cache/bind
sudo chmod g+w /var/cache/bind
sudo mkdir /etc/named
Next you’ll have to create a named.conf file in the directory /etc/named. You can do this from scratch or from one of the examples available on the internet. Another way is to first install bind via an Ubuntu package and then removing the package but keeping the configuration files. Regardless what option you choose, the configuration should include an option part. The option part is where you enable dnstap.
Enable dnstap
In my named.conf.options file I have these settings to enable dnstap
options {
    directory "/var/cache/bind";

    dnstap {auth; client; resolver; forwarder;};
    dnstap-output unix "/var/cache/bind/dnstap.sock";
...
}
The first option dnstap instructs which type of messages it should log. There are four types, client, auth, resolver, and forwarder. For each type you can also indicate whether to log query messages or response messages; if not specified (as in the example), both queries and responses are logged.
Then you’ll have to tell dnstap to either log to a file or to a UNIX socket. Note that the socket must exist before you start bind. Obviously choosing a socket allows you to take full advantage of dnstap.
Enable Frame Streams
Remember that dnstap needs a socket to write to? This socket acts as the jump point between bind and the logging component. Dnstap writes to the socket and then frame streams picks up the messages and writes them to a file. To avoid permission problems you should start frame streams as the same user that is used to start named. You then have to tell it where the socket is located and where it needs to write the log file. Optionally you can include -d to enable debugging.
sudo -u bind fstrm_capture -t protobuf:dnstap.Dnstap -u /var/cache/bind/dnstap.sock -w /var/cache/bind/logfile.dnstap
Start bind
Now it’s time to start bind. For debugging purposes it’s best to include the debug option (-d 2), this allows you to more easily find the source of any errors that might occur.
sudo named -4 -u bind -d 2
If all went well, the syslog should include a message similar to the one below
Dec 22 14:40:47 localhost named[55972]: opening dnstap destination '/var/cache/bind/dnstap.sock'
Test dnstap
Now that bind together with dnstap is running it’s time to have it resolve some queries. If you get a succesfull reply to the queries you should see that the log file has grown in size. However if you try to open the file with less or cat you’ll get a message that this is a binary file. You’ll need a special tool to read the file, dnstap-read. Dnstap-read allows you to read the binary file and have its content represented in different formats.
The default use of dnstap-read prints all the messages that it observed.
dnstab-read /var/cache/bind/logfile.dnstap
22-Dec-2018 19:07:07.803 CQ 127.0.0.1:57719 -> 127.0.0.1:0 UDP 53b www.blah.org/IN/A
22-Dec-2018 19:07:07.803 RQ 192.168.42.210:58529 -> 199.19.56.1:53 UDP 53b www.blah.org/IN/A
22-Dec-2018 19:07:08.099 RR 192.168.42.210:58529 <- 199.19.56.1:53 UDP 41b www.blah.org/IN/A
22-Dec-2018 19:07:08.099 RQ 192.168.42.210:33546 -> 199.19.56.1:53 TCP 53b www.blah.org/IN/A
22-Dec-2018 19:07:08.714 RR 192.168.42.210:33546 <- 199.19.56.1:53 TCP 586b www.blah.org/IN/A
22-Dec-2018 19:07:08.715 RQ 192.168.42.210:60693 -> 192.35.51.30:53 UDP 58b auth01.ca-dns.net/IN/A
22-Dec-2018 19:07:08.715 RQ 192.168.42.210:57323 -> 192.35.51.30:53 UDP 58b auth02.ca-dns.net/IN/A
As you can see in the output, there are different type of messages, for example
- CQ : Client Query
- RQ : Resolver Query
- RR : Resolver Response
So far there are ten different type of messages, covering stubs, clients, resolvers, auth and forwarders. An overview can be found on Github, dnstap.proto.
I also mentioned that you can get all the details of the messages. This requires you to start dnstab-read with with the -p option. Below is one response for an A record.
dnstab-read -p /var/cache/bind/logfile.dnstap
22-Dec-2018 19:07:09.084 RR 192.168.42.210:51350 <- 142.77.2.37:53 UDP 57b www.blah.org/IN/A
;; ->>HEADER<<- opcode: QUERY, status: NOERROR, id:  51860
;; flags: qr aa; QUESTION: 1, ANSWER: 1, AUTHORITY: 0, ADDITIONAL: 1
;; OPT PSEUDOSECTION:
; EDNS: version: 0, flags: do; udp: 4096
;; QUESTION SECTION:
;www.blah.org.			IN	A

;; ANSWER SECTION:
www.blah.org.		86400	IN	A	205.150.150.140
Dnstap, System maintenance
There are a few things you need to finish if you want to keep your system running smoothly with dnstap enabled.
- Monitor the socket. Adjust the system monitoring tools so that they not only check for the bind service but also that the socket is writable and that the frame stream capture process is running.
- Logging all the message types give you all possible information but might overwhelm you with data. Optionally you can choose to only log client and auth message types ( dnstap {auth; client; }; ). However if you want to build a passive dns database, then the resolver response message type should be enabled. If you consider building your own Passive DNS database, you can also have a look at DNSDB.
- Unfortunately I couldn’t find a solution to do something similar as a “tail -f query.log” with dnstap-read. I tried running it in watch but this only gave the first lines, not the last -new- lines.
- Include Frame Streams in the bind init script. Because the socket needs to exist before bind starts, I opted to start fstrm_capture in the init script of bind (systemd), then have it wait for a second and then start named.
- The log file can grow quickly in size. Enabling dnstap might give you a logging system that no longer acts as a bottleneck for the service. If the data partition fills up, you’ll eventually also run into trouble though. I rotate the log file by restarting the capture process. Before restarting I copy the existing log file to a NAS for later analysis.
Conclusion
Dnstap is a great solution if you require more detail on the type of DNS queries on your network. If your system is not at its limit resource-wise, you can also keep default bind query logging enabled. In my setup I use the “normal” DNS query logging to ship the information to ELK and then keep dnstap logs for more in-depth investigations (for example tracking the answers).
Privacy can be a concern if you share the data files with others. Because of the details (CQ, CR etc.) you might want to filter out certain type of requests.
Further reading
Useful resources


Performance also depends on the OS on which BIND is run. Back in the day, when the commercial version was around, BIND on BSDi could serve our 35K customers with no noticeable system load. The same software on Linux ran at 60-90% load. For those that are tempted to suggest it, Microsoft’s DNS service was a non-starter. It had a memory leak and required that the server be rebooted every 4 hours. I wonder what a new comparison would reveal…
thanks so usefull
Microsoft’s DNS service was a non-starter. It had a memory leak and required that the server be rebooted every 4 hours
Compilation error happening while compiling and installing the binaries . Any help