Cytomic Orion
Cytomic Orion is a solution for Threat Hunting & Incident Response, that speeds up the process of identification, investigation, containment, and remediation of cyber threats & insiders using Living-off-the-Land techniques to evade existing controls (Reduce the MTTD & MTTR). The Cytomic Orion API allows you to integrate it with other tools, one of those tools is MISP.
The integration with Cytomic Orion allows you to achieve two main goals :
- Query the Cytomic Orion API, check if MISP threat data has been observed and then import sighting details as username and machine name and add them to the MISP event;
- Export the threat data from MISP to Cytomic Orion. The export works in two ways, you can either upload attributes (or indicators) from MISP to Cytomic Orion, or delete them from Cytomic Orion by sending the delete request from within MISP.
Configure MISP
There are a few things you need to setup before you can use the integration features.
MISP Objects
MISP objects are an addition to MISP attributes to allow advanced combinations of attributes. Two specific MISP objects are added to import results from Cytomic Orion into MISP. Log in to MISP and go to the menu Global Actions > List Object Templates. Once you’re in the MISP objects screen, click Update objects to make sure you have the latest set of objects.
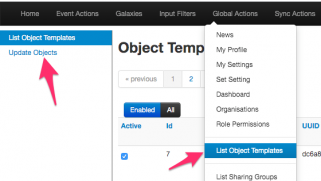
If you then search for the Cytomic objects, you should receive two results.
Cytomic Taxonomy
Remember that there are two integration options, one for importing and one for exporting?
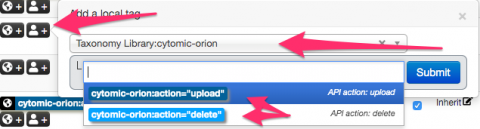
Whereas the import feature relies on the MISP objects, the export feature relies on a Cytomic Orion MISP taxonomy. Enabling this taxonomy is as easy as enabling the objects. In your MISP interface, go to Event Actions > List Taxonomies. In the taxonomies screen, click Update taxonomies to fetch the latest taxonomies.
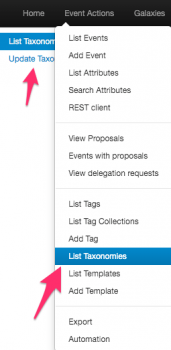
Once that is done, you need to enable the Cytomic Orion Taxonomy, and then enable all the terms in that taxonomy.
![]()
When you have enabled the taxonomy, you can have a look at its content. The two terms in the taxonomy, upload and delete, represent the export actions that are supported with the integration script.
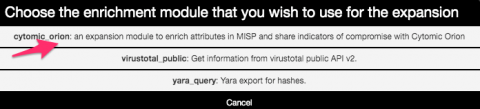
MISP module
The last step needed is enabling the MISP module for Cytomic Orion. If your MISP setup is up-to-date it should contain the latest available modules, including the one for Cytomic Orion. Enable the module under Administration > Server Settings and Maintenance > Plugin Settings > Enrichment.
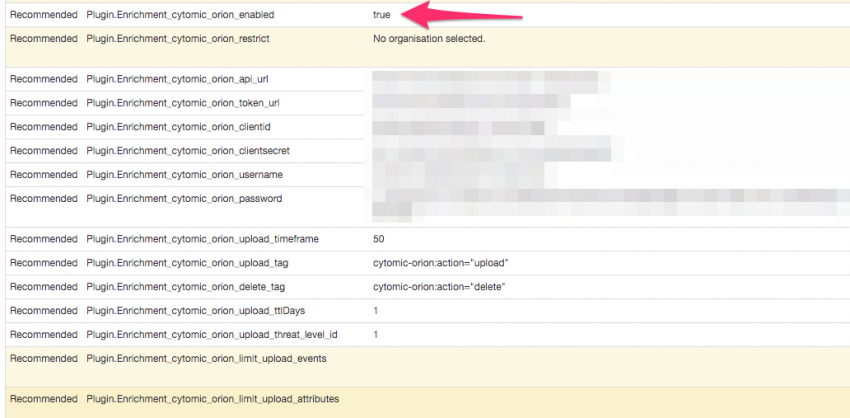
The module includes a couple of configuration options that you need to set. The URLs and authentication information is something that you can obtain via Cytomic Orion.
- cytomic_orion_api_url : The Cytomoc Orion API url;
- cytomic_orion_token_url : The URL where you can fetch the authentication token;
- cytomic_orion_clientid, cytomic_orion_clientsecret, cytomic_orion_username and cytomic_orion_password : The authentication details to access the API;
- cytomic_orion_upload_timeframe : The maximum (published timestamp) age of MISP events to take into account when uploading (or deleting) attributes. Expressed in days. Defaults to 5d (5 days);
- cytomic_orion_upload_ttlDays : The default TTLDays (Cytomic Orion option) to be set when uploading attributes. Defaults to 1;
- cytomic_orion_upload_threat_level_id : The minimal threat level to take into account when uploading (or deleting) attributes. Values between 1 (High) and 4 (Undefined). Defaults to 2 (Medium), meaning Medium and High events are used;
- cytomic_orion_limit_upload_events : Maximum number of events from which to upload attributes. Defaults to 50;
- cytomic_orion_limit_upload_attributes : Maximum number of attributes to upload. Defaults to 50;
- cytomic_orion_upload_tag : The tag (or workflow) that indicates the attribute (or event) needs to be uploaded to Cytomic Orion. You can use whatever tag you prefer but it’s best to use the tag from the Cytomic Orion taxonomy;
- cytomic_orion_delete_tag : The tag (or workflow) that indicates the attribute needs to be deleted from Cytomic Orion. It’s best to stick to the Cytomic Orion taxonomy.
To make use of the module, you must set the URLs and authentication information, and the upload and delete tags. If you use the provided taxonomy, you can set them to
Upload: cytomic-orion:action="upload"
Delete: cytomic-orion:action="delete"
PyMISP
The last component that needs to be set is a PyMISP module. If your system is up-to-date, it will contain the Cytomic Orion PyMISP module. There’s no configuration needed for this module, it takes its configuration from the previous MISP module.
There are a few options that you can configure inline in the script, these are all found in the script code block where the class cytomicobject is defined. For example the Debug option can be useful to disable once you’re sure everything works as expected.
You can choose to run the script manually, or have it run in the background as a cron job. The advantage of the cron job is that you do not need console access to the MISP machine and that there’s no manual intervention needed.
*/15 * * * * mispuser /usr/bin/python3 /home/mispuser/PyMISP/examples/cytomic_orion.py
The frequency to run this cron job depends on your preference, but running it every 15′ should suffice in most cases.
Query the Cytomic Orion API
The first objective is to query the Cytomic Orion API for MISP threat data and then get the sightings back as MISP objects. Querying can only happen for the md5 attributes. If you’re all setup, and MISP modules are running, then in a MISP event you should notice the query/add enrichment options on the right of the attribute list. Clicking these will give you the option to start the Cytomic Orion enrichment module.
This will then start the query with the API, and return the results in the form of objects if any are found. If will return
- A file object, if the file is known to Cytomic Orion and how it has been classified. Also includes the first- and last-seen;
- One or multiple machine objects, listing on which machines Cytomic Orion has spotted the file. This includes machine name, organization, path of the file and client identification. The client name is added as a tag to the attribute. This tagging feature allows you to later on query or search the MISP interface more easily for specific occurences.
The only thing left to do is then accept the proposed enrichment data and click the Submit button near the bottom of the screen.
Upload (or delete) attributes from Cytomic Orion
The second objective is to upload (or delete attributes from Cytomic Orion). This works in two steps. You first need to tag either an attribute or an event to be processed, and then a background job (the PyMISP script) will execute the action. The attributes that can be exported include the MISP attributes ip-dst, ip-src, url, md5, domain, hostname, domain|ip and hostname|port attributes. A word of caution, make sure you are allowed to share the attributes, before marking them to be uploaded or deleted. The module will not check sharing group or TLP codes.
The first step, tagging an event or attribute is straightforward if you have the taxonomy enabled. Select the event or attribute and add the tag. Note that you can tag any type of attribute, but only the attribute types listed above will be processed. What’s the difference between tagging an event or attribute? See below for the different options.
Do not forget to Publish the event, the export will only consider MISP threat events which have been published. Additionally, also take care of the configuration option in the MISP module for the threat level and timeframe.
This script supports three options, which are closely linked with how you tagged the event or attributes.
usage: cytomic_orion.py [-h] [--upload | --delete | --events]

Upload or delete indicators to Cytomic API

optional arguments:
  -h, --help  show this help message and exit
  --events    Upload events indicators
  --upload    Upload indicators
  --delete    Delete indicators
Upload all attributes from an event
The first option allows you to upload all attributes in an event. This works based on events which have been tagged with the upload tag, preferably cytomic-orion:action=”upload”. You can start this export via PyMISP with
/var/www/MISP/venv/bin/python /var/www/MISP/PyMISP/examples/cytomic_orion.py --events
If all went as expected, you should receive output similar to this
Event: 351 urls: 1 | hashs: 2 | domains: 1 (event untagged)
Note that on a few occasions, the Cytomic Orion API can return a HTTP 400 error code, with the return message “InternalServerError”. This does not mean there’s an error in the uploading, it means there’s an error on the parsing side. If the script runs in cron, the next run will most likely fix the issue. If you run it manually you just have to run the script again.
When the script successfully ran, you can check that the tag that you added to the event has been removed.
Upload (or delete) attributes
The second (and also third) option allows you to upload attributes from MISP or delete attributes from Cytomic Orion. This is similar to the option for events, but is now attribute based. Add the upload (or delete) tag to an event and make sure that the events are published. The script will then search for all events (regardless if they are tagged or not on ‘event-level’) and then upload (or delete) the attributes which you have tagged.
/var/www/MISP/venv/bin/python /var/www/MISP/PyMISP/examples/cytomic_orion.py --upload
/var/www/MISP/venv/bin/python /var/www/MISP/PyMISP/examples/cytomic_orion.py --delete
If all went as expected, you should receive output similar to this
RESULT: {'success': True, 'message': '1 DomainIoc deleted.', 'error': None}
Again, when the script successfully ran, you can check that the tags that you added to the attributes have been removed.
ToDo
Currently the integration does not include support for the sightings mechanism in MISP.

