I posted an article on the website of the MISP project on how to start with creating your own MISP galaxy / cluster.
Install MITRE ATT&CK Navigator in an isolated environment
ATT&CK Navigator
The ATT&CK Navigator is a great tool to browse the ATT&CK matrices. You can run the tool directly from Github, but you can also install it locally. This can especially be useful if you want to browse the ATT&CK matrices when you’re working in an isolated environment.
Navigator can be used via Docker, but that instance does not contain the matrices. Next is a short overview of commands to get the Navigator to work locally, with al matrices available.
Install via Docker
The first step is obviously to clone the Github repository. Following that, download the matrices for Enterprise, Mobile and Pre in the src/assets directory.
git clone https://github.com/mitre-attack/attack-navigator.git
cd attack-navigator/nav-app/src/assets
wget https://raw.githubusercontent.com/mitre/cti/master/enterprise-attack/enterprise-attack.json
wget https://raw.githubusercontent.com/mitre/cti/master/mobile-attack/mobile-attack.json
wget https://raw.githubusercontent.com/mitre/cti/master/pre-attack/pre-attack.json
cd ../..
Next you need to change the file nav-app/src/assets/config.json. Disable the external matrices URLs and change them to the local instance. Verify that the taxii_server is disabled.
{
    "enterprise_attack_url": "assets/enterprise-attack.json",
    "pre_attack_url": "assets/pre-attack.json",
    "mobile_data_url": "assets/mobile-attack.json",
    "taxii_server": {
        "enabled": false,
When the above is done, create the docker file from within the nav-app directory. The creation file for the docker container will copy the contents from the current location (so the content from nav-app) to the docker location /nav-app/. Because we’ve previously added the matrices, this will also contain the local matrices.
docker build -t attack_navigator .
docker run -p 4200:4200 attack_navigator
What’s now left to do is to browse with your browser to localhost:4200.
Did you know that, next to the Navigator, you can also run the entire MITRE ATT&CK website on a standalone server? Check out https://github.com/mitre-attack/attack-website. If you get an error ‘At least one invalid signature was encountered.’ when trying to build the docker image, then issue an ‘docker system prune –force’ and try again.
Create and delete training alerts in TheHive
TheHive Case Management
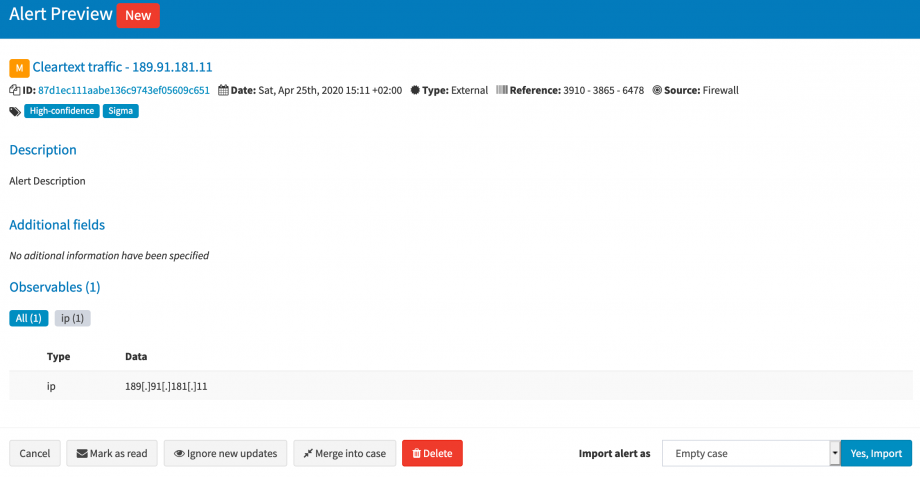
TheHive is a scalable, open source and free Security Incident Response Platform, which tightly integrates with MISP. It supports a feature that allows you to convert one or more alerts, for example alerts sent by security devices, to a security case (an investigation). The creation, and handling, of these alerts can be done via an API.
Creating, and then afterwards deleting, these alerts to showcase the features of TheHive during a training session can be a time-consuming process. So why not automate this process?
Create and Delete Alerts
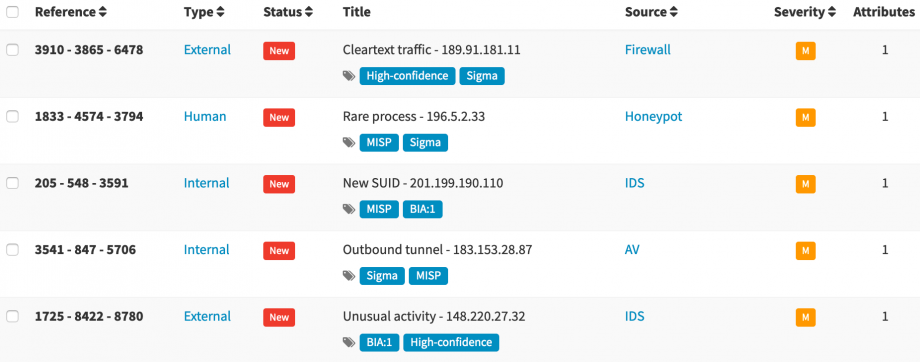
With the Python script training-alert.py you can easily create a large number of alerts, and delete them if you want to start over. The created alerts are unique and contain a set of random elements, such as title and observables.
You can get the script from TheHive-Resources/contrib/ManageTrainingAlerts/, or below this post.
Create alerts
Creating alerts can be done by calling the script with the, create option and then supplying the number of alerts to be created. The alert details such as title, alert type and source are randomly generated. The alert is extended with two random tags and with one observable.
training-alert.py create 5
The random values are stored in the variables sources, alert_type, title and tags.
Delete alerts
The deletion of these alerts can be done by calling the script with the delete option and then either supplying an alert id or a tag. With the alert id, one single alert gets deleted. With the tag option, all the alerts which have the supplied tag, will be deleted.
A warning, this deletion does not take into account if the alerts were previously created by this script or not.
training-alert.py delete _id 1fd272233688b6cd685b138092970ce8

training-alert.py delete tag Perimeter
The deletion of the alerts are done by calling the API with the force parameter. Calling the script with the tag parameter causes it to first list the alerts with the given tag, and then recursively call the delete function with the found id.
Training sessions for TheHive
The alert feature in TheHive, and the option to convert these alerts into cases and link the observables to previous cases is a great feature. But having to create these alerts manually with curl (or similar) can be tedious. This script can save you a lot of time if you give a training session of TheHive. Good luck!
training-alert.py
#!/usr/bin/env python3

'''
TheHive - Create and Delete alerts. Useful during a training session.
Koen Van Impe - 2020

 Create 5 alerts:
    training-alert.py create 5
 Delete specific alert:
    training-alert.py delete _id 1fd272233688b6cd685b138092970ce8
 Delete alerts with a tag:
    training-alert.py delete tag Perimeter
'''

import requests
import json
import random
import sys

auth = "<AUTHKEY>"
host = "http://127.0.0.1:9000"


def create_alert():
    maxrand = 10000
    sources = ['IDS', 'AV', 'Firewall', 'Honeypot']
    alert_type = ['Internal', 'External', 'Human']
    title = ['Rare process', 'Rare scheduled task', 'Unusual activity', 'Outbound tunnel', 'Cleartext traffic', 'Malware alert', 'New SUID']
    title_ip = '{}.{}.{}.{}'.format(random.randrange(1, 223), random.randrange(1, 223), random.randrange(1, 223), random.randrange(1, 223))
    tags = ['MISP', 'Sigma', 'Perimeter', 'BIA:1', 'High-confidence']

    headers = {'Content-Type': 'application/json', 'Authorization': 'Bearer {}'.format(auth), 'Accept': 'text/plain'}
    url = "{}/api/alert".format(host)

    data = {'title': '{} - {}'.format(random.choice(title), title_ip), 'description': 'Alert Description', 'type': random.choice(alert_type), 'source': random.choice(sources), 'sourceRef': '{} - {} - {}'.format(random.randrange(maxrand), random.randrange(maxrand), random.randrange(maxrand)), 'tags': [random.choice(tags), random.choice(tags)], 'artifacts': [{'dataType': 'ip', 'data': title_ip, 'message': 'Victim'}]}

    result = requests.post(url, headers=headers, data=json.dumps(data))
    if result.json()['status'] == 'New':
        print('Alert {} added'.format(result.json()['_id']))
    else:
        print('Failed to add alert')
        print(data)


def delete_alert(_id=False, tag=False):
    if _id:
        url = "{}/api/alert/{}?force=1".format(host, _id)
        headers = {'Authorization': 'Bearer {}'.format(auth)}
        result = requests.delete(url, headers=headers)
        if result.status_code == 204:
            print('Alert {} deleted'.format(_id))
        else:
            print('Failed to delete {}'.format(_id))

    if tag:
        url = "{}/api/alert/_search?range=all".format(host)
        headers = {'Content-Type': 'application/json', 'Authorization': 'Bearer {}'.format(auth), 'Accept': 'text/plain'}
        data = {'query': {'tags': tag}}
        result = requests.post(url, headers=headers, data=json.dumps(data))
        if result.status_code == 200:
            if result.json():
                for alert in result.json():
                    delete_alert(_id=alert['_id'])
            else:
                print("Nothing to delete")
        else:
            print("Failed to delete", result)


if len(sys.argv) > 1:
    action = sys.argv[1]
    if action == "create":
        i = 0
        count = int(sys.argv[2])
        while i <= count:
            create_alert()
            i = i + 1
    if action == "delete":
        subaction = sys.argv[2]
        if subaction == "_id":
            _id = sys.argv[3]
            delete_alert(_id=_id)
        elif subaction == "tag":
            tag = sys.argv[3]
            delete_alert(tag=tag)
else:
    print("Invalid arguments")
RDP Honeypots
Increase in public RDP hosts
In a recent post the SANS ISC warned of an increase in RDP Scanning. Although the initially reported number was adjusted downward later, there is still an increase in exposed RDP servers. It would be interesting to track the volume of RDP scans, and the credentials used in the scan. Let’s run an RDP honeypot.
RDPY
One of these RDP honeypots is written by Sylvain Peyrefitte, RDPY. RDPY is more than just a RDP honeypot. It is a Python implementation of the Microsoft RDP protocol, built over the event driven network engine Twisted.
RDP Session
One of the first things you need to do, is record an RDP session (the login screen) which can then be used with the RDP honeypot. First have a Windows system where RDP is enabled and NLA (Network Level Authentication) is disabled, then create a MiTM attack and record the session (RSS files). This session is actually the ‘screen’ how visitors on the RDP connection are greeted. For my exercise, I used a Windows 7 system.
rdpy-rdpmitm.py -t 1.2.3.4 -o rss_files
The target (1.2.3.4) is the IP of the Windows system. Then connect to the RDP service, via the MiTM proxy.
xfreerdp --no-nla 127.0.0.1
When this is done, you can replay the recorded session, stored in an RSS file, with rdpy-rssplayer.py.
Start the RDP honeypot
The original implementation of rdpy-rdphoneypot.py did not contain timestamps and logging to a file. Also, the tracking of submitted credentials was on a multiline. I changed this via PR 108, which is now also included in the master branch. Running the honeypot is as simple as it gets by starting the rdpy-rdphoneypot.py command. I run it from screen and have the screen restarted daily.
screen -S rdphoneypot rdpy-rdphoneypot.py -L rdpy-rdphoneypot/rdp.log rdpy-rdphoneypot/win7.rss
This is how a succesfull logged connection looks like.
The options are self-explanatory.
- -L the log path;
the recorded RDP session.
Other options available include
- -l listen_port default 3389;
- -k private_key_file_path (mandatory for SSL);
- -c certificate_file_path (mandatory for SSL).
It took less than 20 minutes after the start of the RDP honeypot to see the first connections.
Logstash
I store the logs from the different honeypots in Elastic. Below is the grok filter used for the RPD logs.
					if "Credentials" in [message] {
						grok {
							match => { "message" => "INFO:\t%{TIMESTAMP_ISO8601:timestamp} --- Credentials: domain: (?:%{SPACE}|%{WORD:rdp_domain}) username: (?:%{SPACE}|%{WORD:rdp_username}) password: (?:%{SPACE}|%{WORD:rdp_password}) hostname: %{WORD:rdp_hostname}"}
							remove_field => [ "message" ]
							add_field => { "rdp_type" => "credentials" }
						}

					}
					if "Connection" in [message] {
						grok {
							match => { "message" => "INFO:\t%{TIMESTAMP_ISO8601:timestamp} --- Connection from %{IPV4:src_ip}:%{POSINT:src_port}"}
							remove_field => [ "message" ]
							add_field => { "rdp_type" => "connection" }
						}
				 	}
Report sightings from Kibana to MISP
A problem we all face when using threat intelligence data is getting rid of false positives in our data feeds. On the other hand, reporting of true positives is equally important as it allows to increase the level of trust in an indicator.
I published a post on the NVISO blog, “Report sightings from Kibana to MISP“, which provides a solution for this problem.
COVID-19 Blocklists
COVID-19 Initiatives
A lot of good initiatives popped up recently to combat malicious activity related to the Corona pandemic.
- A MISP instance for tracking COVID-19 activity;
- A list of domains which provides legitimate COVID-19 services;
- The Slack channel of COVID19 Cyber Threat Coalition;
- The COVID-19 CTI League;
- Public MISP feed by DCSO;
- And a feed by 1984.sh;
- Threat reports by RiskIQ;
- A COVID-19 threat list by domaintools;
- The COVID-19 domain classifier by SANS;
- A MISP warning list with legitimate domains related Corona that you can whitelist.
COVID-19 Blocklist
I wanted to created a blocklist of COVID-19 activity, based on the threat data received from the MISP instance used for COVID-19 and prevent that known good or legitimate sites are included in this list. The approach is
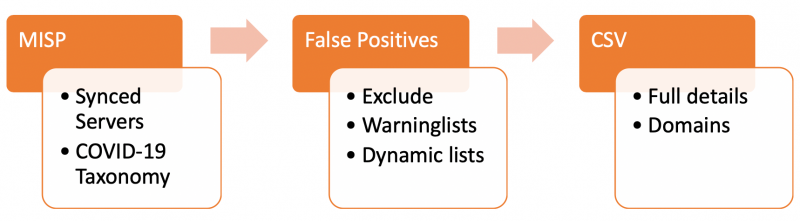
- Import the threat data in MISP from synced servers, label it with the pandemic COVID-19 taxonomy;
- Exclude the attributes that exist on the warning lists;
- Additionally, exclude attributes which are ‘known’ to be good, either related to Corona or because they are company-required. These known domains need to be added to a dynamic warninglist;
- Extract all domains, hostnames and URLs;
- Have lists with TLP:White and False Positive:Low risk;
- Export the list in an easy accessible format as CSV.
Approach
MISP Warninglists
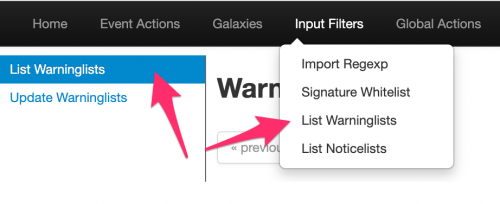
First, enable the necessary MISP warninglists. I enabled the ones below, especially the covid list is important to remove known good sites.
List of domains that need to be excluded from blocklists
List of known domains to know external IP
List of known URL Shorteners domains
Top 1,000,000 most-used sites from Tranco
List of known Office 365 URLs address ranges
List of known microsoft domains
Top 10K websites from Majestic Million
Valid covid-19 related domains
Common contact e-mail addresses
List of known Cloudflare IP ranges
List of known Amazon AWS IP address ranges
List of known Wikimedia address ranges
Specialized list of IPv6 addresses belonging to common VPN providers and datacenters
Specialized list of IPv4 addresses belonging to common VPN providers and datacenters
University domains
Fingerprint of known intermedicate of trusted certificates
Fingerprint of trusted CA certificates
List of known Office 365 IP address ranges
List of known Googlebot IP ranges
List of known gmail sending IP ranges
List of disposable email domains
List of known domains used by automated malware analysis services & security vendors
TLDs as known by IANA
List of known sinkholes
List of known security providers/vendors blog domain
Second level TLDs as known by Mozilla Foundation
List of RFC 6761 Special-Use Domain Names
List of RFC 6598 CIDR blocks
List of RFC 5735 CIDR blocks
List of RFC 3849 CIDR blocks
List of RFC 1918 CIDR blocks
List of known IPv6 public DNS resolvers
List of known IPv4 public DNS resolvers
List of known public DNS resolvers expressed as hostname
List of known Ovh Cluster IP
List of RFC 5771 multicast CIDR blocks
Top 500 domains and pages from https://moz.com/top500
List of known Windows 10 connection endpoints
List of known Office 365 IP
List of known Office 365 IP address ranges in China
List of known Office 365 URLs
List of known Microsoft Azure Datacenter IP Ranges
List of known Office 365 Attack Simulator used for phishing awareness campaigns
List of IPv6 link local blocks
List of known google domains
List of known hashes for empty files
List of hashes for EICAR test virus
List of known dax30 webpages
CRL Warninglist
List of known hashes with common false-positives (based on Florian Roth input list)
Top 1000 website from Cisco Umbrella
List of known bank domains
Top 1000 website from Alexa
List of known Akamai IP ranges
Besides these warninglists, you also need to enable the dynamic -custom- warninglist referred to below in the Python script. By default the supplied Python script assumes this list is called corp_exclusion. Adding this warninglist to MISP is easy.
- Create a directory corp_exclusion in /var/www/MISP/app/files/warninglists/lists/;
- Add a list.json file to this location and edit the details to correspond to the setting below.
{"name": "List of domains that need to be excluded from blocklists",
"version": 10,
"description": "Maintained by blocklist_generator",
"list": ["belgium.be", "google.com", "www.info-coronavirus.be", "info-coronavirus.be"],
"type": "hostname",
"matching_attributes": ["domain", "hostname", "url"]}
Once you have added this warninglist, in the MISP interface, update the warninglists and enable it.
Extract and exclude
If you export MISP attributes via the RestAPI, you can indicate that attributes that are in warninglists should be ignored.
"enforceWarninglist": "true"
Dynamic warninglist
I wanted to have the option to download domains known to be ‘good’ (either external or company required) and then have these also excluded from the blocklist. The easiest way to do this is adding these domains to a dynamic warninglist. This, together with the export to CSV is done via a Python script.
Export the list
The export of the blocklist is done via a Python script which calls PyMISP.
Extensions and caveats
False Positives
MISP supports a false positive taxonomy. This allows feed providers to indicate the risk of false positives. If you are a feed provider, you can help the community by indicate the risk of false positives.
The quality of the dynamic warninglist, and thus also your final blocklist, highly depends on which data you feed it. You can use your proxy ‘top sites’ or use the registration date (whois) of domains to remove known, legitimate sites. Basically you control the quality of the feed by adjusting the domains which end up in the dynamic warninglist.
Domains, URLs and Hostnames
The script fetches domains, URLs and hostnames. If you are only interested in domains then change the search query.
Python script
You can find the script on Github but also below. https://github.com/cudeso/tools/blob/master/covid-19-feed/blocklist_generator.py. Ideally you put this in a crontab, after the pull schedule of the sync server.
#!/usr/bin/env python
# -*- coding: utf-8 -*-

'''
Koen Van Impe

Create block list from MISP data
Put this script in crontab to run every /15 or /60
    */5 *    * * *   mispuser   /usr/bin/python3 /home/mispuser/PyMISP/examples/blocklist_generator.py


'''

from pymisp import ExpandedPyMISP
from keys import misp_url, misp_key, misp_verifycert

import logging
import os
import sys
import json
import urllib3


if misp_verifycert is False:
    urllib3.disable_warnings(urllib3.exceptions.InsecureRequestWarning)

logging.basicConfig(level=os.environ.get("LOGLEVEL", "INFO"))
misp = ExpandedPyMISP(misp_url, misp_key, misp_verifycert, debug=False, tool='blocklist_generator')
exclude_warninglist = "corp_exclusion"
path_to_warninglist = "/var/www/MISP/app/files/warninglists/lists/{}/list.json".format(exclude_warninglist)


def get_valid_domains():
    return ['belgium.be', 'google.com', 'www.info-coronavirus.be', 'info-coronavirus.be']


def fetch_misp_results(misp_tags):
    relative_path = 'attributes/restSearch'
    body = {
        "returnFormat": "json",
        "enforceWarninglist": "True",
        "tags": misp_tags,
        "type": ["url", "domain", "hostname"],
        "includeDecayScore": "True",
        "includeEventTags": "True"
        }
    result = misp.direct_call(relative_path, body)

    result_csv = result_tlpwhite_csv = result_falsepositive_low = result_domain_csv =  result_domain_tlpwhite_csv = result_domain_falsepositive_csv = "value,decay_sore,value_type,event_id,event_info"
    if "Attribute" in result:

        for attribute in result["Attribute"]:
            value = attribute["value"]
            value_type = attribute["type"]
            decay_score = 0
            if "decay_score" in attribute:
                decay_score = attribute["decay_score"][0]["score"]
            event_info = attribute["Event"]["info"]
            event_id = attribute["Event"]["id"]
            result_csv = result_csv + "\n{},{},{},{},\"{}\"".format(value, decay_score, value_type, event_id, event_info)
            result_domain_csv = result_domain_csv + "\n{}".format(value)

            for t in attribute["Tag"]:
                if t["name"] == "tlp:white":
                    result_tlpwhite_csv = result_tlpwhite_csv + "\n{},{},{},{},\"{}\"".format(value, decay_score, value_type, event_id, event_info)
                    result_domain_tlpwhite_csv = result_domain_tlpwhite_csv + "\n{}".format(value)
                if t["name"] == "false-positive:risk=\"low\"":
                    result_falsepositive_low = result_falsepositive_low + "\n{},{},{},{},\"{}\"".format(value, decay_score, value_type, event_id, event_info)
                    result_domain_falsepositive_csv = result_domain_falsepositive_csv + "\n{}".format(value)

    return result_csv, result_tlpwhite_csv, result_falsepositive_low, result_domain_csv, result_domain_tlpwhite_csv, result_domain_falsepositive_csv

# Step 0: Print all enabled warninglists
active_warninglists = misp.warninglists()
for w_list in active_warninglists:
    w_list_detail = w_list["Warninglist"]["name"]
    logging.info("Warninglist enabled {}".format(w_list_detail))

# Step 1: Fetch the list of "valid domains"
valid_domains = get_valid_domains()

# Step 2: Extend the exclusion list
domains_for_exclusion = []
for domain in valid_domains:
    # Check if the domain is already in a warninglist
    lookup_warninglist = misp.values_in_warninglist([domain])
    if lookup_warninglist:
        # It's already in the list, ignore
        res = lookup_warninglist[domain][0]
        list_name = lookup_warninglist[domain][0]['name']
        list_id = lookup_warninglist[domain][0]['id']
        logging.info("Ignore domain '{}' because already in {} (id {})".format(domain, list_name, list_id))
    else:
        # A new domain, add it to the exclusion list
        domains_for_exclusion.append(domain)
        logging.info("Add domain '{}'".format(domain))

# Step 3: Write the exclusion list
if domains_for_exclusion:
    # First read current file
    logging.info("Reading exclusion file")
    with open(path_to_warninglist) as exclusion_file:
        data = json.load(exclusion_file)

    exclusion_file_version = data["version"]
    current_list = data["list"]
    new_list = (current_list + domains_for_exclusion)
    new_list.sort()

    data["version"] = exclusion_file_version + 1
    data["list"] = new_list

    logging.info("Updating exclusion file")
    with open(path_to_warninglist, 'w') as exclusion_file:
        json.dump(data, exclusion_file)

# Step 4: Update the MISP warning lists
update_result = misp.update_warninglists()
logging.info(json.dumps(update_result))

# Step 5: Fetch all the domains that we want on the blocklist
result_full, result_tlpwhite, result_fp, result_domain, result_domain_tlpwhite, result_domain_fp = fetch_misp_results("pandemic:covid-19=\"cyber\"")

# Step 6: Write the blocklist
logging.info("Write CSV files")
f = open("/home/misp/blocklist_upload/blocklist_full.csv", "w")
f.write(result_full)
f = open("/home/misp/blocklist_upload/blocklist_tlpwhite.csv", "w")
f.write(result_tlpwhite)
f = open("/home/misp/blocklist_upload/blocklist_fp_lowrisk.csv", "w")
f.write(result_fp)
f = open("/home/misp/blocklist_upload/blocklist_domain.csv", "w")
f.write(result_domain)
f = open("/home/misp/blocklist_upload/blocklist_domain_fp_lowrisk.csv", "w")
f.write(result_domain_fp)
f = open("/home/misp/blocklist_upload/blocklist_domain_tlpwhite.csv", "w")
f.write(result_domain_tlpwhite)
Integrating MISP and Cytomic Orion
Cytomic Orion
Cytomic Orion is a solution for Threat Hunting & Incident Response, that speeds up the process of identification, investigation, containment, and remediation of cyber threats & insiders using Living-off-the-Land techniques to evade existing controls (Reduce the MTTD & MTTR). The Cytomic Orion API allows you to integrate it with other tools, one of those tools is MISP.
The integration with Cytomic Orion allows you to achieve two main goals :
- Query the Cytomic Orion API, check if MISP threat data has been observed and then import sighting details as username and machine name and add them to the MISP event;
- Export the threat data from MISP to Cytomic Orion. The export works in two ways, you can either upload attributes (or indicators) from MISP to Cytomic Orion, or delete them from Cytomic Orion by sending the delete request from within MISP.
Configure MISP
There are a few things you need to setup before you can use the integration features.
MISP Objects
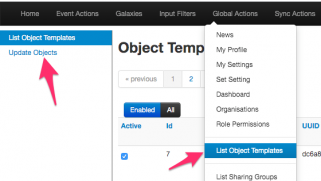
MISP objects are an addition to MISP attributes to allow advanced combinations of attributes. Two specific MISP objects are added to import results from Cytomic Orion into MISP. Log in to MISP and go to the menu Global Actions > List Object Templates. Once you’re in the MISP objects screen, click Update objects to make sure you have the latest set of objects.
If you then search for the Cytomic objects, you should receive two results.
Cytomic Taxonomy
Remember that there are two integration options, one for importing and one for exporting?
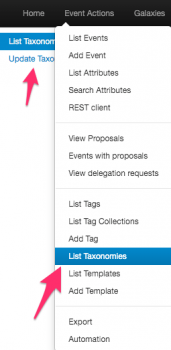
Whereas the import feature relies on the MISP objects, the export feature relies on a Cytomic Orion MISP taxonomy. Enabling this taxonomy is as easy as enabling the objects. In your MISP interface, go to Event Actions > List Taxonomies. In the taxonomies screen, click Update taxonomies to fetch the latest taxonomies.
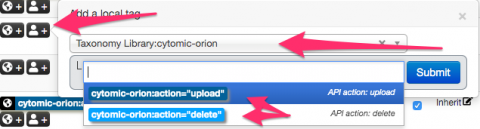
Once that is done, you need to enable the Cytomic Orion Taxonomy, and then enable all the terms in that taxonomy.
![]()
When you have enabled the taxonomy, you can have a look at its content. The two terms in the taxonomy, upload and delete, represent the export actions that are supported with the integration script.
MISP module
The last step needed is enabling the MISP module for Cytomic Orion. If your MISP setup is up-to-date it should contain the latest available modules, including the one for Cytomic Orion. Enable the module under Administration > Server Settings and Maintenance > Plugin Settings > Enrichment.
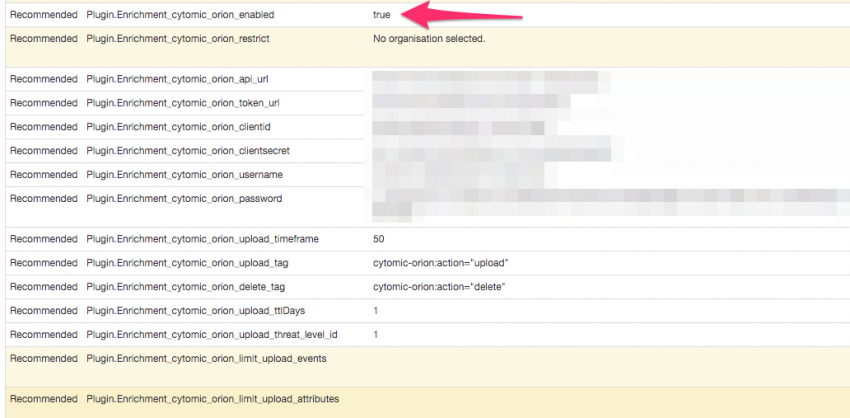
The module includes a couple of configuration options that you need to set. The URLs and authentication information is something that you can obtain via Cytomic Orion.
- cytomic_orion_api_url : The Cytomoc Orion API url;
- cytomic_orion_token_url : The URL where you can fetch the authentication token;
- cytomic_orion_clientid, cytomic_orion_clientsecret, cytomic_orion_username and cytomic_orion_password : The authentication details to access the API;
- cytomic_orion_upload_timeframe : The maximum (published timestamp) age of MISP events to take into account when uploading (or deleting) attributes. Expressed in days. Defaults to 5d (5 days);
- cytomic_orion_upload_ttlDays : The default TTLDays (Cytomic Orion option) to be set when uploading attributes. Defaults to 1;
- cytomic_orion_upload_threat_level_id : The minimal threat level to take into account when uploading (or deleting) attributes. Values between 1 (High) and 4 (Undefined). Defaults to 2 (Medium), meaning Medium and High events are used;
- cytomic_orion_limit_upload_events : Maximum number of events from which to upload attributes. Defaults to 50;
- cytomic_orion_limit_upload_attributes : Maximum number of attributes to upload. Defaults to 50;
- cytomic_orion_upload_tag : The tag (or workflow) that indicates the attribute (or event) needs to be uploaded to Cytomic Orion. You can use whatever tag you prefer but it’s best to use the tag from the Cytomic Orion taxonomy;
- cytomic_orion_delete_tag : The tag (or workflow) that indicates the attribute needs to be deleted from Cytomic Orion. It’s best to stick to the Cytomic Orion taxonomy.
To make use of the module, you must set the URLs and authentication information, and the upload and delete tags. If you use the provided taxonomy, you can set them to
Upload: cytomic-orion:action="upload"
Delete: cytomic-orion:action="delete"
PyMISP
The last component that needs to be set is a PyMISP module. If your system is up-to-date, it will contain the Cytomic Orion PyMISP module. There’s no configuration needed for this module, it takes its configuration from the previous MISP module.
There are a few options that you can configure inline in the script, these are all found in the script code block where the class cytomicobject is defined. For example the Debug option can be useful to disable once you’re sure everything works as expected.
You can choose to run the script manually, or have it run in the background as a cron job. The advantage of the cron job is that you do not need console access to the MISP machine and that there’s no manual intervention needed.
*/15 * * * * mispuser /usr/bin/python3 /home/mispuser/PyMISP/examples/cytomic_orion.py
The frequency to run this cron job depends on your preference, but running it every 15′ should suffice in most cases.
Query the Cytomic Orion API
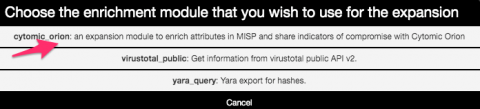
The first objective is to query the Cytomic Orion API for MISP threat data and then get the sightings back as MISP objects. Querying can only happen for the md5 attributes. If you’re all setup, and MISP modules are running, then in a MISP event you should notice the query/add enrichment options on the right of the attribute list. Clicking these will give you the option to start the Cytomic Orion enrichment module.
This will then start the query with the API, and return the results in the form of objects if any are found. If will return
- A file object, if the file is known to Cytomic Orion and how it has been classified. Also includes the first- and last-seen;
- One or multiple machine objects, listing on which machines Cytomic Orion has spotted the file. This includes machine name, organization, path of the file and client identification. The client name is added as a tag to the attribute. This tagging feature allows you to later on query or search the MISP interface more easily for specific occurences.
The only thing left to do is then accept the proposed enrichment data and click the Submit button near the bottom of the screen.
Upload (or delete) attributes from Cytomic Orion
The second objective is to upload (or delete attributes from Cytomic Orion). This works in two steps. You first need to tag either an attribute or an event to be processed, and then a background job (the PyMISP script) will execute the action. The attributes that can be exported include the MISP attributes ip-dst, ip-src, url, md5, domain, hostname, domain|ip and hostname|port attributes. A word of caution, make sure you are allowed to share the attributes, before marking them to be uploaded or deleted. The module will not check sharing group or TLP codes.
The first step, tagging an event or attribute is straightforward if you have the taxonomy enabled. Select the event or attribute and add the tag. Note that you can tag any type of attribute, but only the attribute types listed above will be processed. What’s the difference between tagging an event or attribute? See below for the different options.
Do not forget to Publish the event, the export will only consider MISP threat events which have been published. Additionally, also take care of the configuration option in the MISP module for the threat level and timeframe.
This script supports three options, which are closely linked with how you tagged the event or attributes.
usage: cytomic_orion.py [-h] [--upload | --delete | --events]

Upload or delete indicators to Cytomic API

optional arguments:
  -h, --help  show this help message and exit
  --events    Upload events indicators
  --upload    Upload indicators
  --delete    Delete indicators
Upload all attributes from an event
The first option allows you to upload all attributes in an event. This works based on events which have been tagged with the upload tag, preferably cytomic-orion:action=”upload”. You can start this export via PyMISP with
/var/www/MISP/venv/bin/python /var/www/MISP/PyMISP/examples/cytomic_orion.py --events
If all went as expected, you should receive output similar to this
Event: 351 urls: 1 | hashs: 2 | domains: 1 (event untagged)
Note that on a few occasions, the Cytomic Orion API can return a HTTP 400 error code, with the return message “InternalServerError”. This does not mean there’s an error in the uploading, it means there’s an error on the parsing side. If the script runs in cron, the next run will most likely fix the issue. If you run it manually you just have to run the script again.
When the script successfully ran, you can check that the tag that you added to the event has been removed.
Upload (or delete) attributes
The second (and also third) option allows you to upload attributes from MISP or delete attributes from Cytomic Orion. This is similar to the option for events, but is now attribute based. Add the upload (or delete) tag to an event and make sure that the events are published. The script will then search for all events (regardless if they are tagged or not on ‘event-level’) and then upload (or delete) the attributes which you have tagged.
/var/www/MISP/venv/bin/python /var/www/MISP/PyMISP/examples/cytomic_orion.py --upload
/var/www/MISP/venv/bin/python /var/www/MISP/PyMISP/examples/cytomic_orion.py --delete
If all went as expected, you should receive output similar to this
RESULT: {'success': True, 'message': '1 DomainIoc deleted.', 'error': None}
Again, when the script successfully ran, you can check that the tags that you added to the attributes have been removed.
ToDo
Currently the integration does not include support for the sightings mechanism in MISP.
Sysmon not logging all process creation events (Calculator and other sandboxed apps)
Sysmon
System Monitor or Sysmon is a Windows system service and device driver that provides event data on process creation, network connections and file alterations. It is one of the most powerful tools available for security monitoring and gives detailed insight on what is happening on an endpoint.
Sysmon can be started from the command line, with a specific set of modules and processes to monitor but will in most cases be installed as a service and configured via an XML configuration file. These XML configuration files can be fairly complex and might scare potential users. To get started with Sysmon, a lot of administrators will use the configuration file provided by SwiftOnSecurity : sysmonconfig-export.xml.
Process creation. And Windows Calculator
Sysmon tracks process creation via Event ID 1. One of the obvious cases to test if logging of process execution works is by launching the Windows Calculator. However, if you do this on Windows 10 with the default SwiftOnSecurity Sysmon configuration file then you’ll be in for a surprise. The start of the calculator will not be recorded.
Why?
One of the exclusion for the process creation event is for the IntegrityLevel set to AppContainer, basically exclude the logging of process execution of Windows sandboxed processes.
<IntegrityLevel condition="is">AppContainer</IntegrityLevel> <!--Windows: Don't care about sandboxed processes right now. Will need to revisit this decision.-->
Whether or not this is a good thing is up to you to decide (take into account the relative minimal extra log entries these events will likely cause). But, if you want to keep track of the launch of sandboxed applications, then you will have to comment that line.
If you want to know more about the security features of IntegrityLevels, then read Integrity Levels and DLL Injection.
Sysmon isn’t your only source
If you cannot install Sysmon and would still like to track process creation then you can fall-back to Windows Security Auditing. The Event ID 4688 gives similar results as Sysmon Event ID 1. By default, process tracking is not enabled, you need to do this via the Group Policy Editor (Audit Process Tracking).
Parse stored Windows Event logs with Security Onion
Security Onion
Security Onion is a free tool to monitor for suspicious activity in network events. I find it very easy to use, especially if you integrate the MISP threat data with the Bro -Zeek- intelligence framework. Besides investigating network events, you can also use it to analyze Windows Event logs, both from a live event stream and for analyzing stored Windows events.
Winlogbeat
Winlogbeat, part of Elastic, is the shipper that we will use to send the logfiles to Security Onion, more precisely, the Logstash docker container running within Security Onion. With Winlogbeat you can subscribe to a number of Windows log channels and then have the selected events send to a log collector. The configuration is explained in detailed in the documentation of Elastic but some interesting features include
- ignore_older : Ignore older log events; useful if you configure a new system and you’re only interested in the new events;
- processors : Enhance data locally, before sending it to the log collector; useful for the Sysmon and Security channel;
- event_id : Filter for specific event IDs;
- add_host_metadata : Automatically add some host meta data to the log event;
Use Winlogbeat to read local files
Instead of subscribing to live log channels, you can also point Winlogbeat to a local -previously recorded- Windows Event log. You do not need to stop the ingesting of live events for this, both processes can exist along each-other.
This is the configuration file to have Winlogbeat read events from local log files.
winlogbeat.event_logs:
 - name: ${EVTX_FILE}
   no_more_events: stop

winlogbeat.shutdown_timeout: 30s
winlogbeat.registry_file: evtx-registry.yml

setup.template.settings:
  index.number_of_shards: 1

name: winlogbeat

tags: ["replay_windows", "securityonion", "winlogbeat"]

output.logstash:
  hosts: ["1.1.1.1:5044"]

processors:
  - add_host_metadata: ~
Then on a Windows host you can start ingesting the event log files with
.\winlogbeat.exe -e -c .\winlogbeat_stored_evtx.yml -E EVTX_FILE=c:\simulationset\sysmon_13_rdp_settings_tampering.evtx
If you need a set of Windows event log files to test your configuration, you can use the set at EVTX-ATTACK-SAMPLES.
There are some caveats though!
- The Winlogbeat registry file keeps track of the last log file that was read. If you do multiple tests, do not forget to delete this file before every run. The file is in the data directory of your Winlogbeat installation;
- The EVTX_FILE requires the absolute path to the log file. It will not work if you give it a relative path, even if the log file is in the current directory (fe. with ./);/
- Do not forget that Security Onion comes with Curator installed. This will close the older Elastic indexes, for example those older than 90 days. The ingestion will not be successful If you leave Curator running while ingesting the log files. You can temporarily stop curator with so-curator-stop.
Logstash
The default Logstash configuration of Security Onion requires some changes before it can properly ingest data from the latest (7.5) Winlogbeat. You first need to export the correct index template from Winlogbeat and then have Logstash set so that it uses this template for the new index creation.
output {
  if "winlogbeat" in [tags] {
    elasticsearch {
      hosts => elasticsearch
      index => "logstash-winlog-%{+YYYY.MM.dd}"
      template_name => "winlogbeat"
      template => "/winlogbeat-7.5.1.json"
      template_overwrite => true
    }
  }
}
Which Incident Response Investments Are You Prioritizing in 2020?
I published an article on the IBM SecurityIntelligence blog on to Which Incident Response Investments Are You Prioritizing in 2020?
The post describes that improving incident response plans should be the number one priority for future investment, but there are other pressing areas to consider as well. Invest in the Future of Digital Forensics, especially in light of further inclusion of cloud, BYOD and IoT related devices. Get Ready for Changes in Network Monitoring as common ‘easy to monitor’ traffic is becoming encrypted, requiring you to look for other approaches. Finally, Prepare for Supply Chain Attacks and Align on Standardized Frameworks.

