MISP
MISP or Malware Information Sharing Platform & Threat Sharing is an open source tool for sharing malware and threat information with the security community. It is available on Github and is used by a large number of CERTs and security teams.
This first post describes how to get MISP installed and get it up and running. The next post describes how you can use MISP to your benefit to share threat information with your community.
You’ll need a webserver with PHP enabled and a mysql database server. It also needs a mail server to send out notices (‘Satellite system’ when using Postfix). It is highly recommended to use a secure web connection (HTTPS).
Install
Make sure you have git installed. You need it for downloading MISP (and its subcomponents)
apt-get install git
git clone https://github.com/MISP/MISP.git
This will install git and download the latest version of MISP. Ideally you do this in /var/www.
The install documentation is located in the INSTALL directory. The user documentation can be found in INSTALL/documentation.pdf.
All the steps for Ubuntu are listed in the file INSTALL/INSTALL.ubuntu1404.txt. I highlight a couple of important steps below.
Basic configuration
The repository contains a number of sample configuration files (*.default.php). You can use these (copy them from x.default.php to x.php) to get sane defaults.
Database configuration
The database configuration of MISP is in MISP/app/Config/database.php. The mysql database create script can be found at MISP/INSTALL/MYSQL.sql.
Webserver configuration
The webserver should have the rewrite module enabled. This allows for rewriting to ‘pretty’ URLs.
I installed MISP in separate virtual hosts. I could not get it to work in a separate subdirectory (see the MISP issue #423)
Make sure you set the ownership and file permissions correct according to the install documentation
Do not forget to restart your webserver after enabling redis.
Extra modules
Some commands during the install of MISP require you to download and install additional PHP or Python modules (styx, cybox, …). Don’t forget to run the install command as the root user, otherwise the system-wide install will fail.
MISP configuration
The bulk of the configuration of MISP is done in the files in MISP/app/Config/.
Edit the file MISP/app/Config/config.php and change the baseurl (and optionally other relevant sections)
<?php
$config = array (
...
  ),
  'MISP' =>
  array (
    'baseurl' => 'http://192.168.1.1',
Do not forget to change the salt value in MISP/app/Config/config.php. Changing the value on a working system will invalidate all the passwords.
In the MISP/app/Config/bootstrap.php file you have to enable CakeResque to facilitate the background jobs. This is essential for having MISP working properly. Near the end of the file you should uncomment this section
CakePlugin::loadAll(array(
        'CakeResque' => array('bootstrap' => true)
));
and add a line
Configure::write('MISP.background_jobs', true);
Near the end of the file MISP/app/Config/core.php you should uncomment
require_once dirname(__DIR__) . '/Vendor/autoload.php';
Background workers
A couple of jobs are done by so called background workers. You can check if your setup is working properly with the command
MISP/app/Console/worker/start.sh
First login
You can now login to MISP with the default credentials username admin@admin.test and password admin. You’ll have to change the default password after logging in.
Mail notifications from MISP
MISP can send the users a mail notification when a change to an event has been published. Make sure that your mail server is properly configured and accepting and delivering e-mails.
“Reported by”
The Reported by field gets its value from the organisation set in the user profile. If you change the organisation after the creation of an event then that event will still belong to the old organisation to which the user belonged.
Prefix of e-mail subject
The prefix of the e-mail subject (the ‘organisation’) and the sender are defined in MISP/app/Config/config.php.
$config = array (
  ...
  ),
  'MISP' =>
  array (
    'org' => 'MyPrefix------------',
    'email' => 'mysender@mymisp.tld',
Remember that if you change this configuration setting you’ll have to restart the workers with
MISP/app/Console/worker/start.sh
Synced MISP servers
One of the great things about MISP is that you can sync events between multiple servers. This means adding the events in one MISP server and having them appear in a number of connected servers. By setting the community with whom you want to share you can automatically transfer events from one server to other servers.
According to the documentation you have to make sure that the organisation set in your configuration file matches with the organisation identifier of the hosting organisation. During my tests this was not necessary. In any case, you can change the organisation setting in MISP/app/Config/bootstrap.php with
Configure::write('MISP.org','ADMIN');
Syncing can be done in two directions, either push or pullreceiving the events.
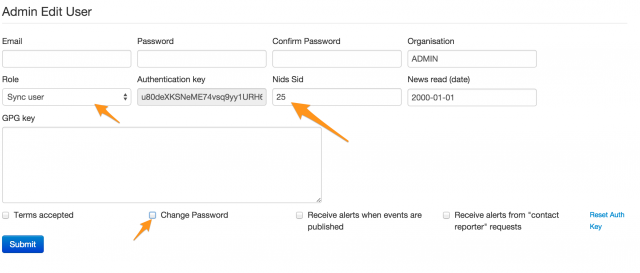
You can add the user under Administration, New user. Select Sync user as role and add a unique Nids Sid.
IMPORTANT : once the user is added, edit the user again and uncheck Change Password and check Terms accepted (see MISP Issue 432).
Take note of the authentication key, you’ll need it afterwards.
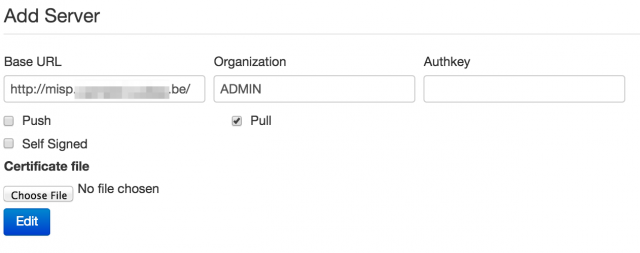
On the server that is “hosting” the events you now have to add the server to which you will push the data. The sync servers are listed under Sync actions, List servers.

Add the URL of the receiving server, select the organization (see earlier) and set the authentication key that you got when you created the sync user.
If you had background jobs enabled when you went through the install documentation you can now issue a push of the available events.
If things are not working out as expected I suggest you take a look at the log files of the webserver, the logs of MISP (in MISP/app/tmp/logs) or just do a network packet capture of the requests to verify the responses of both servers.
A read-only MISP
MISP benefits from a community effort where everyone contributes. There might be situations where you do not need feedback from your community. For example because you are the only one providing the data.
You can setup MISP in a read-only modus by limiting the database access. The Cake framework needs a couple of tables with write permissions and logging. Basically you can have the MISP database user set to read-only and then allow write permissions on the tables bruteforces, cake_sessions and logs.
GRANT SELECT , INSERT , UPDATE , DELETE ON  `misp`.`bruteforces` TO  'misp'@'localhost';
GRANT SELECT , INSERT , UPDATE , DELETE ON  `misp`.`cake_sessions` TO  'misp'@'localhost';
GRANT SELECT , INSERT , UPDATE , DELETE ON  `misp`.`logs` TO  'misp'@'localhost';
Using MISP
So far this post described how to get MISP up and running. The next post describes how you can use MISP to your benefit to share threat information with your community.


Hi, thanks for share this information, I’m having troubles with my installation of MISP because I don’t understand the part that says “Important! Change the salt key in /var/www/MISP/app/Config/config.php”.
How can I change the salt key? It’s only delete one or two of the characters or It’s something more complicated?
I appreciate your help in advance.
Kind regards,
MJLC.
Just replace the salt key with a long random string.
I have been trying to get this up and running on Ubuntu but for the life of me keep getting errors with the WebUI. Is there a preconfiged install on like a .ova or .vmdk I could import into my vmhost?
https://www.circl.lu/assets/files/misp-training/misp-training.ova
Hello,
Im trying to connect 2 instances and i can’t success with your instructions.
I access the instance A on https://192.168.1.81:444 and instance B on https://10.0.1.2:444. I can ping from/to each one.
When I generate the SSL certificates, must I specify the port or it is no needed.
I add the server certificate from B in A in .pem format (PRIVATE KEY + CERTIFICATE) in a text file.pem and the certificate from A in client
I don’t undertand what im doing wrong. I would really appreciate your help.
When I test connection appears the error (Server unreachable) and when I push to B I had the error “Connection timed out” or “Job failed. The remote instance is too far outdated to initiate a push.”
Could you help me please?
Dear, just saw this now, perhaps a bit late but better later then never:
Is this issue still blocking you? I suppose by now you moved on. If not, give it a try again. Since Early 2017 a lot has changed, especially for interconnecting instances.
Just installed misp on rhel7. The installation doc was a mess on rhel6 and is even more on rhel7 (in fact using the install guide results in a system not working due to selinux stuff and wrong git-pull commands …). Let’s hope they’ll take my comments 🙂
Is this based on the RHEL7 document? Otherwise do a pull request with the proposed updates.
You can also address it in the chat, via https://gitter.im/MISP/MISP
Good luck 😉
hello
i am not able to sent email via misp