What is passive DNS?
According to isc.org “Passive DNS” or “passive DNS replication” is a technique invented by Florian Weimer in 2004 to opportunistically reconstruct a partial view of the data available in the global Domain Name System into a central database where it can be indexed and queried.
In practical terms passive DNS describes an historical database of DNS resolutions. What does this all mean? It means that you can lookup to what IP address a domain resolved in the past. This is even the case if that domain has been removed from the nameservers and is no longer available.
Important to note is that with passive DNS normally only the server to server communication is captured. The queries from stub-resolvers (typically that’s the local software preparing the DNS query) are not taken into account.
Why would you use passive DNS?
Passive DNS is very useful when doing incident response investigations.
Imagine a case where you receive information that a certain type of malware is using a domain “update.newaptvers.ion”. When you receive the information from your peers and you try to resolve the domain it points to 8.8.8.8. Using this IP address as an IOC is going to give you lots of false positives (for info: 8.8.8.8 is Google DNS). Now with the use of passive DNS you are able to look up to what IP address(es) this domain resolved in the past. If the domain has been captured by passive DNS sensors you will get a set of network IOCs that you can use to conduct a further investigation.
Passive DNS – Common Output Format
There is an Internet-Draft, draft-dulaunoy-dnsop-passive-dns-cof-01, describing a common output format of Passive DNS Servers which clients can query. You can query passive DNS servers that support COF with a client API via for example PyDNS. The result of your query will then be in JSON format.
In this post I will not cover PyDNS but PassiveDNS::Client, a Ruby application to do passive DNS queries. Currently PassiveDNS::Client has not yet support for this common format but I found this tool to be the only one that has flexible support for lookups on different passive DNS servers.
PassiveDNS::Client
Different servers
The PassiveDNS::Client has support for different passive DNS servers
- BFK.de
- Mnemonic
- PassiveDNS.cn
- CIRCL
- VirusTotal
- PassiveTotal
- DNSDB
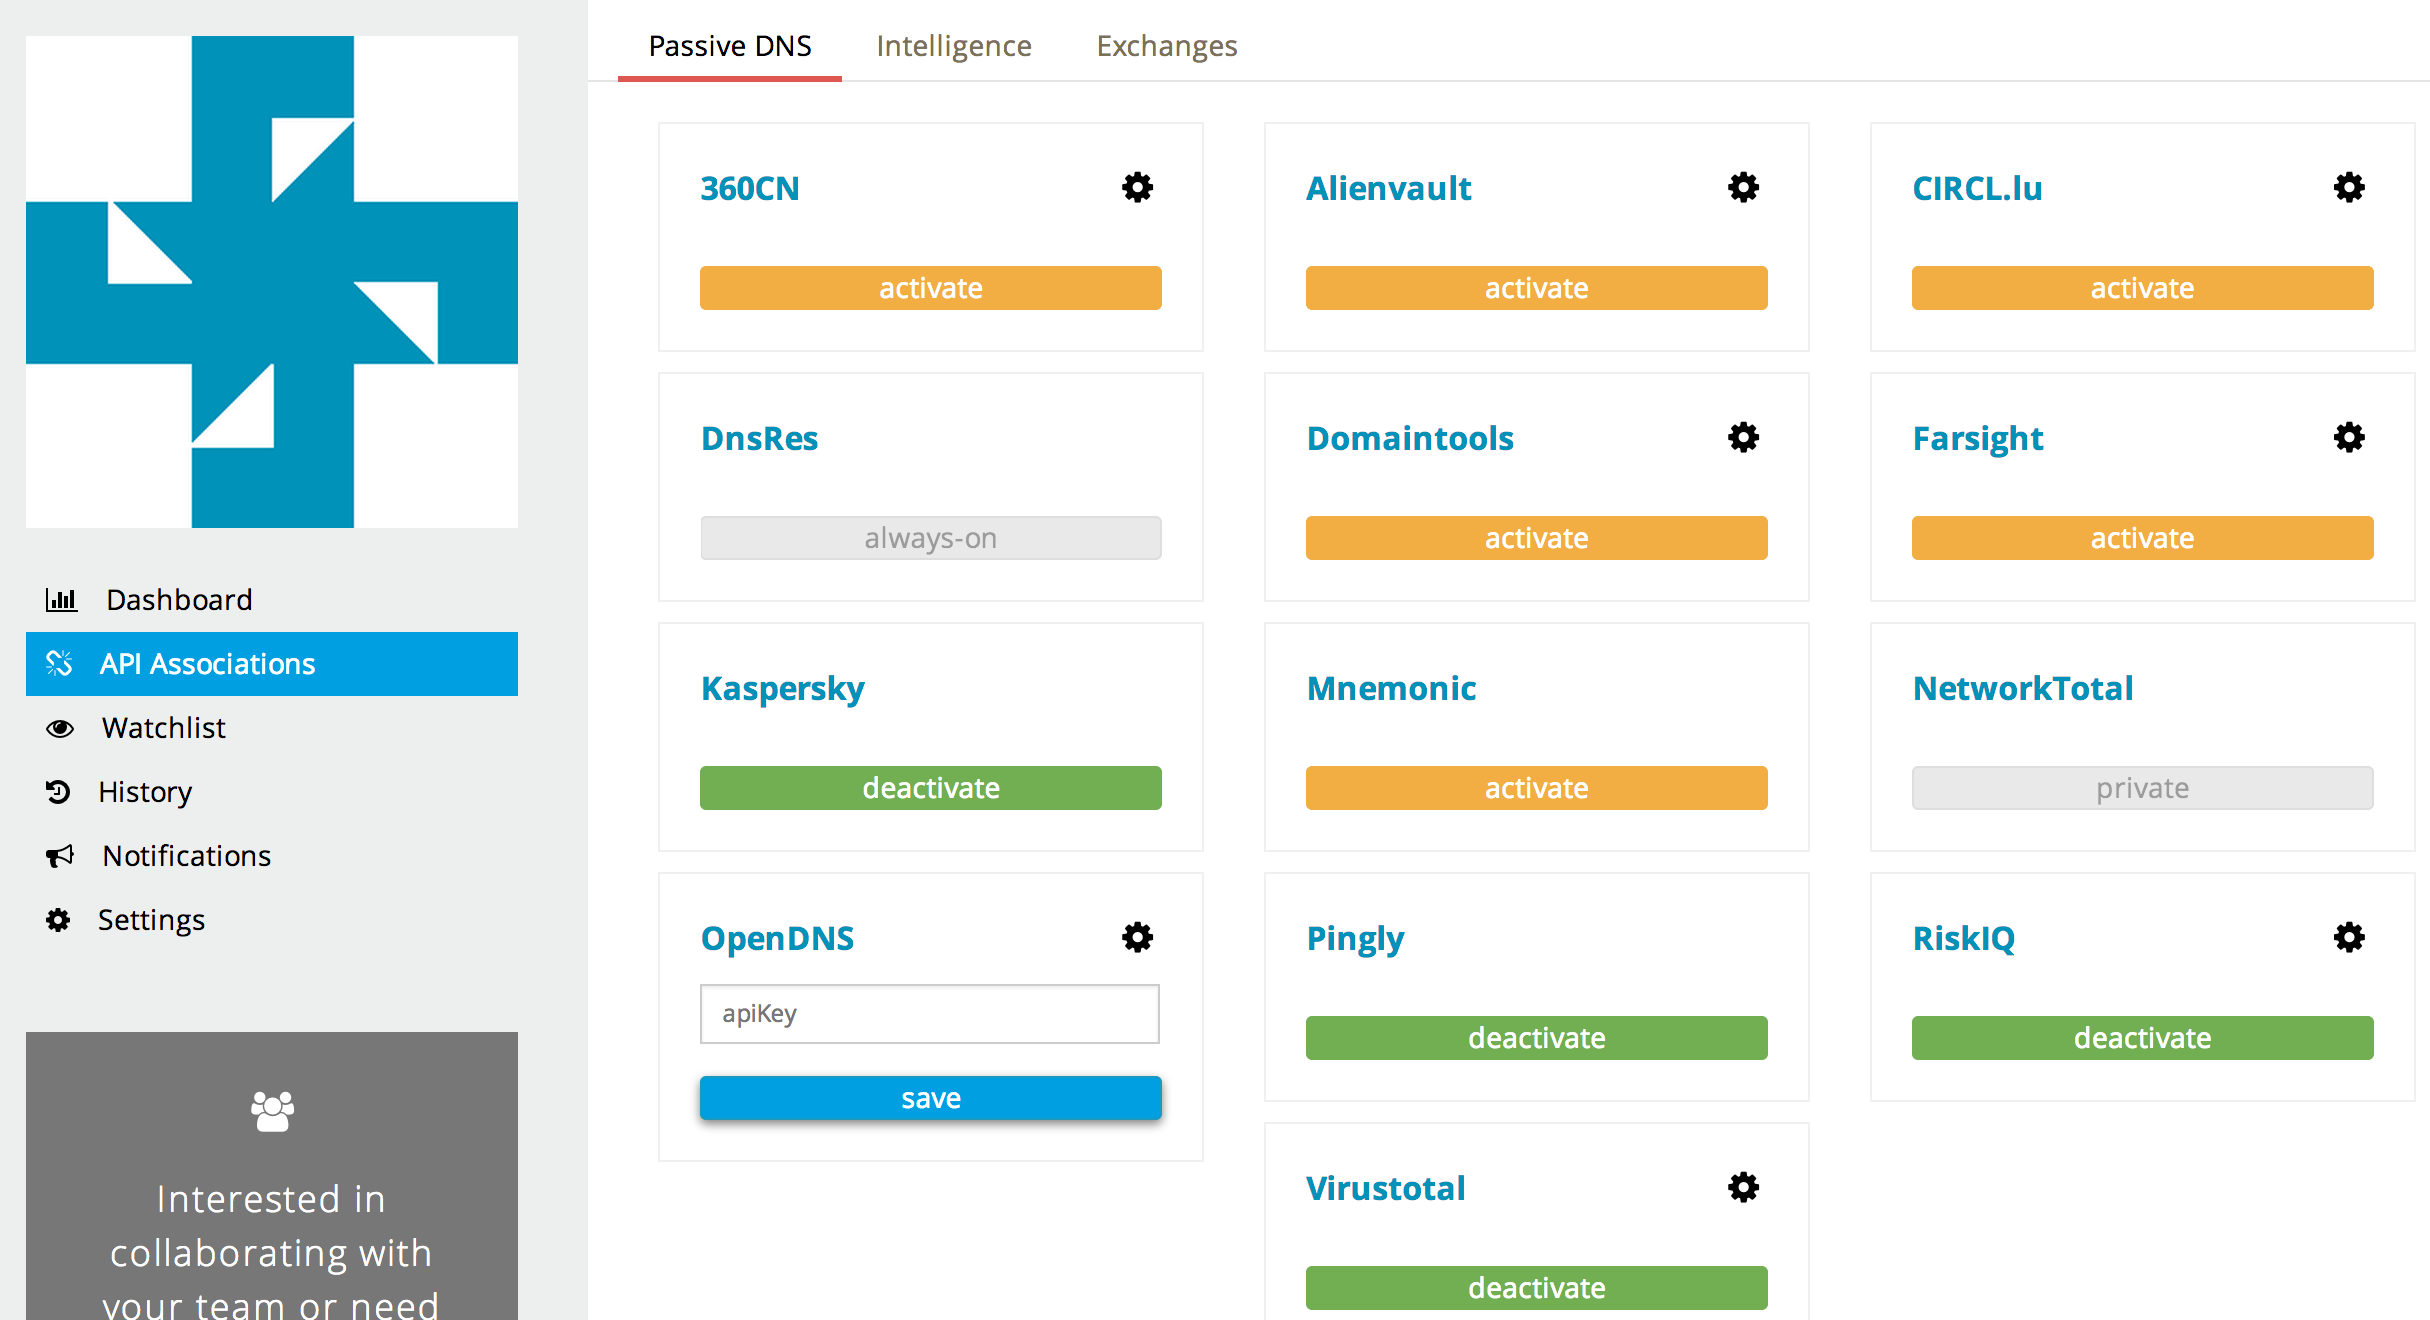
The most useful supported server, in my opinion, is the one for PassiveTotal. PassiveTotal by itself already allows you to enable other external sources for retrieving data making the results more useful.
Install and configuration
Installing the PassiveDNS::Client is described in detail on the GitHub page. The steps to get it installed boil down to
git clone https://github.com/chrislee35/passivedns-client.git
cd passivedns-client.git
sudo gem install passivedns-client
Once installed you have to create the configuration file, typically found in $HOME/.passivedns-client.
For this post I use PassiveTotal and VirusTotal so my config file looked like this
[virustotal]
APIKEY = key
[passivetotal]
APIKEY = key
Using passive DNS
Test case for incident response
How would you use the passive DNS client? Imagine you were doing incident response based on a set of IOCS (and flash back to mid-2015). In this case I start with the IOCs for Operation Potao provided by ESET. The IOCs contain a number of domain names like for example the domain truecryptrussia.ru.
If you now do a lookup of the domain you will notice that it resolves to 104.27.168.41. That IP is part of CloudFlare. Doing a research based on hits to the CloudFlare network is not feasible in a large network (or in a small network, it will be very difficult to draw conclusions based on hits to CloudFlare).
This is where passive DNS can help. If you query passive DNS servers (in this case I use PassiveTotal and VirusTotal) you get a history of the DNS records for this domain.
pdnstool -dp -dv -t truecryptrussia.ru
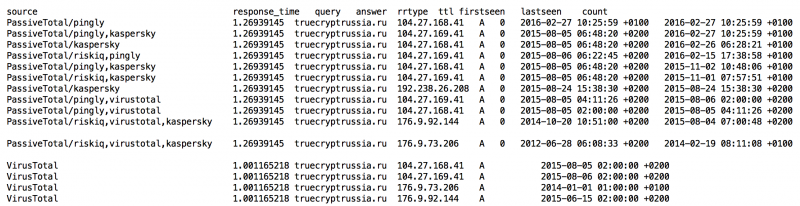
For this domain you can see that there are a lot of registrations pointing to CloudFlare. However there are also three registrations not pointing to CloudFlare. If you are doing an investigation around mid of 2015 then you can certainly use the IPs 192.238.26.208 and 176.9.92.144 to check for traffic in your network. The other IP, 176.9.73.206, seems to be to “old” (last seen early 2014).
Note that the listed domain and investigation steps are only listed for demonstration purposes to show you how an investigation could take place based on passive DNS data.
As an extra : sometimes attackers will first use some “probes” (either towards your network or by silently testing if unusual outbound traffic is detected). If they use the same domain name for these probes but later on switch to a different network for conducting the mass of the attack you will still be able to reconstruct what happened, based on the network information gathered via passive DNS.
Output formats
PassiveDNS::Client supports a number of output formats. The default is to print out the results on the console (by default tab-delimited). If you would like to automate the process of enriching your intelligence database you will probably use JSON, XML or CSV support. These are a couple of the settings that you need to supply for getting a different output format :
- -c CSV
- -x XML
- -j JSON
- -t ASCII text
Querying different servers
In the example given above I used PassiveTotal and VirusTotal. PassiveDNS::Client also supports other servers like for example
- -d3 use 360.cn
- -dc use CIRCL
- -dd use DNSDB
- -dp use PassiveTotal
- -dv use VirusTotal
Running your own passive DNS server
Passive sensors
There are a couple of options for running your own passive DNS server. You can run a passive DNS sensor provided by Farsight Security. This allows you to contribute to the existing dataset and make it more valuable, for you and for the community.
Another option is to run your own passive DNS sensor and using the data only internally. The best option that I found for this was using passivedns from Gamelinux.org. From a high level view this is a network sniffer that extracts DNS packets and stores them in a log file. You can then use a Perl script to monitor the log file and store the events in a sql database.
Combining with Moloch
I just started experimenting with running Moloch for grabbing the entire network traffic. Moloch stores network traffic details (either from sniffing or from pcap files) in a central database for later processing.
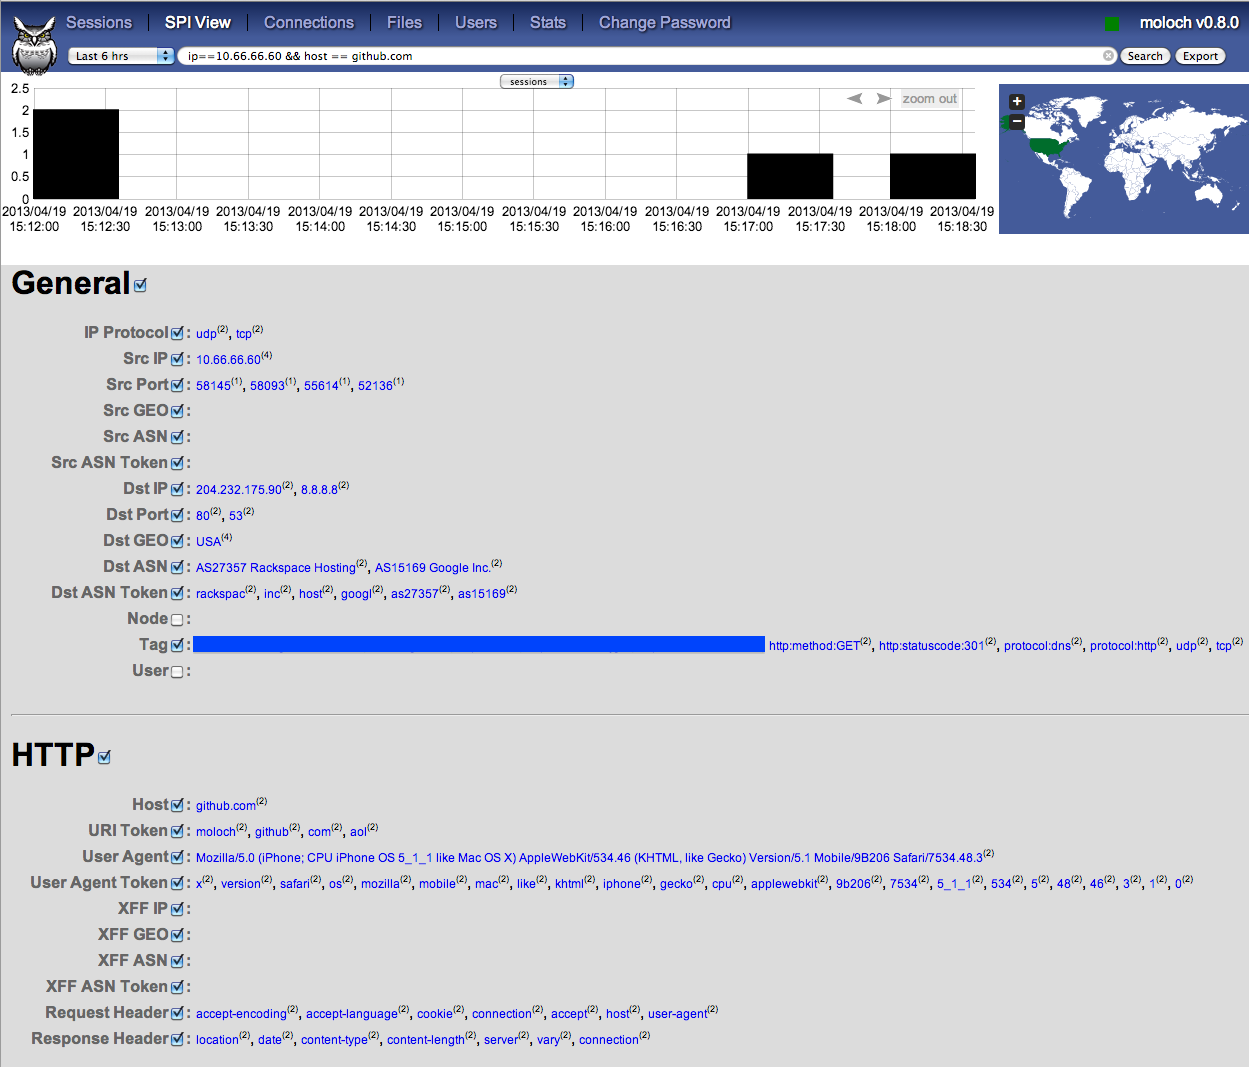
(image from https://n0where.net)
Moloch has a feature that allows you to query only the DNS queries but I found it a bit cumbersome to extract all the queries (and results) that happened for a specific domain name over a given time frame.
This is where I used a different instance with passivedns that looks at the same traffic. Note that passivedns is also able to read the pcap files, it is not limited to only live traffic.
A security colleague explained a working setup with an IDS storing the individual pcap files (for example rotated every 100MB) and then later processing the pcap with Moloch (a post on this is coming soon). I added a post-process task with passivedns on the same pcap files that extracts domain information and query results and then makes the data available in a sql database.
This setup allows me to get the best of both worlds. Three worlds in fact :
- Using Moloch to look at the entire packet-stream
- Use a local passive DNS to look for queries (and their results) that happened on the local network
- Zoom in on suspicious data and use PassiveDNS::Client to get external passive DNS data and enrich the database
Remarks on the location of the sensors
The numbers of sensors that you can place will always be limited so you have to choose the location wisely. If your users are allowed to do DNS queries directly to the internet you might be missing out on data because the traffic is not seen by the sensor. Ideally you request users to use your own DNS server and block all other outgoing DNS traffic. Additionally this also allows you to more easily implement blocklists on DNS level. Your company-network DNS server then makes a great place to put a sensor.
Conclusion
I knew about passive DNS for a while but I’ve never came to putting it to use. Some informal talks during the last FIRST Technical Colloquium introduced me to Moloch and playing around with it gave me the idea for putting it together with passive DNS.
All in all I think passive DNS (both online and offline) is a very valuable source of information if you have to conduct an investigation.


How do you create your own configuration file ? I just started learning linux and I am very fresh. will you be able to share the steps. Thank you