Extending MISP
I’m a happy user of MISP, Malware Information Sharing Platform & Threat Sharing. MISP core already contains a lot of features to satisfy your needs when it concerns threat and information sharing. But there’s always room for improvement. If you submit a feature request, MISP can be extended with your request. However changing the core is not always desirable. Also sometimes you want some feature to work just the way you want it, this doesn’t always correspond with how other users envision the working of MISP.
This is where the MISP module extensions can help : https://github.com/MISP/misp-modules/. MISP modules
- are a way to extend MISP without altering the core
- allow you to get started quickly without a need to study the internals
- are in a programming friendly language – Python
For a starter on using MISP modules read
In this post I’ll walk you through on how to integrate VMRay, automated malware analysis for CERTs and MISP. The VMRay MISP module connector has been pushed recently to the repository.
Different types of MISP modules
There are three main types of modules that can extend the features of MISP
- extension (1) : a module to extend an attribute, this type is most visible in the interface by the use of a “*” next to an attribute that can be extended, note that the extension can also be added as one or more proposals. Some extension modules can also be accessed by hovering above the attribute (VMRay is not meant to be used via hovering though)
- import (2) : populate a MISP event by importing external data
- export (3) : export MISP event data
Installing MISP modules is outside the scope of this blog, basically you have to clone the repository, run the pip3 install script and start the python script.
Configuring VMRay MISP modules
You need two things for the VMRay connector to work : an API key and the URL of your VMRay instance. If you use the cloud version of VMRay the URL will be : cloud.vmray.com.
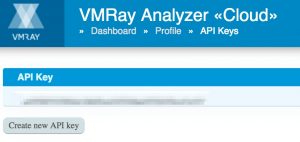
The API key is something you get via the VMRay interface. Log in to your VMRay account, navigate to your Profile and then click on VMRay API keys. If there’s no API key displayed click on Create new API key.
The VMRay MISP connector consists of two modules
- vmray_submit : to submit a sample to VMRay, works as an extension module
- vmray_import : to import the analysis data from VMRay, works as an import module
Because these are two separate modules there is something of a configuration quirk : you need to add the VMRay URL and API key twice, once for each type of module.
Enable MISP enrichment service
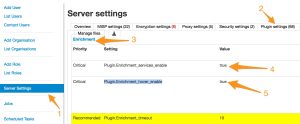
First you have to enable the MISP extension service
- Go to Administration
- Server settings (1)
- Plugin settings (2)
- Enrichment ((3)
- Set Plugin.Enrichment_services_enable to True (4)
- If you want to enable extensions by hovering above an attribute (only for modules that support it, not VMRay), then set Plugin.Enrichment_hover_enable to True (5)
- Reload the server settings page
Do not forget to start the Python script that runs the back-end of the modules. If this script/service isn’t running you won’t be able to use the external modules.
misp-modules$ sudo -u www-data misp-modules -s
Enable VMRay submit module
Once this is done (make sure you reload the page), on the settings page, scroll down until you find the VMRay submit module
- Set Plugin.Enrichment_vmray_submit_enabled to True
- Reload the settings page
- Add your VMRay API key in Plugin.Enrichment_vmray_submit_apikey
- Add the VMRay URL in Plugin.Enrichment_vmray_submit_url (for cloud use: cloud.vmray.com)
There are two other settings that are important to consider when uploading samples
- Enrichment_vmray_submit_shareable : share (for example with VirusTotal) the sample
- Enrichment_vmray_submit_do_not_reanalyze : do not re-analyze a previously analyzed sample
Enable MISP import services
Now you’ll have to do the same configuration steps, but this time for the import modules service. It is also best to change the import service time out setting to something more reasonable :
- In the Server settings, Plugin settings choose Import
- Set Plugin.Import_services_enable to True
- Reload the settings page
Enable VMRay import module
Update the time out, enable the VMRay module and configure both the API key and the URL.
- Change Plugin.Import_timeout to 75
- Set Plugin.Import_vmray_import_enabled to True
- Reload the settings page
- Add your VMRay API key in Plugin.Import_vmray_import_apikey
- Add the VMRay URL in Plugin.Import_vmray_import_url (for cloud use: cloud.vmray.com)
Adding an attachment or malware sample to MISP
The first thing you want to do is submit a sample to VMRay. This is done by submitting the sample that is attached as an attribute to a MISP event.
MISP supports two types of attachments. Regular attachments that are uploaded via “Payload delivery” or “Antivirus detection”. For these attachments the IDS flag will not be set. The attachment is also available from the event as a direct download via the MISP interface. The other type of attachment is Malware sample. These can be attached to an event via “Artifacts dropped” or “Payload installation”. MISP will set the IDS flag and add the file hashes of the upload. These samples are not directly available as a download, they are put in a password protected (infected) ZIP file.
The submit module is able to handle both types of attachments. Regular attachments are sent straight to VMRay whereas a malware sample is extracted from the ZIP file and then submitted.
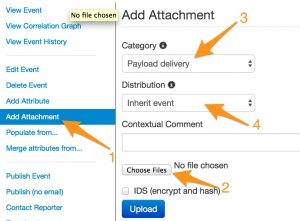
To add an attachment, go to the event
- Click Add attachment (1)
- Choose the file (2)
- The attachment type (3)
- The distribution level (4)
Submit sample to VMRay
Once the above is done, the attachment or malware sample should show up as an attribute in your event. If the extension module service is working there should now be a “*” next to the added attribute.
If you click the “*”, you get a list of extension modules capable of working with this attribute type. If the VMRay submit module is enabled, the popup list should include vmray_submit.
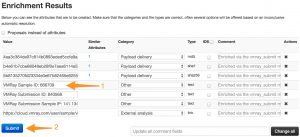
If everything goes well, you’ll then get an overview of the results of the submission.
The screen contains one field that is important : VMRay Sample ID (1). You will need to note the ID and use that sample ID later on to retrieve the results of the VMRay analysis. Unfortunately there is (yet) no automated way to go from submit sample to import results.
Then click on the Submit (2) button to add the attributes to your event.
Import the results from an analysis
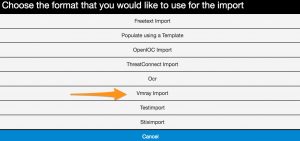
When VMRay has finished with the different analysis jobs you can import the results back into MISP. To do this use the menu Populate From …. You will then be presented with a choice of available import modules, obviously you have to choose vmray_import.
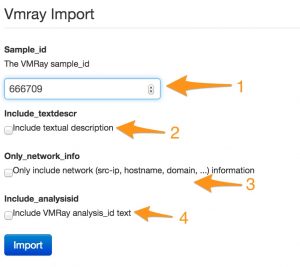
The next screen requires you to enter the sample id (1), along with options for what data you want to import. By default the import module will add the IOCs that were returned from VMRay. This includes network information, mutex, filenames and registry. If you prefer to have some context with these IOCs you can include a textual description (via include_textdescr) of what was found or happened during the analysis. If you are interested in the analysis jobs executed by VMRay then enable include_analysisid.
Make sure you have set a reasonable time out for the import module as fetching the results can take a couple of seconds.
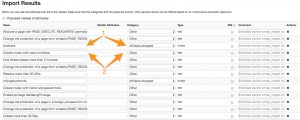
When the import module has finished fetching the results you get an overview of all the IOCs (1) that were found. If you enabled the option for textual description you also get a meaningful explanation of what happened. Textual descriptions are added as a “text” attribute to a MISP event.
Don’t be afraid of adding the same attribute multiple times to an event. MISP checks if an attribute already exists and will prevent you from creating doubles.
Conclusion
The VMRay modules is an example how relatively easy it is to extend MISP with external services.
What’s next to come? In a future post I’ll describe how PyMISP, MISP, VMRay, LOKI and your IDS can be chained to do incident response and basic forensic research.

