Infrastructure as code for MISP
For a future project I was looking into ways of deploying (and deleting) instances of MISP on a regular basis. Instead of manually installing MISP, I wanted the deployment and the configuration automated and based on simple configuration files. This is called “infrastructure as code”, typically addressed by CI/CD (Continuous Integration, Continuous Development). To throw in other popular terminology “DevOps” could support me in provisioning (and deploying) the infrastructure that is going to be used by other teams.
For the setup and deployment I rely on software from HashiCorp and deploy everything in the Amazon AWS cloud.
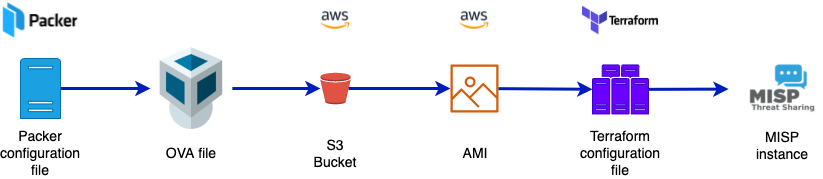
This post only scratches the surface of what’s possible with this approach but it was sufficient for my needs. Also, there are most likely better ways of configuring Packer, Terraform or AWS. The workflow is :
- Use Packer to deploy a -local- virtual image of a MISP server;
- Upload the virtual image to a cloud bucket (S3);
- Convert the virtual image to something that can be used by the cloud provider (AMI for AWS);
- Create infrastructure (servers) based on this AMI, with the help of Terraform.
Setup AWS
Before we can even start using Packer or Terraform, we need to setup the AWS environment.
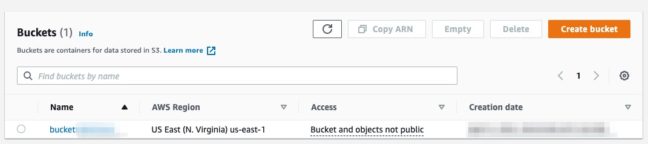
S3 bucket
The virtual machine images used for provisioning the systems are stored in an S3 bucket. So obviously we first have to create this bucket. Make sure that you do not set the S3 bucket and objects public!
AWS_CLI
The next step consists of installing the AWS CLI. This is a unified tool to manage AWS services. The Linux installation is straightforward and in order to function the CLI needs a user account.
User account
These steps are well documented by Amazon:
- Login to AWS;
- Create an IAM user account;
- Create an access key and secret access key.
You don’t need to download the credentials file. After installing AWS CLI you can configure the client from the console and it will store the credentials in your home directory (.aws/credentials).
aws configure
After creating the user account and setting up the AWS CLI, we need to create a service role that can upload images to AWS.
IAM
Under the Identity and Access Management (IAM) section of AWS you have to add an additional role to upload virtual machine images and import them into EC2. In order to work with Packer, this role needs to have the specific name vmimport. You can create it via the web interface but it’s much easier from the console, with the help of AWS CLI.
The documentation to create the service role for vmimport provides all necessary details. In essence you require the files trust-policy.json and role-policy.json. To make it easier, I have stored these files in a separate repository https://github.com/cudeso/misp-basic-cicd/tree/main/aws-service-role.
Clone the directory and use AWS CLI to create the role. Do not forget to replace the bucket name “bucket.mydomain.int” with your bucket name!
aws iam create-role --role-name vmimport --assume-role-policy-document "file://aws-service-role/trust-policy.json"
aws iam put-role-policy --role-name vmimport --policy-name vmimport --policy-document "file://aws-service-role/role-policy.json"
If all goes well, this role, and associated policy should be visible under IAM.

Virtual Private Cloud
You’re almost done. The -soon to be- uploaded virtual machines all need to run in one network, a so called Virtual Private Cloud or VPC. If you do not already have a VPC, then the easiest way to create one is in the VPC dashboard via the VPC Wizard. Your VPC should have Internet access, so do not forget to add an Internet gateway (something which is done automatically by the wizard).
For the later configuration steps, you need to note
- The VPC ID;
- The region where the VPC resides;
- A subnet ID where the virtual machine (instance) needs to run.
Summary of AWS changes
To summarize the AWS part, you need
- An S3 bucket;
- A user account with an access key;
- The AWS CLI, using the access key;
- A new role, and associated policy;
- A VPC where the new machines will run.
Now it’s time to turn to Packer.
HashiCorp Packer
Packer is a free and open source tool for creating golden images for multiple platforms from a single source configuration. To make things easier, the MISP project already has a repository with a good Packer configuration file: https://github.com/MISP/misp-packer. The default branch is for Ubuntu 18.04, but there’s also a branch for Ubuntu 20.04. Do not forget to have VirtualBox installed, otherwise you will not be able to build the virtual machine image.
The default repository allows you to create a Virtualbox image, but it does not include the configuration to upload this image to an S3 bucket and transform it into an AMI. I added configuration files to https://github.com/cudeso/misp-basic-cicd/tree/main/cudeso-misp-packer that will help you with this. The changes compared to the original MISP repository include
- In misp-with-s3.json, the S3 import post-processor clause. This does the upload to an S3 bucket, as well as transforming the image to an AMI;
- In the preseed.cfg file, changes to the keyboard layout and adding the necessary cloud-init Ubuntu package;
- In build_vbox.sh, the call to the correct Packer configuration file.
In order to use these files you have to copy them over to the MISP Packer repository. Then export the access and secret key as an environment variable and execute build_vbox.sh.
cp -r misp-basic-cicd/cudeso-misp-packer/* misp-packer/
export AWS_ACCESS_KEY_ID=KEY
export AWS_SECRET_ACCESS_KEY=SECRET
./build_vbox.sh
If all goes well (and this can take a while), the builder will return with the AMI ID. Note this ID as you need it in the next stage.

Terraform
Terraform is an open-source infrastructure as code software tool that provides a consistent CLI workflow to manage hundreds of cloud services.
You can find an example of the Terraform configuration file in https://github.com/cudeso/misp-basic-cicd/tree/main/terraform. There are two files that are essential, main.tf and terraform.tfvars. The first one contains the actual configuration, whereas the second contains the variables used to configure the AMI ID (image), VPC and network. You can leave main.tf unchanged, but terraform.tfvars definitely needs to be updated with your settings.
In terraform.tfvars, update the VPC, AMI and subnet ID. Optionally you can also change hte region. Update the CIDR_HOMELAB to specify from where you want to connect to the instance.
misp_cicd_vars = {
  region        = "us-east-1"
  vpc           = "vpc-VPC_ID"
  ami           = "ami-AMI_ID"
  instance_type = "t2.micro"
  subnet        = "subnet-SUBNET_ID"
  public_ip     = true
  secgroupname  = "misp_cicd_securitygroup"
}

homelab_vars = {
  cidr_blocks = ["CIDR_HOMELAB"]
}
In the main.tf file you can find the definitions for the new instance, and a corresponding security group. This security group allows inbound SSH and HTTPS traffic (from a CIDR location defined in the variables file) and allows all outbound traffic.
Once you have updated the files, you can initialise Terraform, update the formatting of the files and verify its configuration.
terraform init
terraform plan
terraform fmt
terraform validate
If no errors are shown then it’s time to build the infrastructure with Terraform.
terraform apply
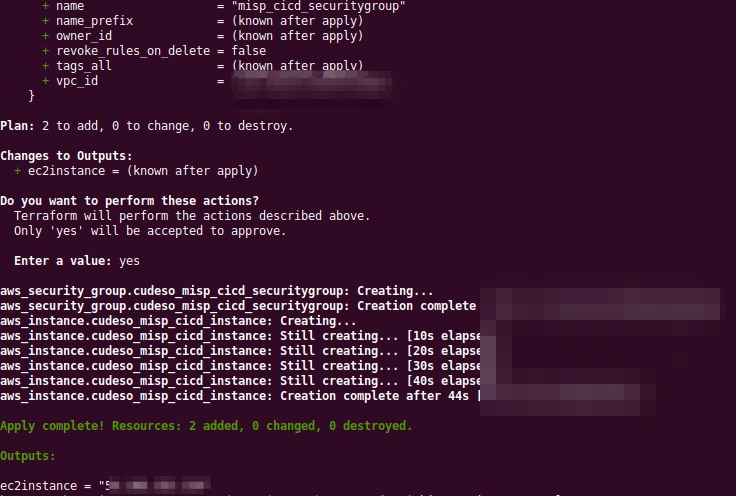
If the operation was successful, it will return the IP of the created instance. Apart from the virtual machine instance, it also has created an associated security group.
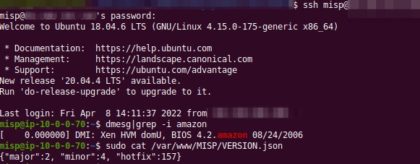
Afterwards, you can then connect to the new MISP server. The username and password to authenticate were previously defined in the Packer configuration.
When you’re done, you can delete the instance with terraform destroy. This will not only destroy the instance, it will also delete the newly created security group.
terraform destroy
References
Additional topics
There are topics not covered in this post that you might find useful to further explorer:
- Use Github actions to automate the execution of Terraform.
- Terraform stores the state of the infrastructure in terraform.tfstate files. If you want to collaborate with other people then it’s recommended to store these remotely in the Terraform Cloud.
Azure
I used the Amazon cloud for this approach, but you can as well use Azure. Packer includes Azure Virtual Machine Image Builders.
Resources
I used a number of online resources to come to this result. Have a look at these sites for further information.
- https://www.middlewareinventory.com/blog/packer-aws-terraform-example/
- https://www.middlewareinventory.com/blog/terraform-aws-example-ec2/
- https://discourse.ubuntu.com/t/how-to-build-your-own-ami-from-ubuntu-pro-using-packer/25719
- https://aaronluna.dev/blog/packer-template-aws-ec2-ubuntu-nginx/
- https://medium.com/@eng.mohamed.m.saeed/convert-a-vm-to-ami-in-aws-b101a1c52e0e
- https://www.ipswitch.com/blog/import-machine-images-into-aws-with-packer

