This article demonstrates how to quickly add new MISP feeds, either to your own MISP server or as a contributor to the MISP project. I use the feeds from Threatview.io as an example. Threatview.io provides daily feeds on IPs, domains, URLs, and file hashes, as well as a C2 hunt feed.
MISP feeds
MISP feeds are remote or local resources containing indicators that can be either imported into MISP or used for correlations without importing them into your MISP server. MISP comes with a set of default feeds (described in defaults.json), but you can also add your own feeds.
Feeds can be in three different formats:
- MISP standardised format: This is the preferred format to benefit from all MISP functionalities.
- CSV format: Allows you to select specific columns to be imported.
- Freetext format: Enables automatic ingestion and detection of indicators/attributes by parsing any unstructured text.
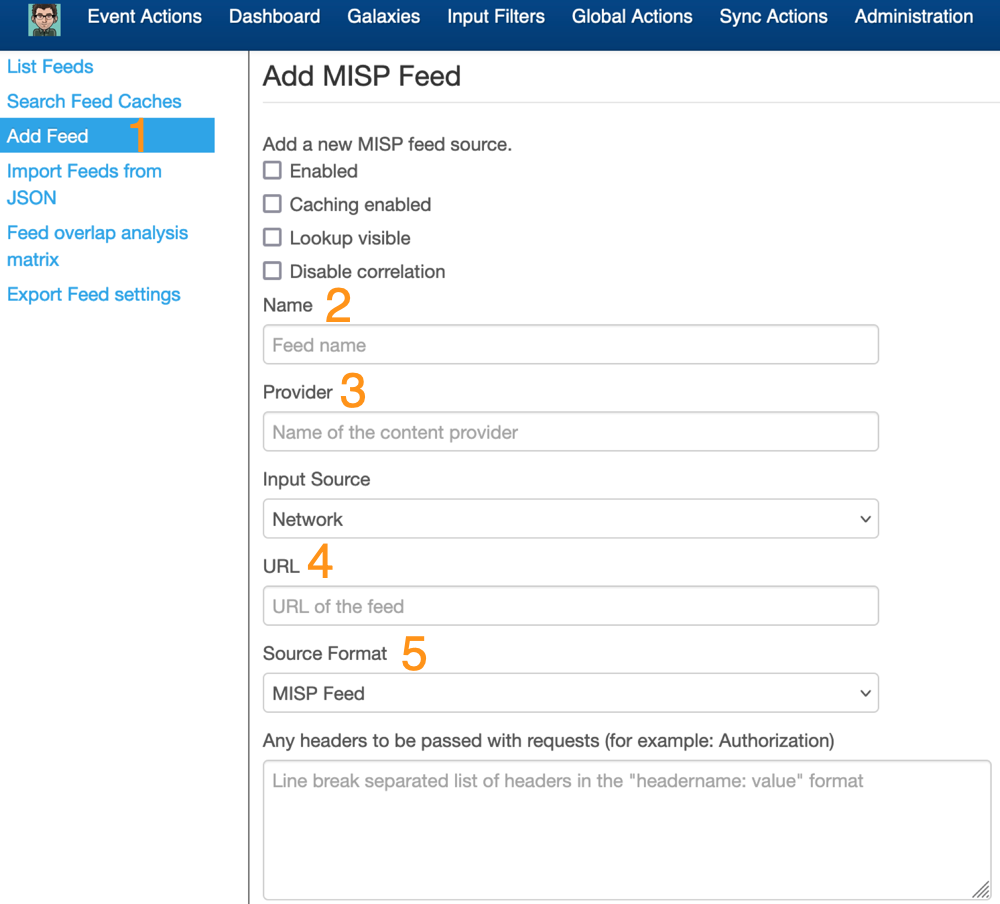
Adding a new MISP feed
In the MISP interface, navigate to Sync Actions, Feeds.
- Click on Add feed
- Add the feed name
- Specify the name of the provider
- Enter the URL where the feed is located
- Select the feed format
There are three source formats, and depending on the format you choose while adding the feed, you must supply additional configuration. The easiest to add is the MISP standardised format. In this case, the feed points to a list of JSON-formatted files like MISP events. These feeds are generated by the PyMISP feed-generator. Examples can be found at botvrij.eu/data/feed-osint.
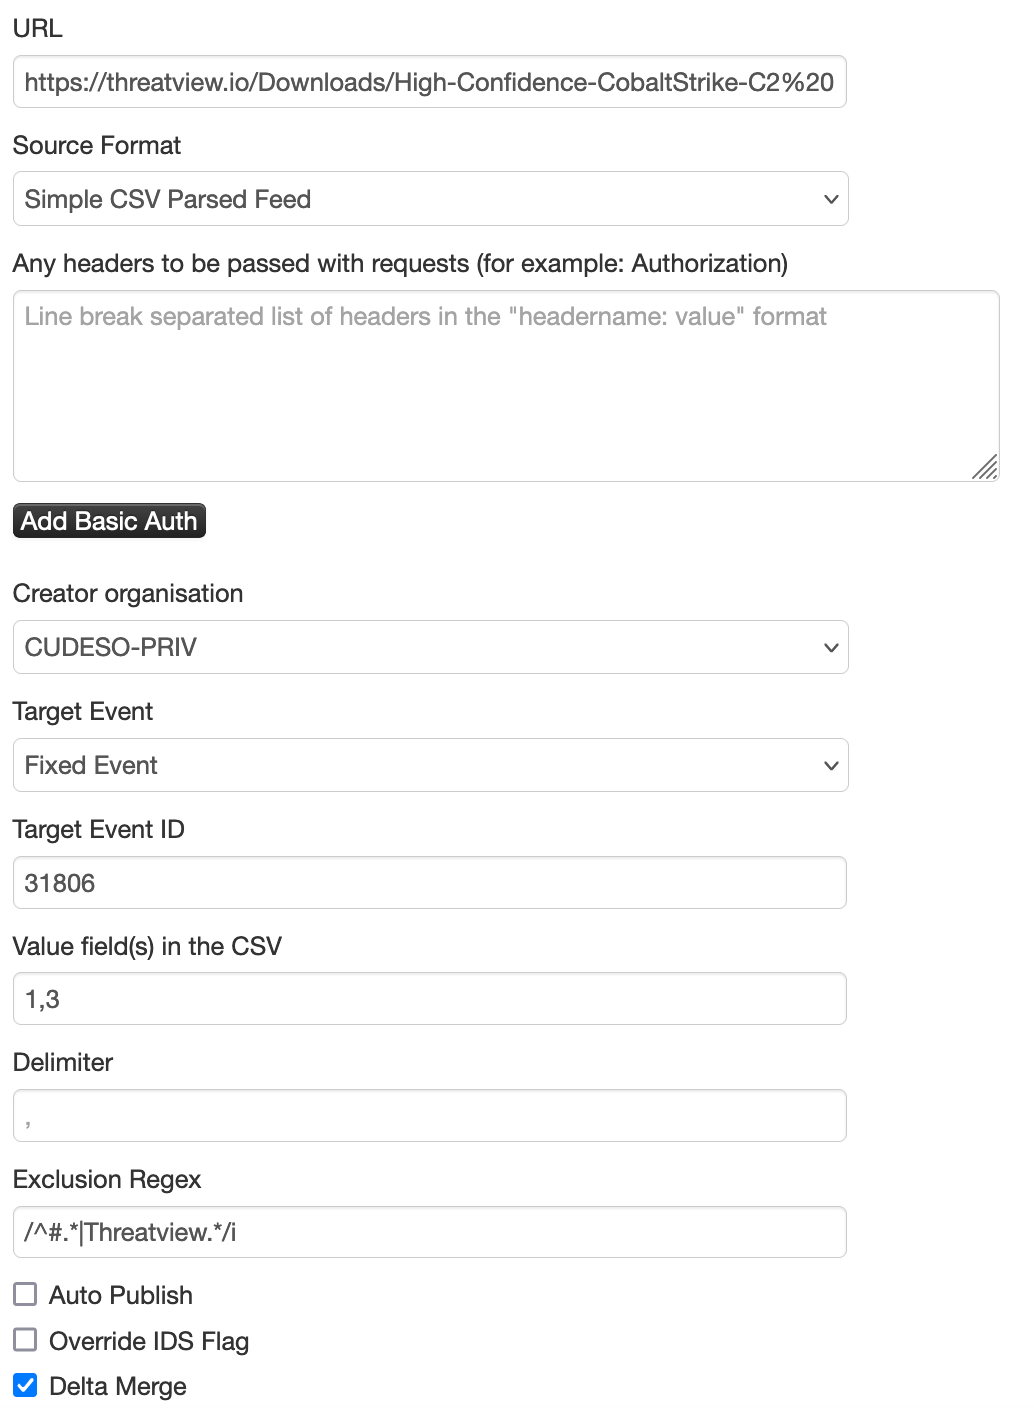
The other two formats you can choose from are CSV and freetext. For the Threatview.io example, I’ll be adding feeds in both CSV and freetext formats. Choose Freetext Parsed Feed as the source format, and then follow these steps:
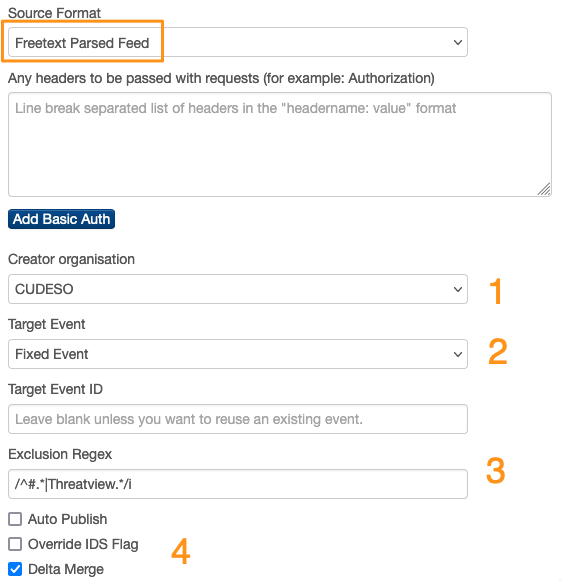
- Define which Creator organisation you want to use to import the feeds. Generally, this is your host organisation, but if the feed provider already exists as an organisation on your MISP server, you can choose this organisation as well.
- Choose the Target event. You have two options: either the preferred fixed event or a new event for each pull. With one fixed event, all indicators related to the feed are in one easy-to-handle event. A disadvantage is that older information, if it’s no longer in the feed, is no longer available in your MISP instance. If you create new events on each pull, you don’t have this problem, but your MISP environment can become overwhelmed with excessive data volumes.
- You can also specify a PHP regular expression to indicate which information needs to be omitted. For example, you might want to exclude lines starting with a hashtag (#), which are typically comments, as well as lines containing “Threatview.” This prevents any reference to the threat feed provider from being added as an indicator in MISP.
- The last set of options allows you to automatically publish the event, override the IDS flag, and perform a delta merge. If you have high confidence in the threat feed provider, you can choose to automatically publish your events. Generally, I curate the content of the feeds (also see the MISP playbook “Curate MISP events“) before pushing them to security controls. Additionally, overriding the IDS flag (checking the option sets the IDS to False) is another way to control which “actionable” indicators are sent to your security controls. Lastly, the delta merge is important for removing older attributes from your events. If the feed no longer contains a specific attribute, those attributes are (soft) deleted from your event.
If you choose the CSV format, you have similar options, with a few differences:
- Specify the fields that contain the useful information in the CSV file. You need to provide the column number(s).
- Define the field delimiter. Typically, for CSV files, this is a comma (,).
Before you can click the submit button, there are two additional useful options:
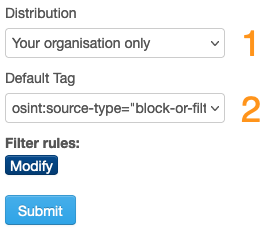
- The Distribution level allows you to share the information with other MISP communities. Before sharing outside your organisation, it’s worth checking if the feed owner permits sharing, and also verifying if the receiving community is interested in this feed. As a best practice, you should avoid sharing redundant information (threat events).
- Lastly, tag the events from the feed. For a large portion of the (OSINT) threat feeds, you can use osint:source-type=”block-or-filter-list”.
Working with the Threatview.io feeds
There’s no better way to approach this than by showing the feed management with a couple of examples, in this case with the feeds from Threatview.io. Their feeds are documented on the website and I will go through them one by one for guidance.
OSINT Threat Feed
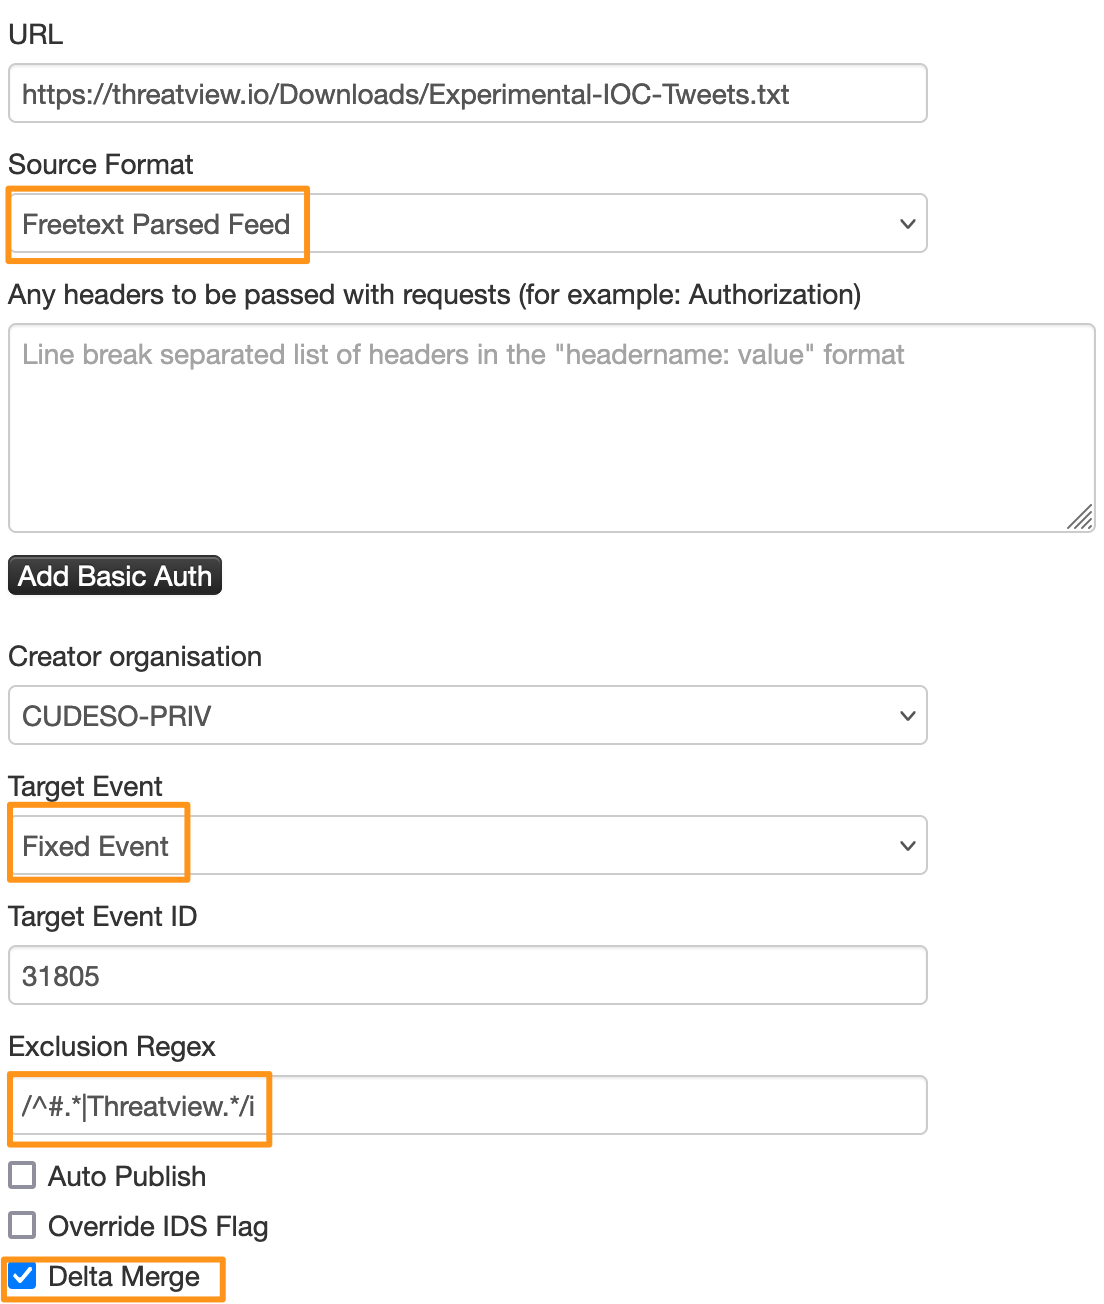
The first feed is the OSINT Threat Feed: “Malicious indicators of compromise gathered from OSINT sources – Twitter and Pastebin”. This feed contains IPs and hashes in a text file, with one entry per line. For this case, we can use the Freetext format. Because we’re only interested in the most recent indicators, they are always pulled in a fixed event, with a delta merge. Lastly, the header of the feed contains a comment line, so to ignore this line, a PHP regular expression is added: /^#.*|Threatview.*/i. The feed is also not shared outside the organisation, and the event is tagged with osint:source-type=”block-or-filter-list”.
IP Blocklist, Domain Blocklist and URL Blocklist
The IP Blocklist (“Malicious IP Blocklist for known Bad IP addresses”), Domain Blocklist (“Malicious Domains identified for phishing/ serving malware/ command and control”) and URL Blocklist (“Malicious URL’s serving malware, phishing, botnets and C2”) are setup similarly to the OSINT Threat Feed as a Freetext format.
C2 Hunt Feed
The next example is the C2 Hunt Feed: “Infrastructure hosting Command & Control Servers found during proactive hunts by Threatview.io”. This feed contains CSV data in the format #IP,Date of Detection,Host,Protocol,Beacon Config,Comment. For this feed, we’ll use the Simple CSV Parsed Feed format, and only select fields 1 (IP) and 3 (Host), as these contain the attribute data that we want to import into MISP. Similar to the previous feed, I also added a regular expression to exclude lines with comments and applied tagging for the feed.
MD5 Hash Blocklist, SHA File Hash Blocklist, and Bitcoin Address Intel
Lastly, we have the MD5 Hash Blocklist (“MD5 hashes of malicious files or associated with malware, ransomware, hack tools, bots, etc.”), SHA File Hash Blocklist (“SHA hashes of files known or linked with malware execution”), and Bitcoin Address Intel (“Bitcoin addresses identified to be linked with malicious activity” feeds. These feeds are also added in Freetext format, but in this case, we do not use the delta merge. The “maliciousness” of IPs or domains changes over time when owners clean up their assets. However, an MD5 or SHA1 hash that points to a malicious file remains valid, even after an extended period. So, in this case, it’s not useful to remove older entries; we want to keep them and extend the event with the new entries.
Contribute to the MISP Project
After all this hard work, it’s also useful to contribute your changes back to the MISP project, as briefly covered in How to have my feed published in the default MISP OSINT feed. Since you have already configured the feeds in your local MISP, you first need to export the configuration and then add it to the MISP defaults.json file.
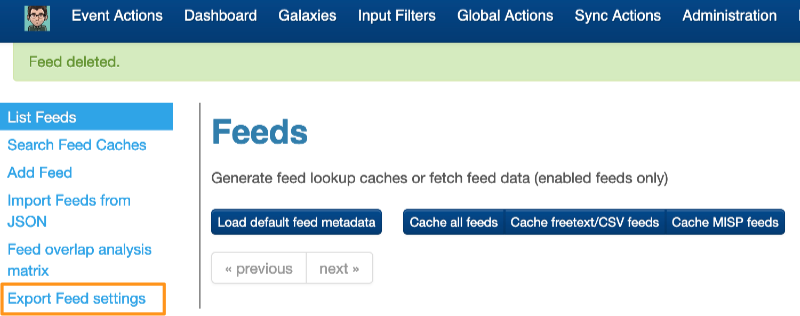
First, save your feed configuration via Export Feed Settings. This generates a JSON file. Next, extract the feed configurations you just added. In this case, we configured feed IDs 77 to 84.
jq '[.[] | select(.Feed.id == "77" or .Feed.id == "78" or .Feed.id == "79" or .Feed.id == "80" or .Feed.id == "81" or .Feed.id == "82") | {Feed: (.Feed | del(.id, .orgc_id, .cache_timestamp, .tag_id, .event_id, .orgc_id)), Tag: .Tag}]' feed_index.json > misp_contrib.json
This eventually gives us the misp_contrib.json file, which we can then add to a pull request to the MISP project. For reference, the MISP pull request covering the Threatview.io feeds is PR-9792.
Cronjob and false positives
To conclude this post, if you want to pull in the feed data automatically you can use the below MISP CLI command, either from the console or put it in the crontab of the user www-data (or apache on Red Hat systems).
sudo -H -E -u www-data /var/www/MISP/app/Console/cake Server fetchFeed 1 78
And as a final remark, ensure you use the MISP build-in features such as the warninglists to highlight potential false positives.

