Incident response case management
A good case management is indispensable for CSIRTs. There are a number of excellent case management tools available but either these are more tailored towards SOCs, are overpriced or are unnecessary complex to use. I have used TheHive, RTIR, Omnitracker, OTRS and ServiceNow and although TheHive and RTIR come close, I have never really found a solution that addresses my needs.
I currently use a combination of
- TheHive
- Case management
- Template system to start new cases
- Correlate items between cases
- Timesketch
- Register evidences
- Correlate activities between evidences
- Python scripts to transform logs that are not immediately ingested by Timesketch
- MISP
- Push indicators to TheHive and query events in Timesketch
- Describe the threats/malware/activities found during the investigation
- Create detection rules
- Report writing
- Python scripts to move data between TheHive, TimeSketch and MISP and to create MD files from the MISP reports
Recently Airbus Cybersecurity released DFIR-IRIS. The feature list of DFIR-IRIS includes
- Multiple cases (investigations)
- Ingestion of assets (computers, servers, accounts)
- Create IOCs and associate IOCs with assets
- Create a timeline referencing assets and IOCs
- Create an automated graph of the attack from the timeline
- Much more, see: What can I do with Iris
Using DFIR-IRIS
Based on its feature list DFIR-IRIS looks as a very good candidate for a case management system for incident response. You can easily test IRIS yourself with the Docker setup.
git clone https://github.com/dfir-iris/iris-web.git
cd iris-web
cp .env.model .env
(edit .env and change the secrets)
docker-compose build

docker-compose up
Note that the password for the administrator account is displayed when the containers are being setup.
Tutorials
The documentation from DFIR-IRIS provides a number of demonstration videos that cover all its features.
Interface and performance
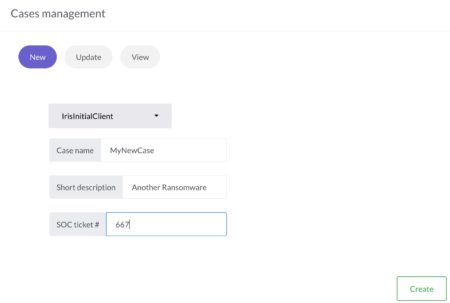
The DFIR-IRIS interface is slick and well-thought-out. There’s no unnecessary clutter of icons or menu’s and is very responsive. To demonstrate the ease of use just have a look at how to create a new case. You only have to provide a customer name, case name, description and a SOC ticket number.

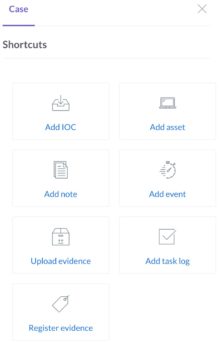
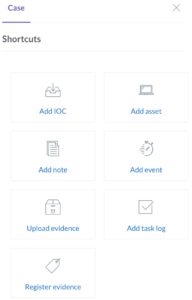
Another demonstration of the ease of use is the shortcut toolbar, allowing you to quickly add assets, notes or events.
During none of my tests I had the impression that the system was slow or un-responsive.
Case templates
Cases in DFIR-IRIS consist of a summary, notes, assets, IOCs, tasks and evidences. Unfortunately there is no option to start a case based on a pre-defined template, something which can be found in TheHive. I use templates in TheHive describing the basic steps that need to be done for example for phishing incidents or account compromise cases.
There are however solutions to address the lack of templates. DFIR-IRIS is fully accessible via the API and one of the endpoints is add a case task. The case templates in TheHive are JSON files. So you only need a small script that reads the TheHive JSON template file, extracts the tasks and then adds them to DFIR-IRIS via the API.
Assets
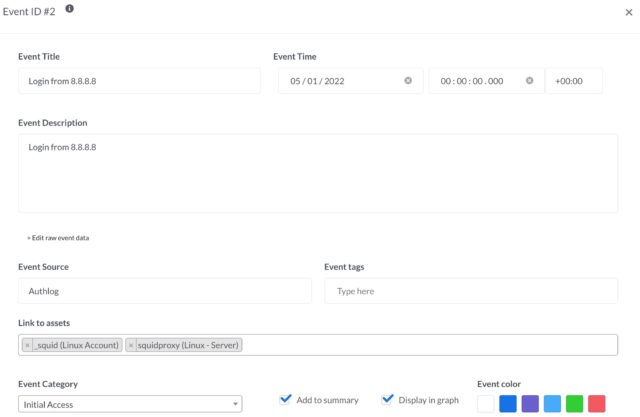
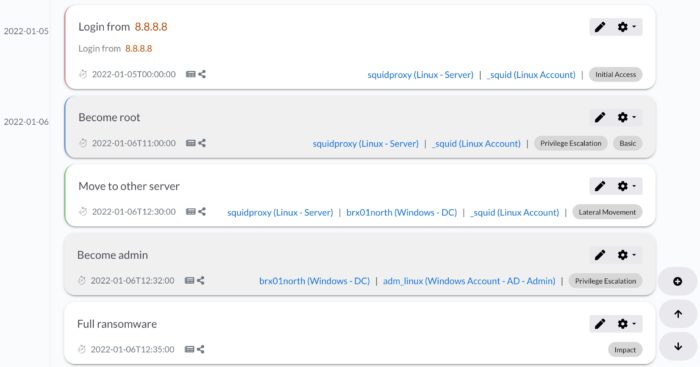
“Events” in DFIR-IRIS describe important events that can be displayed in the timeline. You can link these events to a specific source, add tags and categorise them.
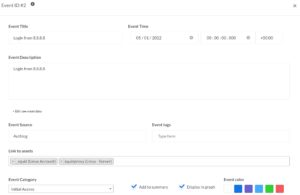
It’s also possible to link events to assets. Now instead of manually adding the assets via the user interface you can also make use of the API to add assets.
To demonstrate how easy this is you can find a Python script that creates assets based on a CSV file.
assets.csv
"brx01north",11,"","CORP","192.168.1.1","",2
"brx02north",11,"","CORP","192.168.10.1","",2
"squidproxy",3,"Corporate Squid Proxy","","192.168.1.10","",2
"_squid",5,"Linux account for Squid","","","",1
add_assets.py
import requests
import csv
import json
from requests_toolbelt.utils import dump

iris_host="https://case:4433/"
iris_apikey="IRIS_APIKEY"
iris_headers = {"Authorization": "Bearer {}".format(iris_apikey), "Content-Type": "application/json" }
iris_verify = False

case_id = 1

with open('assets.csv') as csv_file:
    csv_reader = csv.reader(csv_file, delimiter=',')
    for row in csv_reader:
        iris_data=json.dumps({"asset_name":row[0], "asset_type_id": row[1], "asset_description": row[2], "asset_domain": row[3], "asset_ip": row[4], "asset_info": row[5], "analysis_status_id": row[6], "cid": case_id})
        result = requests.post("{}/case/assets/add".format(iris_host), headers=iris_headers, data=iris_data, verify=iris_verify)
        print(dump.dump_all(result))
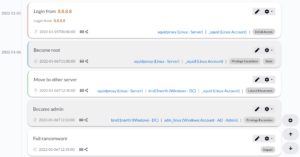
To come back to the events … you can obviously put the events on a timeline.

Unfortunately it’s not possible to export the graphical timeline to a JPEG or PNG format (correction: see
https://github.com/dfir-iris/iris-web/issues/33#issuecomment-1006373124 and
https://github.com/dfir-iris/iris-web/pull/35.
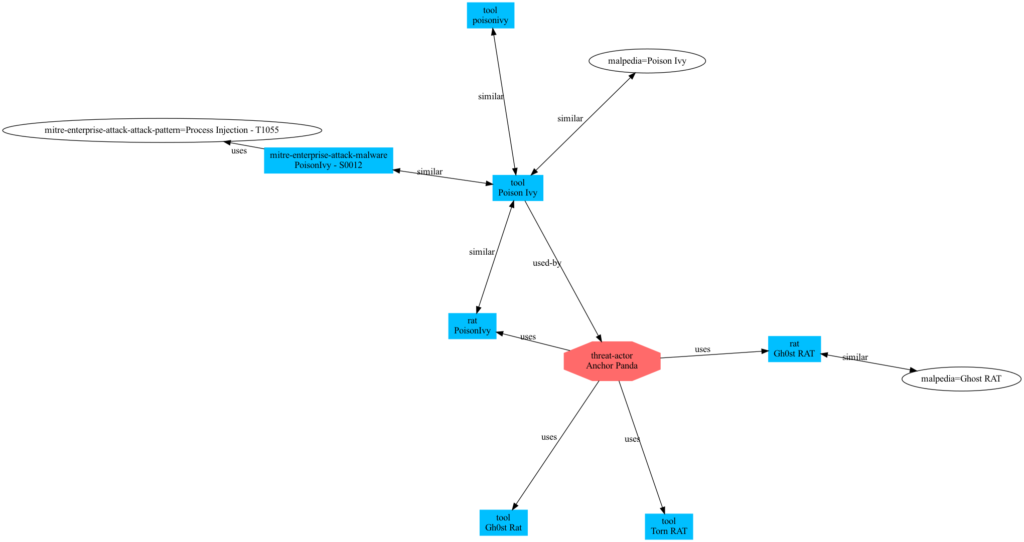
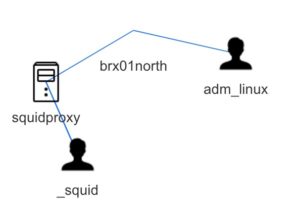
A neat automatically created graph is the relation graph between the different assets. This graph is build on the “affected assets” that you add to the event list.
Evidences
DFIR-IRIS allows you to register evidences but it’s for example not possible to link this with Timesketch. There is a module to import EVTX files but I’ve not been able to test it yet. Personally I’m not a big fan of adding the evidences directly to DFIR-IRIS. I already store evidences (or at least most of the logs) in Timesketch. The feature set of Timesketch to wade through the logs and analyse certain behaviour is not something that needs to be replicated in a case handling tool. A module that queries Timesketch for specific tags and then registers the corresponding events as evidence seems a better solution.
IOCs
In my setup I use MISP to collect all the relevant threat information for a specific customer into one (or multiple) threat events and then tag these events with a customer ID (not the customer name but a pseudonym). Now instead of pushing these IOCs to TheHive or do a lookup in Timesketch I wanted to do the same with DFIR-IRIS. To demonstrate how easy this is there’s a small Python script below that fetches IOCs tagged for a customer, from a MISP instance.
add_iocs.py
import requests
import csv
import json
from requests_toolbelt.utils import dump

iris_host="https://case:4433/"
iris_apikey="IRIS_APIKEY"
iris_headers={"Authorization": "Bearer {}".format(iris_apikey), "Content-Type": "application/json"}
iris_verify=False

misp_host="https://misp/"
misp_apikey="MISP_APIKEY"
misp_headers={"Authorization": misp_apikey, "Accept": "application/json", "Content-Type": "application/json"}
misp_verify=False
misp_data=json.dumps({"returnFormat": "json", "tags": ["customer:CORP"],"to_ids":"1"})

case_id = 1
tlp_code = 2

indicators=requests.post("{}/attributes/restSearch".format(misp_host), headers=misp_headers, data=misp_data, verify=misp_verify)
response=indicators.json()["response"]["Attribute"]
for attr in response:
    ioc_tags = ""
    value=attr["value"]
    if 'Tag' in attr:
        for t in attr["Tag"]:
            ioc_tags += t["name"] + ","

    attr_type=attr["type"]
    if attr_type in ["ip-src","ip-dst"]:
        attr_type="IP"
    elif attr_type in ["md5", "sha1", "sha256"]:
        attr_type="Hash"
    elif attr_type in ["hostname", "domain"]:
        attr_type="Domain"

    iris_data=json.dumps({"ioc_type": attr_type, "ioc_tlp_id": tlp_code, "ioc_value": value, "ioc_description": "From MISP", "ioc_tags": ioc_tags, "cid": case_id})
    result = requests.post("{}/case/ioc/add".format(iris_host), headers=iris_headers, data=iris_data, verify=iris_verify)
    print(dump.dump_all(result))
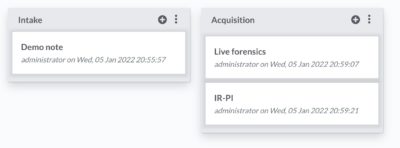
Notes
You can add multiple notes, organised in note groups. There’s nothing spectacular about the note-taking except that it’s incredible straightforward and fast. Exactly how note-taking should be. I personally like this option a lot, also because the notes are stored in MarkDown format and you can do all note manipulations from the API.
I can easily imagine a couple of scripts that collect artefacts (live forensics, via KAPE, analysing PCAP files) and automatically create/add notes for you. Another option would be that there’s a synchronisation between MISP reports (also in MD) and the DFIR-IRIS notes.

Report generation
It’s possible to create incident reports based on a template and on the information added to a case. I’ve not created a custom template but based on the demo template that’s included (https://github.com/dfir-iris/iris-web/blob/master/source/app/templates/docx_reports/iris_report_template.docx) the generated report provides a solid base to create a final -customer- incident response report.
Conclusion
In the short time since it’s available I’ve come to like DFIR-IRIS a lot. I especially enjoy that everything is available via an API (note: there’s a Python client for the API on the roadmap).
There are some features missing, like a direct integration with Timesketch, case templates, integrations with MISP and a “more beautiful timeline” (something like the visual timeline from Aurora). The beauty of DFIR-IRIS is that you can easily contribute to the code or, if you know your way around with accessing an API, you can just create these integrations yourself. And contribute them back to the community (the license model for DFIR-IRIS is LGPL).
Note: the scripts used in this article are also at https://github.com/cudeso/tools/tree/master/dfir-iris.