VMray & MISP
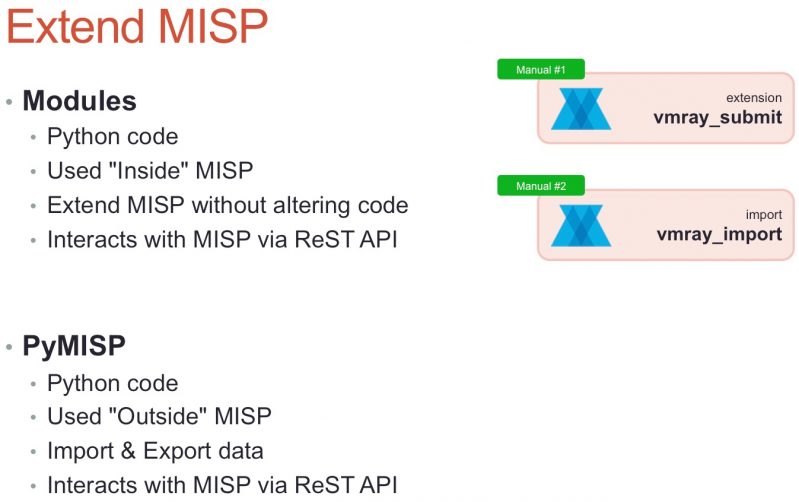
End 2016 I contributed a module to extend MISP, the Open Source Threat Intelligence and Sharing Platform, with malware analysis results from VMRay : Submit malware samples to VMRay via MISP. VMRay provides an agentless, hypervisor-based dynamic analysis approach to malware analysis. One of it great features is the API, allowing you to integrate it with other tools.
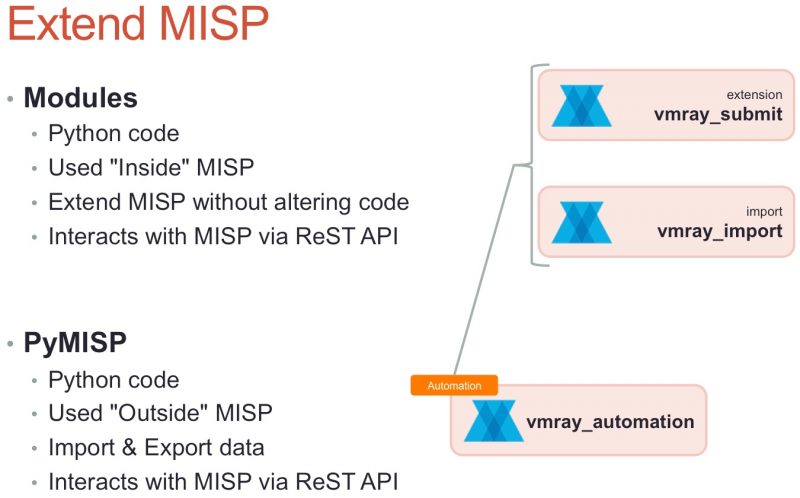
One of the drawbacks of the module was that it required a two step approach : first submitting the sample and then manually importing the results from VMray. Because automation makes our life easier I updated this module so that now only one step is required.
Automation
The module still supports the two step approach:
- vmray_submit.py, the extension MISP module that submits the malware samples to VMray;
- vmray_import.py, the MISP import module that fetches the results from the different analyzer jobs from VMray.
A third script, vmray_automation.py, now links these two Python scripts together.
Under the hood the automated process still calls the manual import step to do the heavy lifting. The automation is based on the build-in tagging system of MISP and makes use of PyMISP. When vmray_submit.py sends the sample to VMray it adds a tag to the MISP attribute that holds the sample identification number and marking the MISP attribute as ‘incomplete’. A background task will then pickup all these ‘incomplete’ attributes and query VMray to check if the analysis results are already available. The MISP module can be configured to wait a certain time to let all the analysis finish, before querying for the results. By default this is set to 30′ after the sample has been submitted.
Why is it not all integrated into one module? By still keeping the manual import step separate from the submit step you keep control over which attributes you’d like to include for certain specific samples. Note also that importing the results manually will not reset the ‘incomplete’ tag that is used for the automated process.
Configuration
Enable the VMRay modules
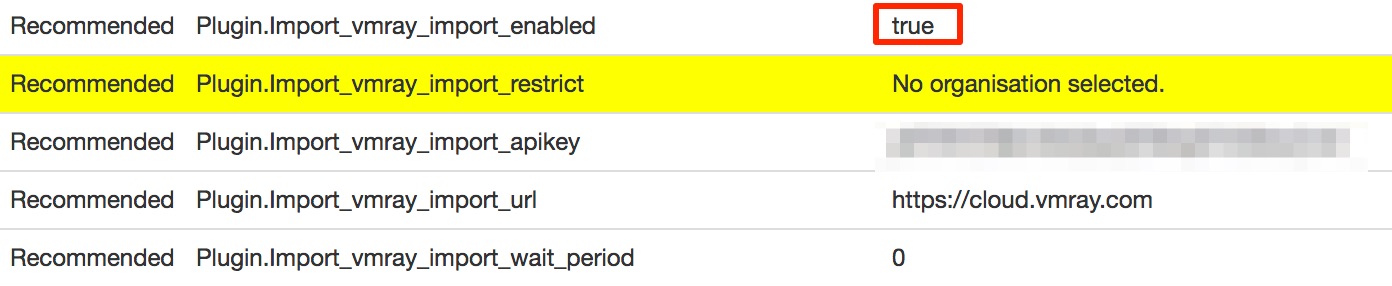
Obviously you first need to enable the VMRay modules. Similar to the old versions, this is done via Administration, Server Settings & Maintenance and then choose the tab Plugin settings. You have to enable the vmray_submit.py module under Enrichment and the vmray_import.py module under Import. Do not forget to also include the API key and the location of your VMRay instance.
Enable the ‘Workflow Taxonomy’
As part of the MISP taxonomies there is a so called workflow taxonomy. This is used by the vmray_automation.py module to mark the ‘completeness’ of an attribute. To enable this workflow you have to go to Event Actions, List Taxonomies. There you’ll see all the available taxonomies. First click Update Taxonomies and then enable the correct workflow taxonomy (called: ‘Workflow’).
Submit a sample
Submitting a sample to VMray hasn’t changed compared to the previous module version. You add the attachment to the MISP event, click the enrichment option and choose VMRay. This launches the MISP submit module which, after the sample has been uploaded to VMRay, gives you the initial information (file hashes of the sample) but also a text attribute containing the sample ID. As a last step, the submit module adds a tag ‘incomplete’ to the sample ID attribute.
Auto-update the event
The core of the automation happens via a script that is not part of the MISP modules itself but is part of the set of example scripts of PyMISP. Pending the inclusion of the PullRequest (PR#389) you can also download it directly from my fork of PyMISP : https://github.com/cudeso/PyMISP (in the examples directory).
For testing purposes it’s best to first test the automation script manually and check for errors. The output, if debug mode is enabled, it should look something like this.
~$ python3 vmray_automation.py

All attributes older than 30
Found event 173 with matching tags workflow:state="incomplete" for sample id 3780044
Response code from submitting to MISP modules 200
Add event 173: Classification : Trojan  as text (Enriched via the vmray_import module) (toids: False)
Add event 173: HKEY_CURRENT_USER\Software\Microsoft\.NETFramework as regkey (Operations: access) (toids: False)
Add event 173: HKEY_LOCAL_MACHINE\Software\Microsoft\.NETFramework as regkey (Operations: access) (toids: False)
Add event 173: HKEY_LOCAL_MACHINE\Software\Microsoft\.NETFramework\DbgDACSkipVerifyDlls as regkey (Operations: read) (toids: True)
Updated event 173
If no errors occur you can install the automation script.
Installation
Installing the script is just a matter of including it in your crontab configuration (/etc/crontab). The script only has a few dependencies and most of them will already be installed anyway if you have MISP modules installed. Similar as the MISP modules, it requires Python3.
Copy it, together with the config file for PyMISP (keys.py), from the example directory to your preferred location and make sure that you use a system user that is allowed to run cron jobs. Do not run the script as root!
*/5 * * * * misp-user /usr/bin/python3 /home/misp-user/PyMISP/examples/vmray_automation.py > /dev/null 2>&1
Inline configuration
The configuration of the automation script is done inline. You should only care about default_wait_period.
- vmray_include_analysisid, vmray_include_imphash_ssdeep, vmray_include_extracted_files, vmray_include_analysisdetails, vmray_include_vtidetails : these values correspond with the options that you can set via the ‘manual’ import of results. By default they are set to 0 (False). Change these to 1 (True) to include additional information of the VMRay jobs;
- custom_tags_incomplete, custom_tags_complete : the tags used to indicate the status of a submitted job. Best is not to change this value;
- default_wait_period : the default wait period after a sample is submitted. When you attach a sample to MISP and then submit the jobs to VMRay it will take a while before all the jobs are completed. This setting instructs the automation module to only start including the job results after the default_wait_period has passed. The value is set in minutes and defaults to 30.
The vmray_automation.py script also contains a debug option that you can use to check if your environment is configured properly : module_DEBUG = True
Download
You can get all the files from Github. Clone the repositories of MISP-modules and PyMISP.
git clone https://github.com/MISP/misp-modules.git
git clone https://github.com/MISP/PyMISP.git
(or git clone https://github.com/cudeso/PyMISP.git)
Automation workflow
The automation is accomplished via these steps:
- First vmray_automation.py fetches the configuration elements from MISP (VMray API key, URL, etc). This way you can manage configuration from within MISP and there’s no need for a separate config file;
- Then it queries through all the MISP attributes with a tag ‘incomplete’ (workflow:state=”incomplete”);
- It checks if the attribute is older than the minimum wait time foreseen for the analyses to finish;
- Then it checks if the attribute contains the required VMray sample identification (VMRay Sample ID:);
- If a sample ID was found, it submits this sample ID to the vmray_import.py MISP module;
- The vmray_import.py module queries VMray and returns the results for all analysis jobs for this sample. The results are then returned to vmray_automation.py;
- Within vmray_automation.py every atttribute is then added to the MISP event;
- Once done, vmray_automation.py changes the workflow tag on the VMray sample ID attrribute to complete (workflow:state=”complete”).


Hi,
After submitting the file using the enrichment module I get this error:
“VMRay: Submission not stored because no jobs were created”
This is an error message from VMRay itself.
Have you installed the vmray python package and configured the API key and submission URL?
Can you post the console output of misp-modules when running in debug (-d) modus?