Hunting for Dridex C2 info

Dridex hunting

Increase of campaigns

Dridex, the multifunctional malware package that leverages macros in Microsoft Office to infect system has seen an increase in the number of campaigns.

What is Dridex?

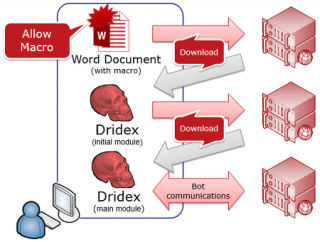
Dridex will first arrive on a user’s computer as an e-mail with an attached Microsoft Word document. If the users opens the attachment (with macros enabled) then a macro embedded in the document triggers a download of the Dridex banking malware, enabling it to get installed.

See for example in an article from JP-CERT.


Dridex

This means that if we can prevent the download of the 2nd phase we can prevent the infection with the downloaded Dridex malware. We will still have to clean-up the host (from the harm that was done by running the document macro) but at least the banking malware is stopped from further execution.

There are some preventive protection measures that you can take to be protected against an infection. But having multiple layers of defense is the best way to have your network protected.

Stop the infection

So how do you stop the download? Simple : by blocking access to the download site (and additionally block access to sites to which full infected machines report their findings). The problem that remains is : where do you get the list of download sites (or IPs)?

Ideally you get such a list via sharing threat information, possibly through a sharing platform like MISP. But what do you do if you do not have access to a sharing platform?

Hunting for Dridex C2 info

Unfortunately there’s no such Dridex C2 Blocklist (and read in the conclusions why that’s not entirely a bad thing). So you’ll have to get the information yourself, from various sources. I listed a couple of the sources below that you can use to build your own blocklist.

Dridex sources

VirusTotal

The first place to look for Dridex information is at VirusTotal. It allows you to search for all comments that have a tag, in this case #dridex.

VirusTotal Dridex

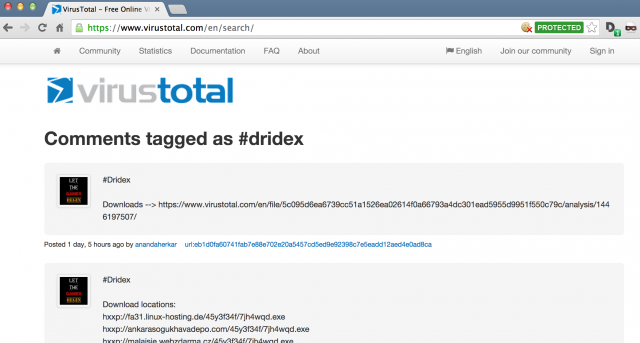
VirusTotal has an API. You can look up IP or domain information but unfortunately it does not support an option to search in the comments.

Because of this, using VirusTotal for setting up a blocklist is not scalable. It’s good for getting updated rules for specific cases but you’ll have to copy/paste the indicators yourself.

CyMon

The next resource I had a look at was CyMon. It is a tracker of open-source security reports about phishing, malware, botnets and other malicious activities. Unfortunately it has no support for string searches.

Because CyMon does not allow you to search for a string related to “dridex” it is not an option for contributing to a blocklist.

Open Threat Exchange

The Open Threat Exchange – OTX from Alienvault allows security researchers and threat data producers to share research and investigate new threats. It has a web interface and an API interface.

The web interface allows you to export indicators in CSV, OpenIOC or STIX format.


OTX

The script below allows you to download all the IPv4 indicators for Dridex (at least events with the tag dridex). Just be sure to insert your own API key.

#!/usr/bin/env python

from OTXv2 import OTXv2
from pandas.io.json import json_normalize
from datetime import datetime, timedelta
import re
import os
import sys
import traceback
import argparse

import datetime 
import dateutil.relativedelta

otx = OTXv2("myapi")

previousmonth= (datetime.datetime.now() + dateutil.relativedelta.relativedelta(months=-1)).strftime('%Y-%m-%d')
#pulses = otx.getsince(previousmonth, 100)
pulses = otx.getall()
output = []
for pulse in pulses:
    n = json_normalize(pulse)
    name = n["name"][0]
    indicators = n["indicators"]
    tags = n["tags"][0]
    created = n["created"][0]
    indicator = indicators[0]
    for ind in indicator:
        if ind["type"] == "IPv4":
            for tag in tags:
                if tag == "dridex":
                    print "%s ; %s ; %s ; %s " % (ind["indicator"], created, name, tags)
                    output.append( { 'indicator': ind["indicator"], 'created': created, 'name': name, 'tags': tags} )

#print output

Unfortunately OTX does not have a lot of updated information for Dridex. If you filter for the most recent events (in the code, you have to switch comments for the line with ‘getsince’) then often you get no results. So extracting Dridex IP information from OTX returns either no or at least older information.

OTX is a good option to automatically add indicators to your blocklist. Unfortunately some of the information is older.
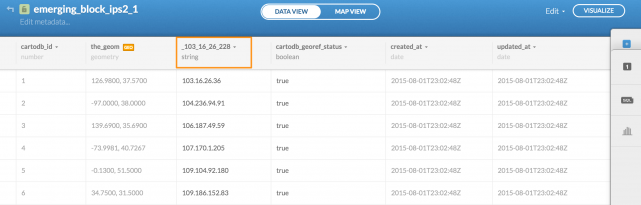
Feodo Tracker

I then used Feodo Tracker. It is a botnet C&C servers tracker, servers related to Dridex are listed version D in their overview.

The IP-blocklist is downloadable as a text file.

##########################################################################
# Feodo IP Blocklist                                                     #
# Generated on 2015-10-31 15:03:43 UTC                                   #
#                                                                        #
# For questions please refer to https://feodotracker.abuse.ch/blocklist/ #
##########################################################################
# START
103.16.26.228
103.16.26.36

The blocklist is also downloadable as a Snort rules file or as a Suricata rules file. The list is fairly regularly updated but also contains some older records (this might cause an issue when IPs are reused).

The Feodo tracker is a good option for automated and updated information.

Malware Domain List

The site Malware Domain List has a list of (older) Dridex IP information. The list for Dridex is not downloadable as a text file.

Because of the outdated information, the list at MDL will not contribute that much to a blocklist.

Emerging Threats

The rulesets at Emerging Threats provide you a list of block rules that can be used with Snort or Suricata.

The rulesets from Emerging Threats provide a good source if you run an IDS (Snort or Suricata).

Conclusion

None of the tested sources provided a comprehensive and easy accessible list of Dridex C2 IP information.

  Dridex via API via GET Recent IP list IDS
VirusTotal            
CyMon            
OTX            
Feodo            
Malware Domain List            
Emerging Threats            

Although a public IP blocklist to protect against further Dridex malware download would make sense it can also introduce other problems. Similar as to VirusTotal were attackers can monitor if new pieces of malware get detected by AVs you give away when an IP, part of the attackers’infrastructure, has been detected. Worst case, the malware gets updated instructions to contact another host, one that is not yet on the blocklist.

If you want to build your own blocklist then

  • start with the information that you get from Feodo tracker
  • combine that information with some manual input from VirusTotal

Ideally you can share your output via a sharing platform as MISP.

Comparing Different Tools for Threat Sharing

I had a guest-posting published at IBM Security Intelligence : Comparing Different Tools for Threat Sharing.

How to use the traffic light protocol – TLP

What is TLP?

The TLP or Traffic Light Protocol is a set of designations designed to help sharing of sensitive information. It has been widely adopted in the CSIRT and security community.

The originator of the information labels the information with one of four colours. These colours indicate what further dissemination, if any, can be undertaken by the recipient. Note that the colours only mark the level of dissemination, not the sensitivity level (although they often align).

Why would you use TLP?

The TLP protocol allows you to share sensitive information and keep control over the distribution of the information.

Usage

Although fairly simple in usage, some visual clarification on how to use the traffic light protocol – TLP doesn’t hurt.

Strong limited, only your peers
My information should remain restricted to the people with whom I share the information directly (only people present in a meeting, participating in a conversation, …).
I use TLP:Red when additional parties outside the direct recipient list can not act on the information.
When recipients do no honor the TLP it would impact my privacy, reputation and have an impact on the operations of my environment.
Limited, only people that act on the information
The recipients can share the information with members of their organization who need to know.
I can amend the TLP:Amber by specifying how relaxed or strong “organization” should be interpreted (department, branch organization, full organization).
I use TLP:Amber when I want people to effectively act upon receiving the information.
When recipients do no honor the TLP it carries some risks for my privacy, reputation or operations.
Relaxed, known by the inner-circle
The recipients can share the information in their sector or organization but it can not be put on a website (or any publicly accessible resource whatsover.
I use TLP:Green when the information is useful for all organizations and their peers in the community.
Open, known by everyone
Everyone can receive my information as long as copyright is included.
I use TLP:White when there’s no foreseeable risk of misuse.

Best practices for sharing IOCs

Use

Ideally if you want to share IOCs where you want people to act on you use TLP:Amber.

TLP:Red or TLP:Amber

Although it might seem tempting to use TLP:Red for something sensitive it can prevent your recipients for doing proper research or alerting in their environment. With TLP:Red you prevent your recipients to inject this information in their team (for all not present during the disclosure) for further analysis. You can use TLP:Red to give a heads-up on a threat but further investigation (and feedback) will be rather limited.

Using TLP:Amber with a constituent restriction (for example ‘only share this with your CSIRT team’) is often far more productive.

You should also take into account when using TLP:Red or TLP:Amber that a lot of network operation centers or abuse-desks have been outsourced. Before sharing an IOC (with Amber) you should ask your recipient who manages their network or sensors.

Be warned that configuring an alert on an appliance could potentially also break TLP:Red. Some appliances share their configuration or ruleset in the cloud (or with the vendor). Before implementing an alert based on TLP:Red information you should check what data gets “phoned-home” by your appliance.

For example if there’s an IP that is been used for an espionage threat you could share the full details of the espionage with your peers under TLP:Red and then share the IP with a more generic description via TLP:Amber.

  • Espionage details : share with TLP:Red with your direct peer.
  • Espionage IP : share with TLP:Amber to request alerting and escalation via the CSIRT.

Don’t get trapped by confusing sensitivity with restriction. If you want information to get acted on sharing it with a restrictive TLP code will limit the usefulness of your information.

TLP:Amber with restriction

The TLP:Amber code is the TLP that is most often used. By defintion it involves sharing information with members of their own organization who need to know, and only as widely as necessary to act on that information.

If you do not define what you understand under organization then it’s up to the recipient to define this. Their definition of ‘organization’ can be different to your understanding of ‘organization’. Ask your recipient to verify with you what’s meant with organization if they have any doubts. As such, try to be as specific as possible when using TLP:Amber.

In practice most CSIRTs will use TLP:Amber with a definition of organization. Most CSIRTs will use “your own CSIRT” as defining the sharing organization but they can also be more relax and use “your NOC”.

As a rule of thumb, if you use TLP:Amber, describe what you mean with “your organization”.

  • Mail Subject: “TLP:Amber New threat on XXX”
  • Mail Body: “TLP:Amber : Organization : is your CSIRT”

Chatham House Rule

The TLP code can also be extended with the Chatham House Rule. Basically this means that anyone who receives the information is free to use it but the receiver is not allowed to provide any attribution.

  • Mail Body: “TLP:Amber TLP:EX:CHR

E-mail

If you send an e-mail where you want to label the information with a TLP code you ideally start the subject with the TLP code. This way your recipient immediately knows how to classify the information.

  • Mail Subject: “TLP:Amber New threat on XXX”

Consequently, almost by definition, sharing information via TLP:Red or TLP:Amber requires you to use encryption (for example GPG) with your peers.

Resources

The TLP protocol is described in detail on the website of US-CERT and CIRCL.

Intro to basic forensic investigation of a hard drive

Basic forensic investigation

For a recent project I had to do a basic forensic investigation of a hard drive. The assignment included two questions :

  1. detect if there were viruses on the system
  2. analyzing the surf behavior of one of the users (policy related)

I want to share the steps that I took to do basic forensics on a cloned disk image. This is not an in-depth forensic investigation but it was enough for this assignment.

The investigation included three machines

  • The laptop (hard drive) to investigate
  • A secure Ubuntu Linux laptop to clone the disk to a disk image, export the image via attached storage and hold a virtual machine
  • A Windows 7 virtual machine (running on the Linux laptop) for the bulk of the investigation. This VM was prepared on an OSX laptop and then finalized on the Linux laptop.

Note that taking into consideration that the original evidence was already contaminated by a prior research, the steps taken were enough for providing “clean evidence”.

Hardware

The device to investigate was a Windows 7 installation on a Lenevo laptop with a Seagate 320GB hard drive.

I disconnected the hard drive and removed it from the laptop.

I used two (one master and one working copy) external storage devices for storing all the investigation details.

Disk image

I connected the hard drive to a laptop running a fresh install of Ubuntu Linux 14.04.2 LTS. I disabled the auto-mount options. This has been described on the Ubuntu wiki. Disabling auto-mounting is necessary to make sure that nothing changes on the original disk. Ideally you use a write-blocker to accomplish this but for this investigation using the read-only option with no mounting on Linux was enough.

The external hard drive showed up as device /dev/sdc. I wanted to create a full disk image, including all the available partitions.

Disk layout

As a first step, for documentation purposes, I listed the disk layout with fdisk.

fdisk /dev/sdc

Print out the layout with the p option.

Disk /dev/sdc: 38913 cylinders, 255 heads, 63 sectors/track
Units = cylinders of 8225280 bytes, blocks of 1024 bytes, counting from 0
Device Boot Start End #cyls #blocks Id System 
/dev/sdc1 * 0+ 38- 39- 307200 7 HPFS/NTFS/exFAT
end: (c,h,s) expected (38,94,56) found (40,184,56)
/dev/sdc2 38+ 36969- 36931- 296647680 7 HPFS/NTFS/exFAT
start: (c,h,s) expected (38,94,57) found (40,184,57)
end: (c,h,s) expected (1023,254,63) found (1023,239,63) 
/dev/sdc3 0 - 0 0 0 Empty 
/dev/sdc4 0 - 0 0 0 Empty

This shows that the Windows hard drive has two partitions, the boot (/dev/sdc1) and the system (/dev/sdc2) partition.

Clone a disk

The easiest way to create full disk images with Linux is with dd.

sudo dd if=/dev/sdc of=/storage/sdc.dd bs=65536 conv=noerror,sync

The options of dd are

  • noerror : continue after read errors
  • sync : use synchronized I/O for data and metadata
  • bs=65536 : write 65536 at a time

This resulted in a full disk image, containing both partitions : boot and system (including the data).

Hash the disk image

In order to guarantee the integrity of the image I made a hash of the image, both with MD5 and SHA1.

md5sum /storage/sdc.dd 
sha1sum /storage/sdc.dd 

Creating a hash of the image file allows you to check in the future that nothing has changed in the original image, preserving the original evidence.

All of this gave me a full forensic clone of the drive image, available under /storage/sdc.dd.

Accessing the image

Now that the full disk image was ready I had to examine it. The majority of the tools available for examining a disk image run on Windows. So I installed a fresh Windows 7 virtual machine and had the dd disk image available via a file share (z:).

One of the easiest tools available to read disk images is FTK Imager. You can use the freely available download of FTK Imager from the website of Access Data.

FTK Imager

With FTK Imager you point it to a disk image and then mount the available drives. In this case it resulted in (Windows) having drive E: and F: available (in read-only modus) for further research. For the remainder of this post :

  • F: is the system drive, retrieved from the disk image
  • E: is the boot partition, retrieved from the disk image

Via FTK Imager you can investigate the files available on the disk but also those that have been deleted (via ‘Unallocated Clusters’) or backed up (in the ‘Volume Shadow Copies’).

Listing users

This investigation focused on a domain user. If you happen to have to do an investigation on a local user it makes sense to document the different user details that you can find in the registry hives.

The user related information can be found in the SAM registry database at [root]\Windows\System32\config\SAM. I use FTK Imager to export the SAM database. Next to the SAM database you’ll also find the SECURITY, SYSTEM, SOFTWARE and DEFAULT database. Do not focus your investigation only on the current registry database. Windows creates backups of the registry in the RegBack directory and these files can also contain useful information.

You can then use FTK Registry Viewer to list the user details.


Registry Viewer

Finding viruses

The first question of the request was to detect if there were any viruses on the system. I used the free version of Avira to scan both the E: and F: device.

The scan via Avira returned a number of possible viruses. I then used Panda Free Antivirus to double check these results. Both scan results had more or less the same hits.

I then used FTK Imager to export the files marked as containing a virus. When you export the files with FTK Imager you can also include the hashes. This results in a CSV file (note, both hashes and filenames are anonimized)

MD5,SHA1,FileNames
"25d6a149ff6010698XXX","XX13d35fe40aaa5a3","\\.\PHYSICALDRIVE1\Partition 2 [289695MB]\System [NTFS]\[root]\Users\xxx\AppData\Local\Temp\xxx.tmp"

Once the files were exported I used the hashes of the files and searched VirusTotal to check the behavior of these files. All files detected by the virusscanners were already previously analyised by VirusTotal. The findings of the two virusscans together with the results from VirusTotal provide a good insight on the nature and impact of the found viruses.

The details from these three sources provided me enough data to answer the first question and backup the answer with proof from the AV- and VT-reports.

Analyze surf behavior

The second question was to check if the surf behavior of a user corresponded with a given policy.

The surf history is available in a number of places (in both deleted and non-deleted files) and depends on the browser being used. Instead of carving all the different files manually I decided to use a tool to do this. I used a trial version of Internet Evidence Finder from Magnetic Forensics. IEF is available as a one month trial version. The trial is great to explore the different features but if you’re going to use it for business purposes you should request a quote.


IEF-Plugins

Within IEF, I enabled all the web-related and operating-system related plugins. This allows you to search for the necessary evidence concerning the ‘web-browsing’. Note that IEF has also plugins for other searches (Skype, Facebook, listing users, P2P, will also reveal other (Skype, Facebook, …).

The first step in IEF requires you to point it to a source. I choose to have it analyze the dd disk image. Because IEF was running in a VM and the disk image was mounted on external storage the analyze process took quite a while.

Once the process is done you have to open the report viewer to see the results. Because IEF reads all the files that were made available via FTK Imager it analyzes both the files normally available on the disk and the deleted files (available via the ‘Unallocated Space’).

For example in the screenshot below you see a record of a visit to Facebook that has been found in the unallocated clusters (meaning the ‘deleted files’).


IEF-Report

IEF returns a database of information found in the different files and a timeline of what happened. The timeline shows you the different actions of the user over time. This is based on different resources like for example the Windows Event Log, the cookies found, the Google Analytics cookies and all other relevant files. Not that this also includes deleted files and files in the Volume Shadow Copies.


IEF

Via IEF I was able to extract the websites that were visited (based on cookies, IE history and Google Analitycs cookies). It allowed me to get a list of web visits per certain category. Combining this information with the timeline gave me the opportunity to reconstruct the web surfing behavior and provide an answer to the second question of the request. I was able to backup the answer with proof by exporting the files that contained the proof (cookies, etc.) via FTK Imager and by exporting the results (in CSV format) from IEF.

Reconstructing events with IEF

Combining the timeline feature with other events allows you to reconstruct in detail what happened prior or after a given timestamp. This is great if you to find out for example what possible visit to a website caused a virus infection.

In an earlier stage I detected the presence of a virus infected file. According to the information from VirusTotal this virus exploited a vulnerability in Java (CVE-2012-1723). With FTK Imager it was possible to detect the “last modified date” (for this case it was in the DOS format field). I then used IEF to zoom in on the actions that happened just before that timestamp. According to the data found in Google Analytics Referral I found out that the user did a search via Yahoo. The same timestamp then showed, via Google Analytics Session and Google Analytics First Visit a visit to a website from the search results. This was confirmed with the timestamp when the cookie was set in the Internet Explorer Cookie database. A couple of seconds after the creation of the cookie the timeline revealed entries in the Windows Event Log. These entries describe how java.exe was started.

<ExePath>C:\Program Files (x86)\Java\jre6\bin\java.exe</ExePath>

I reconstructed the event time line as follows :

  1. Get last modified date from virus via FTK Imager
  2. Use Internet Evidence Finder to zoom in on the timeline a couple of seconds before the last modified date timestamp
  3. Use Google Analytics Referral to extract the user web action (a Yahoo search)
  4. Use Google Analytics Session and Google Analytics First Visit to confirm visit to one of the search results
  5. Confirm the visit with data present in the Internet Explorer Cookie database
  6. Add the different Windows Event Log entries

These series of events make it very likely that the virus was installed by visiting one of the sites from the search results.

Note that some of these entries (espc. the Google Analytics cookies) were found in the Volume Shadow Copies. This shows you that you have to look in every information resources available.

If you want to learn more about extracting information from Google Analytics cookies then you should definitely read the blog posting Carving for Cookies: Supersize your Internet History Timeline using Google Analytic Artifacts.

Summary

This project gave me a short insight in doing a basic forensic research and provide an answer on two simple questions. In short I followed these steps

  • Make the image with dd
  • Mount the image to Windows drives with FTK Imager
  • Scan the system with a virus scanner
  • Export files that need to be analyzed with FTK Imager
  • Use VirusTotal to check the behaviour of potential viruses
  • Combine antivirus and VirusTotal reports
  • Analyze the web behavior with Internet Evidence Finder
  • Use data from unallocated space, shadow copies and non obvious cookies
  • Use a timeline to zoom in on infection dates
  • Extract all the files of interest, include the timestamps, file hashes, the location where they were found and how you extracted them

Split terminal on OSX

OSX Terminal

I use Apple OSX for my day-to-day work. Because of my background with Linux and OpenBSD the OSX Terminal application is my most “popular” application.

Because I got spoiled with the ease of use of screen on Linux devices and the basic Terminal app on OSX is fairly limited in feature-set I was looking for an alternative that runs natively on OSX and provides similar features to screen.

TMUX

TMUX is a terminal application that allows you to use different split panes and windows. It’s also available on OSX via Homebrew

brew update
brew install tmux

It’s a great tool but it doesn’t integrate that nicely with OSX. You can configure it with the ~/.tmux.conf to your prefered environment. But even then it doesn’t feel quite right. For example for scrolling you have to go through a lot of hoops.

So tmux is great if you stick to Linux but not that great if you run OSX natively.

My main feature request was having a terminal that runs smoothly and supports transparancy with split terminal on OSX.

iTerm2

Enters iTerm2. It’s a native OSX app that allows you to run split terminals easily, with scrolling and all the OSX GUI-gimmick support built-in.


split_panes_full

iTerm2 dims the pane that is inactive which gives you immediate visual feedback on your active console. It alllows you to define different profiles. It has support for transparent terminal windows (great if you want to debug a running app).

You can easily split the console window with Command + D or ShiftCommand + D.

iTerm2 also allows you to define a set of shortcuts and integrates the “select and copy” that I’ve been used to from working with Linux devices.

It is a free download. If you plan on using it intensively you might consider donating to the author.

So far I replaced the default OSX Terminal app with iTerm2 and I’ve not discovered any issues. It makes running terminal windows from OSX far more easier and convenient.

DNSSEC in Europe

DNSSEC

The Domain Name System Security Extensions (DNSSEC) is a suite of specifications for securing certain kinds of information provided by the Domain Name System (DNS) used in IP networks.

It does not solve every security problem related to DNS but it will protect users from cache poisoning and other malicious DNS attacks. See DNSSEC FAQs for more info. And implementing DNSSEC is also a great excuse to finally clean up your DNS zones …

As such, if you have a domain used for a website that is important to your constituency you should implement DNSSEC.

DNSSEC in Europe

I wanted to get an overview of the DNSSEC situation in Europe. Instead of verifying the DNS records by hand (see for example the Debian Wiki) I used an online resource to do this.

I primarily used DNSViz, a tool for visualizing the status of a DNS zone. You can double check the results with another online tool (from Verisign) dnssec-debugger.

Data sources

I started with the list of European Countries and used the sites listed under Government to get the list of the “Official” government website for the different countries.

Besides getting the results for the official government websites I also included the results for the top level domain for that country. This was easy because DNSViz by default shows the entire chain, including the TLD. Note that in most cases the organization running the TLD is not the same as the organization running the official websites for their governments.

I based my results on the Status flag returned by DNSViz. A status of SECURE meant “supporting DNSSEC”, a status of INSECURE meant “not supporting DNSSEC”. I disregarded some of the DNSSEC errors that where shown by DNSViz.

DNSSEC results

The results of the different queries can be found in the table below

Country Government Domain TLD
Austria gv.at .at
Belgium belgium.be .be
Bulgaria government.bg .bg
Croatia vlada.hr .hr
Cyprus gov.cy .cy
Czech Republic vlada.cz .cz
Denmark denmark.dk .dk
Estonia valitsus.ee .ee
Finland valtioneuvosto.fi .fi
France gouvernement.fr .fr
Germany bundesregierung.de .de
Greece gov.gr .gr
Hungary magyarorszag.hu .hu
Ireland gov.ie .ie
Italy governo.it .it
Latvia gov.lv .lv
Lithuania lrv.lt .lt
Luxembourg gouvernement.lu .lu
Malta gov.mt .mt
Netherlands government.nl .nl
Poland polska.pl .pl
Portugal gov.pt .pt
Romania gov.ro .ro
Slovakia gov.sk .sk
Slovenia gov.si .si
Spain gob.es .es
Sweden government.se .se
United Kingdom gov.uk .uk

DNSSEC Findings

In summary this means that out of the 28 EU countries tested, only 7 countries had DNSSEC support for the domain for their government websites and 23 EU TLDs had DNSSEC support.

This means that only 25% of the domains used for the European government websites support DNSSEC. In contrast, more than 82% of the European TLDs already support DNSSEC.

The TLDs of

  • Cyprus
  • Italy
  • Malta
  • Romania
  • Slovakia

fail to support DNSSEC.

As of this moment only the government websites of

  • Czech Republic
  • Estonia
  • Greece
  • Netherlands
  • Spain
  • Sweden
  • United Kingdom

support DNSSEC.

Conclusion

Although DNSSEC is not straightforward to implement it is rather astonishing to see that only 25% of the government websites support DNSSEC for their domain. Furthermore it is remarkable to see the discrepancy between the number of TLDs already supporting DNSSEC and the lack of implementation of DNSSEC with the (local) government domains.

ENISA has published -in 2010- a Good practices guide for deploying DNSSEC. The European government websites should address the security shortcomings of DNS by implementing this advice.

Belgian banks

I was also interested in the results of some of the Belgian banks. Unfortunately none of the Belgian banks support DNSSEC.

Bank Site
Argenta argenta.be
KBC kbc.be
Belfius belfius.be
BNP Paribas bnpparibas.com
ING ING

Sync a github.com forked repository

Introduction

I have a couple of forked git repositories. When I want to add custom code it’s useful to get the latest available code from the “original” repository. Before I can do that I have to sync my fork with the latest available code.

The steps to do this are explained extensively in the Github help, this is merely a placeholder for my own documentation.

Some online resources

Configuring a remote for a fork

The first step that you will have to take is to add the remote repository as an ‘upstream’ repository.

git remote add upstream https://github.com/ORIGINAL_OWNER/ORIGINAL_REPOSITORY.git

Check that it has been added with

git remote -v

Sync the fork

Once the remote authoritative repository has been added as upstream you’ll have to sync from the upstream code.

git fetch upstream
git checkout master
git merge upstream/master

Once this is done you can update your local repository with Github and you’ll have an updated version.

Visualising IP data with CartoDB

Visualising

A picture is worth a thousand words. This is even more true for visualising security events.

There are different ways for visualising the source of security events. For example with the use of Kibana and Maxmind GeoIP it is possible to map security events on a world map.

Sometimes you don’t want to go through the entire chain of processing events and mapping them on a world map.

I found an easy way to map -static- IP based data on a map.

CartoDB

CartoDB is a web service that allows you to transform your data into a visual format. It is a free service for public datasets.

Once you have signed up to an account you can create your own maps.

For this example I want to draw the IPs from a blocklist provided by Emerging Threats.

Build a map

Datasource

When you’ve signed in to CartoDB you have to add a datasource. For this exercise I used the emerging-Block-IPs.txt. The first lines of the block list contain comments. I suggest you remove these comments in your editor. This allows you to have a clear view on the imported data.

Importing a data source is easy. Do this via Maps -> Your Datasets and then click New Dataset. Scroll down to select a file. Select the downloaded Emerging Threats Block list. Once selected, choose Connect Dataset and have ‘Let CartoDB automatically guess data types and content on import’ enabled. Then use Connect Dataset. During the upload you’ll notice that CartoDB is busy mapping the IPs to their geo-location.


CartoDB-1

Once the file is uploaded you’ll get an overview of the first rows of data. Now switch to the column that contains the IP data and change its label to something meaningful. By default it contains the first row data but in this case you’d probably want it to be called IP.

Map

Once that is done, click on the button Visualize (upper right corner) and choose to create a map. Then choose the Map View button to get a map view of the IPs found in the block list.

If you click a dot in the map you’ll probably get a message that there are no fields selected. In order to solve this click Select Fields and enable Title. Once this is done you’ll get shown the IP corresponding to the different dots on the map when you hoover / click on them.


CartoDB-2


CartoDB-3

Conclusion

The CartoDB web service provides an easy way to visualize the sources of events on a world map. It might not provide all the details (drill down) that you have available via for example Kibana but it’s an excellent addition to your investigation arsenal for getting quick results.

As an example, this is the map based Emerging Threats Block-DB from 2-Aug-2015.

Use EvtxParser to convert Windows Event Log files to XML

Convert Windows Event Log files to plain text

For a recent project I had to convert Windows Event Log files from a Windows machine to a plain text file. To accomplish this I used the EvtxParser tools from Andreas Schuster

It is a set of Perl files that you can run against the Event Log files.

Install EvtxParser

EvtxParser is written in Perl. So obviously, you need Perl. On Ubuntu you need the extra packages libdatetime-perl and libcarp-assert-perl.

sudo apt-get install libdatetime-perl libcarp-assert-perl

You also need to install two extra CPAN packages :

perl -MCPAN -e shell
install Digest::CRC
install Data::Hexify

Download EvtxParser :

wget http://computer.forensikblog.de/files/evtx/EvtxParser-current.zip
unzip EvtxParser-current.zip

This will result in a directory Parse-Evtx-x.x.x. The next step is to compile and install.

cd Parse-Evtx-1.1.1
perl Makefile.PL
make
sudo make install

On this machine, I have all the custom installed Perl code located in one specific location. Running EvtxParser resulted in an error.

Can't locate Parse/Evtx.pm in @INC (you may need to install the Parse::Evtx module) (@INC contains: /etc/perl /usr/local/lib/perl/5.18.2 /usr/local/share/perl/5.18.2 /usr/lib/perl5 /usr/share/perl5 /usr/lib/perl/5.18 /usr/share/perl/5.18 /usr/local/lib/site_perl .) at ./evtxdump.pl line 51.

To solve this I have to set the PERL5LIB which will add the path to find the necessary libraries to the @INC variable.

export PERL5LIB=/usr/local/perl5sources/lib/perl5/

EvtxParser components

EvtxParser consists of these tools

  • evtxdump.pl : transform an event log file into textual XML
  • evtxinfo.pl : determines information about a Windows XML EventViewer Log
  • evtxtemplates.pl : display the XML templates that are defined in a log file

Where do you find the Windows Event Log files?

The Event Log files are located in a directory

C:\Windows\System32\winevt\Logs

and they contain files like Application.evtx, Microsoft-Windows-Dhcp-Client%4Admin.evtx, Microsoft-Windows-UAC%4Operational.evtx, …

Either you have to mount the Windows partition in your Linux host running EvtxParser or copy them manually.

EvtxParser output

The output of running evtxdump.pl against the System log looks like this

./evtxdump.pl /var/www/WinLogs/Logs/System.evtx | head -n 40
<?xml version="1.0" encoding="utf-8" standalone="yes" ?>
<Events>
<Event xmlns="http://schemas.microsoft.com/win/2004/08/events/event">
<System>
<Provider Name="EventLog" />
<EventID Qualifiers="32768">6011</EventID>
<Level>4</Level>
<Task>0</Task>
<Keywords>0x0080000000000000</Keywords>
<TimeCreated SystemTime="2014-02-24T20:58:02.0Z" />
<EventRecordID>1</EventRecordID>
<Channel>System</Channel>
<Computer>37L4247F27-25</Computer>
<Security /></System>
<EventData>
<Data>[0] 37L4247F27-25
[1] WIN-N4F92N5R9U7</Data>
<Binary></Binary></EventData></Event>
<Event xmlns="http://schemas.microsoft.com/win/2004/08/events/event">
<System>
<Provider Name="EventLog" />
<EventID Qualifiers="32768">6009</EventID>
<Level>4</Level>
<Task>0</Task>
<Keywords>0x0080000000000000</Keywords>
<TimeCreated SystemTime="2014-02-24T20:58:02.0Z" />
<EventRecordID>2</EventRecordID>
<Channel>System</Channel>
<Computer>37L4247F27-25</Computer>
<Security /></System>
<EventData>
<Data>[0] 6.01.
[1] 7601
[2] Service Pack 1
[3] Multiprocessor Free
[4] 17514</Data>
<Binary></Binary></EventData></Event>
<Event xmlns="http://schemas.microsoft.com/win/2004/08/events/event">
<System>
<Provider Name="EventLog" />
...

Client side certificate authentication

Secure communication

TLS (Transport Layer Security) and its predecessor SSL provide secure communication over a computer network. The most common use for TLS/SSL is for establishing an encrypted link between a web server and a browser. This allows you to guarantee that all data passed between the browser and the web server is private and not tampered with.

You can use certificates on both sides, the server side and the client side.

Server side verification

Web site certificates, or server side verification, allow a user to verify that the browser is connecting to the correct web site.

You can get web server certificates from different providers. Most SSL providers have extensive documentation on how to configure your web server with certificates. In this post I’ll mostly focus using on client side certificates.

Certificate Request

Basically what you have to do is generate a certificate request (a .CSR file) and send this to your certificate vendor. They will then send you a certificate file (a .CRT). You will also have to download the certificate chain file (also a .CRT) from your provider.

Apache SSL configuration

Once you get the certificate file you have to configure Apache. In the virtual host that you want to protect you need to enable SSL and point it to the certificate file, the private key file and the certificate chain file.

SSLEngine on
SSLCertificateFile /etc/apache2/mycertif/mycertif.crt
SSLCertificateKeyFile /etc/apache2/mycertif/mycertif.be.key
SSLCertificateChainFile /etc/apache2/mycertif/myproviderCA.crt

Do not forget to restart Apache after you have changed the configuration.

Client side verification

Another interesting feature of certificates is that you can use them to authenticate users. Instead of having a database of usernames and passwords you provide your users a certificate. They will then need to import it in their browser and can use that certificate to authenticate themselves with your web site.

A certificate is not a bullet proof solution. If you are able to steal the certificate, or have access to the browser, then you can impersonate the certificate owner. Modern malware sometimes tries to steal certificates from the browser. If a certificate gets stolen then the administrator (certificate authority) has to revoke the certificate and issue a new one.

Certificates are issued by CAs, certificate authorities. This is both the case for server side and client side certificates. Because there are not a lot of certificate providers that let you generate client certificates I decided to generate them myself. This meant setting up my own CA.

Build your own CA

You can setup your own CA and issue certificates with openssl.

Because anyone having access to your certificate CA files will also be able to generate their own certificates impersonating your CA it is important to limit access to these files. First setup a separate directory /etc/apache2/myca/ that will contain the CA and configuration files. Make sure that this directory is not easily accessible (restrict access to root only).

mkdir /etc/apache2/myca
chown root:root /etc/apache2/myca
chmod 700 /etc/apache2/myca

Now we have to create the openssl.cnf configuration file. Do this in the directory /etc/apache2/myca.

[ req ]
default_md = sha1
distinguished_name = req_distinguished_name

[ req_distinguished_name ]
countryName = Country
localityName = Locality
organizationName = Organization
organizationalUnitName = Unit
emailAddress = emailaddress
commonName = Common Name

[ certauth ]
subjectKeyIdentifier = hash
authorityKeyIdentifier = keyid:always,issuer:always
basicConstraints = CA:true

[ client ]
basicConstraints = critical,CA:FALSE
keyUsage = digitalSignature, keyEncipherment, dataEncipherment
extendedKeyUsage = clientAuth

The next step is to generate the self signed certificate CA. It is valid for 3650 days and stored in ca.cer. We’ll use it to issue the client certificates.

openssl req -config ./openssl.cnf -newkey rsa:2048 -nodes -keyform PEM -keyout ca.key -x509 -days 3650 -extensions certauth -outform PEM -out ca.cer

You’ll then get a couple of questions to answer. It doesn’t really matter what you enter but because some of the information is returned when verifying a certificate it makes sense to provide something meaningful.

Generating a 2048 bit RSA private key
...

Country []:BE
Locality []:Brussels
Organization []:MyOrg
Unit []:MyDpt
emailaddress []:ca@myorg.be
Common Name []:MyOrg CA

This is all that is needed to setup your own CA. The CA certificate is stored in ca.cer, the private key in ca.key.

Client certificate

Now we take on the role of a user requesting a certificate. First step is to generate a private key

openssl genrsa -out client.key 2048

This generates a 2048 bit private key stored in the file client.key.

Now generate the certificate signing request. This will result in the .req file holding the request.

openssl req -config ./openssl.cnf -new -key client.key -out client.req

Similar to generate the certificate CA you have to provide some certificate information. Make sure that you uniquely specify a Common Name (the ‘real name’ of the certificate holder) and correctly set the email address, organization and optionally the unit. Remember that in this phase you are acting as the user requesting a certificate, you are not acting as the CA.

You are about to be asked to enter information that will be incorporated into your certificate request.
...

Country []:BE
Locality []:Brussels
Organization []:MyOrg
Unit []:MyDpt
emailaddress []:koen.vanimpe@myorg.be
Common Name []:Koen Van Impe

Now that you have created a certificate signing request you have to take the role of the CA again and issue a client certificate. The client certificate will be stored in the client.cer file.

openssl x509 -req -in client.req -CA ca.cer -CAkey ca.key -extfile openssl.cnf -extensions client -days 365 -outform PEM -out client.cer -CAcreateserial -CAserial serial.seq

Note that the command above takes care of generating unique serial numbers (CAcreateserial). The serials are stored in a file serial.seq (CAserial).

The last step is to convert this client certificate into something that can be used by the user. Users can import certificates in the browser in PKCS#12 format. This means we have to convert the .cer file into a .p12 file.

openssl pkcs12 -export -inkey client.key -in client.cer -out client.p12

You’ll be prompted to enter a password. This password is needed to “unlock” the certificate to make sure that not everyone who is able to intercept the certificate during transport is able to use it. Remember to transmit this password to the users in a separate communication, do not put it in the same communication that you use to transmit the certificate!

When users wants to import the certificate into their browser they will have to enter this password. Note that once the certificate is imported into the browser they will no longer have to supply the password. It’s one time only.

Certificate flow summary

  • Setup a CA
    1. Generate self signed CA
  • Client request
    1. User creates private key
    2. User generates certificate signing request
    3. User submits request to CA
  • CA receives request from user
    1. Issue certificate
  • User converts certificate to a p12 file
    1. Combine certificate and private key into PKCS#12 format

Apache configuration

Now that you have issued the client certificate it’s time to configure Apache to support client certificates.

The core of the configuration lies in SSLVerifyClient, SSLCACertificateFile and SSLVerifyDepth. You set the certificate verification level with SSLVerifyClient and with SSLCACertificateFile you list the file containing the certificates of the allowed CAs. With SSLVerifyDepth you define how deeply the verification should go before deciding a certificate is valid or not.

SSLVerifyClient require
SSLCACertificateFile /etc/apache2/myca/ca.cer
SSLVerifyDepth 10
CustomLog ${APACHE_LOG_DIR}/access.log "%h %l %{SSL_CLIENT_S_DN_Email}x %t \"%r\" %>s %b \"%{Referer}i\" \"%{User-agent}i\""

<Location />
SSLOptions           +FakeBasicAuth +StrictRequire
SSLRequire ( %{SSL_CIPHER} !~ m/^(EXP|NULL)-/ and %{SSL_CLIENT_S_DN_O} eq "MyOrg" and %{SSL_CLIENT_S_DN_OU} eq "MyDpt")
</Location>

As you can see in the config file I also added a custom log handler, CustomLog. This allows you to track which users connected. In this case I used SSL_CLIENT_S_DN_Email but you can also use SSL_CLIENT_S_DN_CN.

The Location part limits who can access the website. With SSLRequire you can limit access based on couple of certificate parameters. You can for example limit on organization (SSL_CLIENT_S_DN_O), organizational unit (SSL_CLIENT_S_DN_OU) but also on the supplied user name (common name, SSL_CLIENT_S_DN_CN).

Debugging client certificate access

LogLevel

By default the Apache log file will not return that much useful information when something does not work as expected with client side certificate authentication. You should increase the log level to get more verbose information. Add this to the Apache configuration

LogLevel debug

SSL3_GET_CLIENT_CERTIFICATE

I configured client certificate authentication with personal certificates received from www.digicert.com. This worked fine with Chrome and Safari but failed when using Firefox.

Although the allowed CA was properly set I got this error message

SSL Library Error: error:140890C7:SSL routines:SSL3_GET_CLIENT_CERTIFICATE:peer did not return a certificate -- No CAs known to server for verification?

In order to solve the problem, I had to merge the certificate CA file and the certificate chain file into one file. For using client certificates with www.digicert.com this meant

cat TrustedRoot.crt >> MergedCA.crt 
cat DigiCertCA.crt >> MergedCA.crt

and pointing SSLCACertificateFile to MergedCA.crt