Submit malware samples to VMRay via MISP

Extending MISP

I’m a happy user of MISP, Malware Information Sharing Platform & Threat Sharing. MISP core already contains a lot of features to satisfy your needs when it concerns threat and information sharing. But there’s always room for improvement. If you submit a feature request, MISP can be extended with your request. However changing the core is not always desirable. Also sometimes you want some feature to work just the way you want it, this doesn’t always correspond with how other users envision the working of MISP.

This is where the MISP module extensions can help : https://github.com/MISP/misp-modules/. MISP modules

  • are a way to extend MISP without altering the core
  • allow you to get started quickly without a need to study the internals
  • are in a programming friendly language – Python

For a starter on using MISP modules read

In this post I’ll walk you through on how to integrate VMRay, automated malware analysis for CERTs and MISP. The VMRay MISP module connector has been pushed recently to the repository.

Different types of MISP modules

There are three main types of modules that can extend the features of MISP

  • extension (1) : a module to extend an attribute, this type is most visible in the interface by the use of a “*” next to an attribute that can be extended, note that the extension can also be added as one or more proposals. Some extension modules can also be accessed by hovering above the attribute (VMRay is not meant to be used via hovering though)
  • import (2) : populate a MISP event by importing external data
  • export (3) : export MISP event data

misp_modules_ui

Installing MISP modules is outside the scope of this blog, basically you have to clone the repository, run the pip3 install script and start the python script.

Configuring VMRay MISP modules

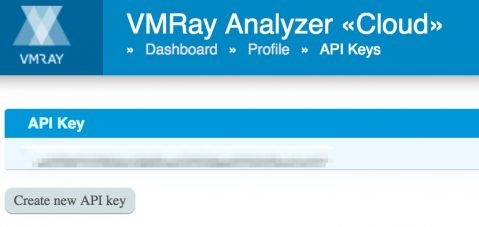
You need two things for the VMRay connector to work : an API key and the URL of your VMRay instance. If you use the cloud version of VMRay the URL will be : cloud.vmray.com.

The API key is something you get via the VMRay interface. Log in to your VMRay account, navigate to your Profile and then click on VMRay API keys. If there’s no API key displayed click on Create new API key.

vmray_api

The VMRay MISP connector consists of two modules

  • vmray_submit : to submit a sample to VMRay, works as an extension module
  • vmray_import : to import the analysis data from VMRay, works as an import module

Because these are two separate modules there is something of a configuration quirk : you need to add the VMRay URL and API key twice, once for each type of module.

Enable MISP enrichment service

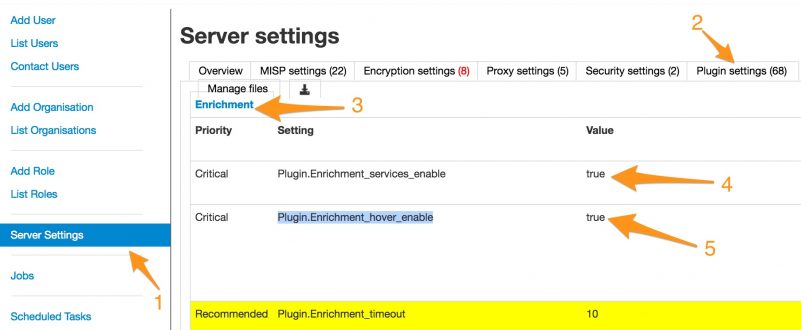
First you have to enable the MISP extension service

  1. Go to Administration
  2. Server settings (1)
  3. Plugin settings (2)
  4. Enrichment ((3)
  5. Set Plugin.Enrichment_services_enable to True (4)
  6. If you want to enable extensions by hovering above an attribute (only for modules that support it, not VMRay), then set Plugin.Enrichment_hover_enable to True (5)
  7. Reload the server settings page

Do not forget to start the Python script that runs the back-end of the modules. If this script/service isn’t running you won’t be able to use the external modules.

misp-modules$ sudo -u www-data misp-modules -s

enable_extensions

Enable VMRay submit module

Once this is done (make sure you reload the page), on the settings page, scroll down until you find the VMRay submit module

  1. Set Plugin.Enrichment_vmray_submit_enabled to True
  2. Reload the settings page
  3. Add your VMRay API key in Plugin.Enrichment_vmray_submit_apikey
  4. Add the VMRay URL in Plugin.Enrichment_vmray_submit_url (for cloud use: cloud.vmray.com)

There are two other settings that are important to consider when uploading samples

  • Enrichment_vmray_submit_shareable : share (for example with VirusTotal) the sample
  • Enrichment_vmray_submit_do_not_reanalyze : do not re-analyze a previously analyzed sample

Enable MISP import services

Now you’ll have to do the same configuration steps, but this time for the import modules service. It is also best to change the import service time out setting to something more reasonable :

  1. In the Server settings, Plugin settings choose Import
  2. Set Plugin.Import_services_enable to True
  3. Reload the settings page

Enable VMRay import module

Update the time out, enable the VMRay module and configure both the API key and the URL.

  1. Change Plugin.Import_timeout to 75
  2. Set Plugin.Import_vmray_import_enabled to True
  3. Reload the settings page
  4. Add your VMRay API key in Plugin.Import_vmray_import_apikey
  5. Add the VMRay URL in Plugin.Import_vmray_import_url (for cloud use: cloud.vmray.com)

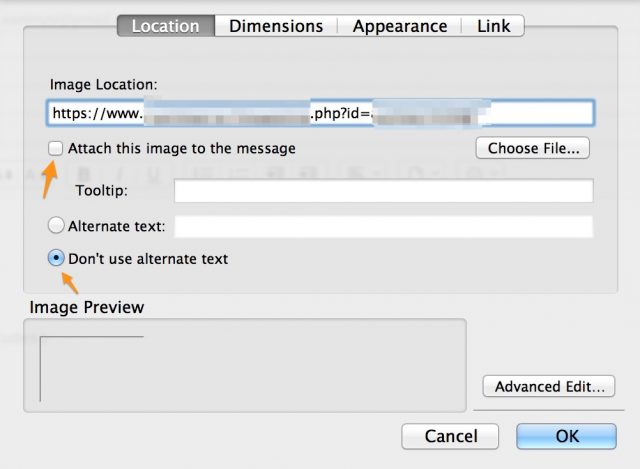
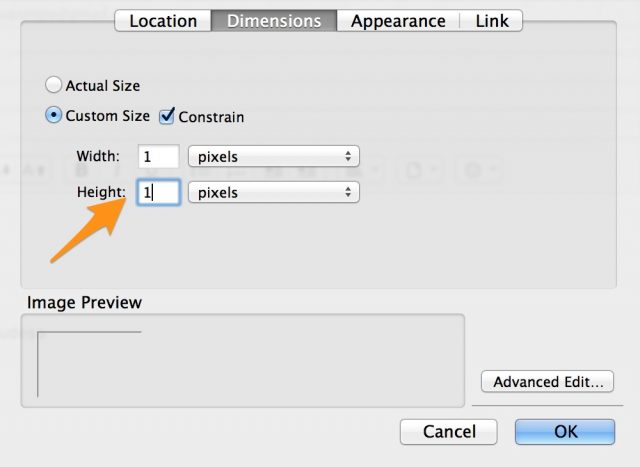
Adding an attachment or malware sample to MISP

The first thing you want to do is submit a sample to VMRay. This is done by submitting the sample that is attached as an attribute to a MISP event.

MISP supports two types of attachments. Regular attachments that are uploaded via “Payload delivery” or “Antivirus detection”. For these attachments the IDS flag will not be set. The attachment is also available from the event as a direct download via the MISP interface. The other type of attachment is Malware sample. These can be attached to an event via “Artifacts dropped” or “Payload installation”. MISP will set the IDS flag and add the file hashes of the upload. These samples are not directly available as a download, they are put in a password protected (infected) ZIP file.

The submit module is able to handle both types of attachments. Regular attachments are sent straight to VMRay whereas a malware sample is extracted from the ZIP file and then submitted.

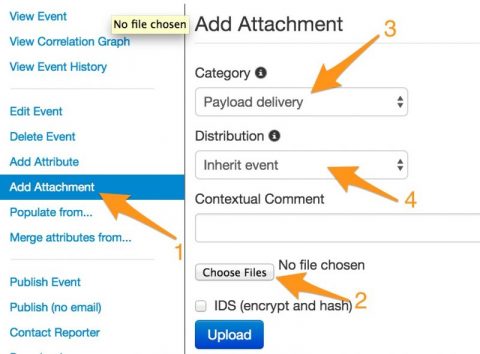
To add an attachment, go to the event

  1. Click Add attachment (1)
  2. Choose the file (2)
  3. The attachment type (3)
  4. The distribution level (4)

add_attachment

Submit sample to VMRay

Once the above is done, the attachment or malware sample should show up as an attribute in your event. If the extension module service is working there should now be a “*” next to the added attribute.

If you click the “*”, you get a list of extension modules capable of working with this attribute type. If the VMRay submit module is enabled, the popup list should include vmray_submit.

misp_submit

If everything goes well, you’ll then get an overview of the results of the submission.

misp_submit_result

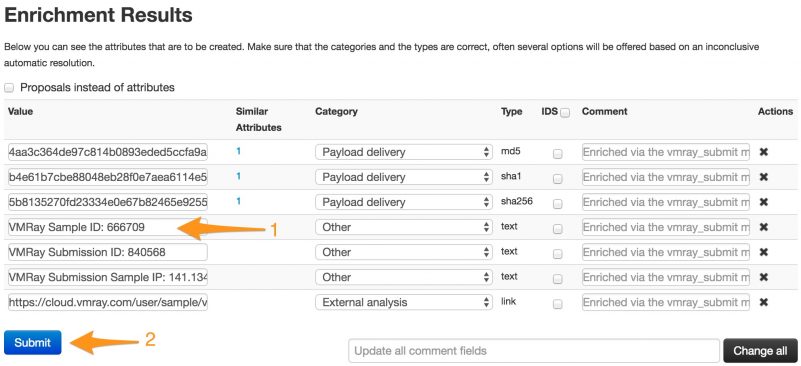
The screen contains one field that is important : VMRay Sample ID (1). You will need to note the ID and use that sample ID later on to retrieve the results of the VMRay analysis. Unfortunately there is (yet) no automated way to go from submit sample to import results.

Then click on the Submit (2) button to add the attributes to your event.

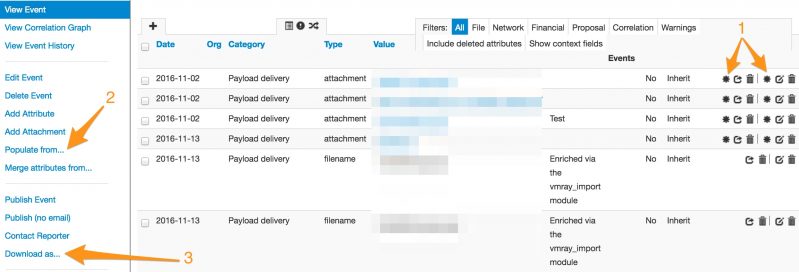
Import the results from an analysis

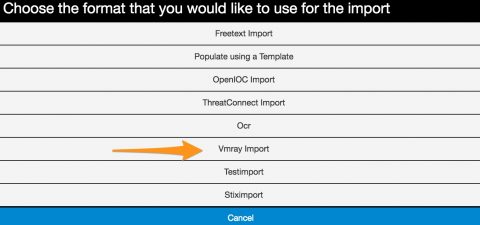
When VMRay has finished with the different analysis jobs you can import the results back into MISP. To do this use the menu Populate From …. You will then be presented with a choice of available import modules, obviously you have to choose vmray_import.

vmray_import

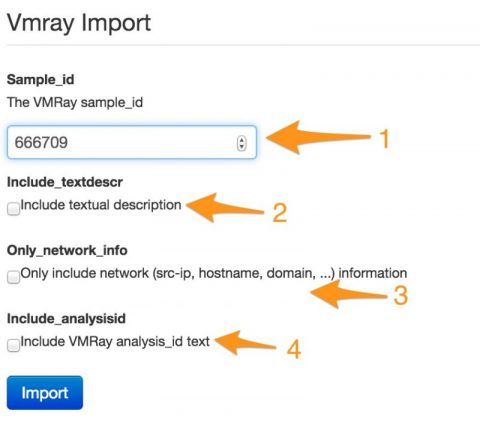
The next screen requires you to enter the sample id (1), along with options for what data you want to import. By default the import module will add the IOCs that were returned from VMRay. This includes network information, mutex, filenames and registry. If you prefer to have some context with these IOCs you can include a textual description (via include_textdescr) of what was found or happened during the analysis. If you are interested in the analysis jobs executed by VMRay then enable include_analysisid.

Make sure you have set a reasonable time out for the import module as fetching the results can take a couple of seconds.

vmray_import_sample

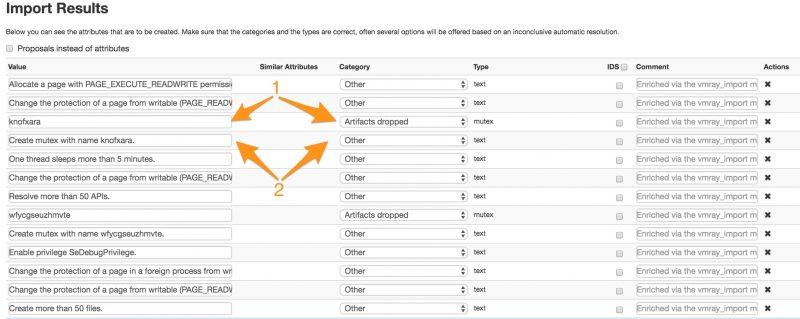
When the import module has finished fetching the results you get an overview of all the IOCs (1) that were found. If you enabled the option for textual description you also get a meaningful explanation of what happened. Textual descriptions are added as a “text” attribute to a MISP event.

Don’t be afraid of adding the same attribute multiple times to an event. MISP checks if an attribute already exists and will prevent you from creating doubles.

vmray_import_result

Conclusion

The VMRay modules is an example how relatively easy it is to extend MISP with external services.

What’s next to come? In a future post I’ll describe how PyMISP, MISP, VMRay, LOKI and your IDS can be chained to do incident response and basic forensic research.

The Krebs Attack: Sign Of A Game Changer

I published an article on The Krebs Attack: Sign Of A Game Changer on the Ipswitch blog.

This article lists the new wave of large scale DDoS attacks against KrebsOnSecurity and OVH and how the release of the Mirai botnet source code can leverage new attacks. I describe how this influences the risks you have to take into account when protecting your infrastructure.

Mail image trap

Setting up a mail image trap

For a recent engagement I had to check if an e-mail was opened (or viewed) by a user. The idea was to get a notification if an e-mail was read, without having access to the e-mail infrastructure.

There are different ways and tools to do this. The available time was limited and because the target environment has HTML e-mail set as default I choose a very straightforward approach : “include a 1 pixel image with a call to a remote server”. This is fairly easy to detect for security conscious users but works fairly well with “average” users.

The goal was not to uniquely identify the users that opened the e-mail, but merely check if the e-mail was opened.

The image trap

A very simplistic script catches the request for an image. I added a basic safety feature that requires a parameter to be set. It’s “security through obscurity” but it prevents the alert being triggered when someone (for example a web crawler) accesses the page.

You have to save the script under a name that’s meaningful to you (for example bigbrother.php) and make it available on a web server.

As a reminder : this script does not uniquely identify which user opened the e-mail (except maybe for the remote IP address included in the alert).

<?php

$mail_rcpt = "<mymail>";
$mail_subject = "Mail Trap Hit";
$run_pw = "123321";
$run_id = "id";

if ($_GET[$run_id] == $run_pw) {
    $output = date(DATE_RFC2822)."\n";
    $output .= "\nSERVER\n---------------\n";

    foreach($_SERVER as $key => $value) {
        $output .= $key . " = " . $value . "\n";
    }

    $output .= "\nREQUEST\n--------------\n";
    foreach($_REQUEST as $key => $value) {
        $output .= $key . " = " . $value . "\n";
    }

    mail( $mail_rcpt, $mail_subject, $output);
}

?>

Composing the e-mail

I used Thunderbird to send the e-mail, with “Compose messages as HTML” as default. Create a new message and then add the image.

Add image

Add the URL to the script that handles the alert. Make sure you disable the option to attach the image to the message and do not provide an alt-text.

Image details

Now change the dimensions of the image to 1×1 pixel.

imagedimensions

The next thing is to add some enticing subject, e-mail content and the recipient and click send.

Thunderbird warning

The target environment used Outlook. If you use Thunderbird to open such a message you will receive a warning message that the e-mail contains remote content.

Thunderbird warning

Conclusion

This technique is not something shocking new, it’s making use of one of the features of HTML e-mail. It worked well for my goal but you might have to use something more clever for tracking unique users, like for example the The Social-Engineer Toolkit (SET).

Proxy server logs for incident response

Proxy server logs for incident response

When you do incident response having access to detailed logs is crucial. One of those treasure troves are proxy server logs.

Proxy server logs contain the requests made by users and applications on your network. This does not only include the most obvious part : web site request by users but also application or service requests made to the internet (for example application updates).

Ideally you have a transparent proxy, meaning that all outgoing requests are redirected by a firewall to a proxy. Unfortunately not all applications behave properly when they have to go through a proxy. As a result, in a lot of corporate environment you’ll find the use of a proxy being forced to users or applications via a configuration setting. If you’re using PAC files for proxy configuration then now might be a good time to read the notification on Proxy auto-config (PAC) files have access to full HTTPS URLs.

It would be a shame if you have proxy server logs for incident response only to find out that they do not contain the information that you need during an investigation. This post contains some of the settings you should take into consideration when configuring your proxy server.

Configuring proxy server logs for incident response

Time synchronization

If you try to reconstruct a timeline then correct timestamps are crucial. So make sure that your proxy server is NTP-synchronized. Also make note of the timezone being used for logging. Ideally you use UTC.

Log retention

A lot of security incidents are detected long after the initial compromise took place. If you can afford the storage you should keep proxy logs for a relatively long time (this means years, not weeks or months). If you don’t have enough storage you can include logs in the backup procedure and restore them if you conduct an investigation. Make sure that logs (and backups) are properly protected (access and integrity). According to Mandiant the median number of days that attackers were present on a victim’s network is 146 days (320 days for data breaches with external notification and 56 days with internal discovery).

Proxy log settings

Proxy server logs should track the below information for being useful during an investigation :

  • Date and time
  • HTTP protocol version
  • HTTP request method
  • Content type
  • User agent
  • HTTP referer
  • Length of the content response
  • Authenticated username of the client
  • Client IP and source port
  • Target host IP and destination port
  • Target hostname (DNS)
  • The requested resource
  • HTTP status code of reply
  • Time needed to provide the reply back to the client
  • Proxy action (from cache, not from cache, …)

Alerts on proxy server entries

Besides being useful during an incident you can also raise alerts based on the content of the proxy server logs.

Unusual protocol version

Most modern clients will now use HTTP/1.1. Requests with HTTP/1.0 require deeper inspection. Don’t be alarmed immediately, some older applications might just not support HTTP/1.0. Keep a list of those applications to exclude them from raising an alert.

User agents

You should not blindly trust user agent information, it’s something that can easily be crafted. But making statistics on the user agents can prove useful. Look out for user agents that indicate the use of a scripting language (Python for example) or user agents that don’t make sense. You can use User Agent String.com as a reference.

If you control your environment then you can develop a list of “known” and “accepted” user agents. Everything that’s out of the ordinary should then trigger an alarm.

If your proxy server logs the computer name you can add this as an extra rule to validate the trustworthiness of the user agent field.

HTTP request methods

Log the HTTP request method (for example GET, POST) and graph / alert on (an increase of) unusual methods (for example CONNECT, PUT)

Focus on POSTs with content types different than text/html. Especially POSTS with application/octet-stream or any of the MS Office document file types should raise suspicion. Repeated requests can indicate that something or someone is uploading a lot of (corporate?) documents.

GET requests contain the query string in the URL. This can easily be logged. POST requests however have the query string in the HTTP message body. This is not always straightforward to log. But without this information it’s sometimes very difficult for getting to know the actual payload that was exchanged. You’ll have to look into something similar as mod security for logging HTTP POST requests. Also don’t forget that logging the entire query string, regardless of GET or POST can raise privacy concerns. Consult the HR and Legal department for advice.

Length of the content response

Track the length of the content response. A host that repeatedly sends or receives the same length of content responses might indicate a host that requires further inspection. It can mean an application update but also malware beaconing out to control servers.

Also, excessive content lengths should raise an alarm.

Target host IP, destination port, hostname and requested resource

Requests that go to non standard HTTP or HTTPS ports should always raise an alert.

Last but not least you should use the information provided by threat information platforms like for example MISP to track requests for hosts or resources that are known to be bad.

As bonus you can also use passive dns information in addition to inspecting the requested resources. This becomes especially useful if your proxy servers logs both target IP and hostname. If a domain was hosting something malicious on a specific IP during a limited timeframe you can use both sets of data to check if you were affected.

Collecting proxy server logs

If you are using a BlueCoat proxy then you can use the article BlueCoat Proxy log search and analytics with ELK as a guideline on how to use ELK to analyse those logs.

Data Breaches and the Importance of Account Protection and Incident Response

I published an article about Data Breaches and the Importance of Account Protection and Incident Response on Security Intelligence.

Understanding Network Intrusions With The Cyber Kill Chain

I published an article on Understanding Network Intrusions With The Cyber Kill Chain on the Ipswitch blog.

The cyber kill chain is nothing new, in the article I give a very high-level overview of what the chain is and what defensive measures you can take against attacks that follow the cyber kill chain.

Malware scanning of web directories with OWASP WebMalwareScanner

Scanning website directories

One of the recent incidents I had to handle involved a compromised webhost. This allowed me to do some Exploring webshells on a WordPress site. In the aftermath of the investigation I searched for tools that could have improved my tasks (evaluating which files might have been compromised).

One of the approaches I had in mind was take a hash of every file and then verify that hash with Virustotal. This would have worked in theory but in practice most of the malicious web code that gets installed gets tuned a little bit to the attacker likening. A minor change but enough to alter the resulting hash and so making verification with Virustotal impossible. Another approach would have been to upload every single file to Virustotal for scanning and awaiting the results. The dataset I had to verify contained thousands of files so this approach was not really feasible.

But why stop here? Most of the malicious files contain some “strings” than can be identified by signatures. This is something similar as the way virus scanners work on end users desktops. As it turns out, there’s an OWASP project that does just that.

WebMalwareScanner

The WebMalwareScanner is a Python script that scans a set of files for known signatures (including Yara rulesets) and returns a report of its findings.

Install WebMalwareScanner

The installation of WebMalwareScanner requires a number of Python packages. Note that I’m not going to use the GUI included by WebMalwareScanner, I use the command line interface and output. This post is also tuned for installing on Ubuntu (14).

First we have to install wxPython

sudo apt-get install python-wxgtk2.8

Then we need CEF Python. The download instructions can be found at https://github.com/cztomczak/cefpython/wiki/Download_CEF3_Linux which basically requires you to download the .deb file (I’m using Ubuntu) from a Dropbox share.

wget https://www.dropbox.com/sh/zar95p27yznuiv1/AACGmGx08UMq8uEGDFlINFdwa/31.2/Linux/python-cefpython3_31.2-1_amd64.deb?dl=0
mv python-cefpython3_31.2-1_amd64.deb\?dl\=0 python-cefpython3_31.2-1_amd64.deb
sudo dpkg -i python-cefpython3_31.2-1_amd64.deb
sudo apt-get -f install
sudo dpkg -i python-cefpython3_31.2-1_amd64.deb

Notice the apt-get -f install. This will install all the missing dependencies for CEF Python.

Because the scanner relies on signatures and some of these signatures are Yara rules we also have to install Yara.

sudo apt-get install yara

Once this is done we have to get the code for WebMalwareScanner from Github.

git clone https://github.com/maxlabelle/WebMalwareScanner.git

This is all that’s necessary to get the scanner installed on Ubuntu. Note that this is without the GUI.

Scan a web directory for malicious files

Of course, the first thing you’d like to do is scan a directory content for possible malicious files. This is done by invoking the Python script

python wms.py /mnt/hgfs/htdocs /data/reports/htdocs

Depending on the size of the directory the scan might take a while but output should look something similar to this.

>> Starting OWASP Web Malware Scanner version 1.0...
>> Loading signature database... (100%)
>> Loaded 577813 malware hash signatures.
>> Loaded 426 YARA ruleset databases.
>> Scanning /mnt/hgfs/htdocs for malwares... (100%)
>> Scanning /mnt/hgfs/htdocs for insecure permissions... (100%)

The output of the scan will result in a text file containing entries of files that require manual verification. A sample output is something similar to

[2016-09-06 23:10:12] Starting OWASP Web Malware Scanner version 1.0...
[2016-09-06 23:10:17] Loaded 577813 malware hash signatures.
[2016-09-06 23:10:17] Loaded 426 YARA ruleset databases.
[2016-09-06 23:17:50] Scan result for file /mnt/hgfs/htdocs/administrator/components/com_admin/models/help.php : misc shells

[2016-09-06 23:17:50] Scan result for file /mnt/hgfs/htdocs/libraries/vendor/leafo/lessphp/lessify : PM Email Sent By PHP Script

[2016-09-06 23:17:50] Scan result for file /mnt/hgfs/htdocs/templates/t3_blank/less/themes/dark/variables-custom.less : CRDF.Malware-Generic.1592130909

Lots of hits

When I used the OWASP Web Malware Scanner I received a lot of hits on the scanned files.

A majority of these hits were false positives. The directories that I scanned included for example phpmyadmin (a well known mysql web administration tool). Although it’s normal that the features of phpmyadmin set of some alarms, the amount of alarms generated by the scanner was high, to the point of becoming useless. Of course this isn’t because of the scanner itself, but more because of the signature rules it relied on.

One of the changes that I did was tweaking the ruleset. First of, I’m scanning web directories, primarily used by popular CMS systems. I don’t need any Android rules to trigger. Starting from the WebMalwareScanner root directory you can remove the Android rules.

rm signatures/rules/Android*

Then one of the other rules that was generating a lot of noise was the Sanesecurity_Spam_5892. I removed this by deleting the rule.

vi rules/scam.yar

delete:
  rule Sanesecurity_Spam_5892
  {
  strings:
        $a0 = { 20736f66747761726520 }

  condition:
        $a0
  }

Removing these rules gave me a set of hits that were much more sane and eased further manual processing. Of course there’s always a risk, removing a rule can make you miss just that one file. Be cautious about this.

Conclusion

The WebMalwareScanner project from OWASP is promising in feature set but it also fails where some virus scanners fails : wrong (or more appropriate, non-relevant) signatures.

Personally I don’t think you’ll get a lot of useful (in the sense of actionable) results by using the scanner with the default set of signatures. The scanner becomes very useful though if you give if it your own set of rules. If you write your own set of Yara rules (or get them from a threat intelligence feed) and then scan the directories you’re interested in for these rules you will get very usable results.

One of the most interesting sources that you can use to get hashes (and code) for PHP shells (the type of malware that typically get left behind on your system after a break-in) is a Github repository : https://github.com/bartblaze/PHP-backdoors. Ideally you tune your Yara rules based on the scripts found in this directory.

Using Bro for building Passive DNS data

Passive DNS

Passive DNS describes an historical database of DNS resolutions. I’ve written a previous post on Using Passive DNS for Incident Response, more specifically combining it with Moloch.

If you run your own corporate -internal- nameservers it makes sense to monitor what domains have been queried and what results were returned in the past. You can use the collection of internal queries for future incident response. You can use this collected information to cross-check with information that you gathered from intelligence feeds or for example via your internal MISP instance.

Using Bro for passive DNS

There are different ways for gathering passive DNS data. The method I describe is via Bro. Bro is network analysis framework that can be extended with different plugins.

The bulk of information in this article comes from a post Building Your Own Passive DNS Collection System, I added some additional configuration notes.

Prepare the system

I installed Bro on an Ubuntu 12 (note that the this is not the latest Ubuntu) version. Bro requires some additional packages that can be easily installed.

sudo apt-get update
sudo apt-get upgrade
sudo apt-get install cmake make gcc g++ flex bison
sudo apt-get install libpcap-dev libgeoip-dev libssl-dev python-dev zlib1g-dev libmagic-dev swig2.0

Next thing we have to do is download Bro, import the GPG key of Bro and verify the package. The GPG verification step is optional but assures you that you have a legitimate version of Bro, you verify the package signature that was signed with the Bro GPG key.

wget https://www.bro.org/downloads/bro-2.4.1.tar.gz

wget -O bro.key "http://pgp.mit.edu:11371/pks/lookup?op=get&search=0x33F15EAEF8CB8019"
gpg --import bro.key

wget https://www.bro.org/downloads/bro-2.4.1.tar.gz.asc

gpg --verify bro-2.4.1.tar.gz.asc bro-2.4.1.tar.gz

The last command should return output containing

gpg: Signature made Sun Sep  6 21:44:21 2015 CEST using RSA key ID 6F9AD2A2
gpg: Good signature from "The Bro Team <info@bro.org>"

Now extract the Bro package, run the configure file and build the package. Note the prefix argument, this defines where Bro will be installed on your system.

tar zxvf bro-2.4.tar.gz
./configure --prefix=/nsm/bro
make
sudo make install

Bro needs to watch a network interface in order to get the necessary data. Defining what interface to monitor is done in a configuration file node.cfg.

vi /nsm/bro/etc/node.cfg

interface=eth2

Database

In order to store the passive DNS data we will also need a database. We’ll use mysql. I assume you already have mysql installed. If not you can do this via

sudo apt-get install mysql-server python-mysqldb

If you already have mysql installed you need to add an extra database, preferably with a dedicated user. Log in to mysql and create the database and user.

create user 'pdns'@'localhost' identified by 'pdns';
create database pdns;
grant all privileges on pdns.* to 'pdns'@'localhost';
flush privileges;

Get the pdns package

The next step is getting the pdns module for Bro and installing it. First we need to prepare the system. I assume you already have pip installed (if not, install it as ‘python-pip’). Next install the bottle package.

pip install bottle

Continue with installing SQLAlchemy

sudo apt-get install python-sqlalchemy

The pdns package is available from Github. Once downloaded it has to be moved inside the Bro folder.

git clone https://github.com/JustinAzoff/bro-pdns.git
mv bro-pdns /nsm/bro/share/bro/site/

We now have to make Bro aware of the new module and the configuration settings. Open the configuration file local.bro and add the database connection.

vi /nsm/bro/share/bro/site/local.bro

@load ./bro-pdns
redef PDNS::uri = "mysql://pdns@localhost/pdns";

Starting Bro

Now that all the configuration is done it is time to start Bro.

/nsm/bro/bin/broctl
[BroControl] > install
[BroControl] > start
[BroControl] > status

Getting process status ...
Getting peer status ...
Name         Type       Host          Status    Pid    Peers  Started
bro          standalone localhost     running   18624  0      05 Sep 23:10:46

The above indicates that Bro was successfully installed and started. You can exit the Bro console with quit.

DNS logging in Bro

The first thing you now have to do is check the Bro logs for the DNS queries that were captured on the monitored interface. You can do this easily with a tail of the log.

tail -f /nsm/bro/logs/current/dns.log

The next step is to use the Bro module for pdns to parse the DNS logs.

BRO_PDNS_DB=mysql://pdns:pdns@localhost/pdns /nsm/bro/share/bro/site/bro-pdns/bro_pdns.py process /nsm/bro/logs/current/dns.log
241

The number returned (241) is the number of records processed.

If you now use mysql to look what’s inside the database you will have an overview of the data that was gathered.

mysql> select * from dns;
+---------------------------------+------+------------------------------+-------+--------+---------------------+---------------------+
| query                           | type | answer                       | count | ttl    | first               | last                |
+---------------------------------+------+------------------------------+-------+--------+---------------------+---------------------+
| be.archive.ubuntu.com           | -    | 91.189.88.161                |     3 |     26 | 2016-09-05 23:20:27 | 2016-09-05 23:20:27 |
| be.archive.ubuntu.com           | -    | 91.189.88.162                |     3 |     26 | 2016-09-05 23:20:27 | 2016-09-05 23:20:27 |
| block.dropbox.com               | -    | 108.160.173.65               |     1 |     30 | 2016-09-05 23:17:45 | 2016-09-05 23:17:45 |

The mysql interface is not a very convenient way to look at the data. There’s a web interface that you can use that returns JSON. Start the interface with

BRO_PDNS_DB=mysql://pdns:pdns@localhost/pdns /nsm/bro/share/bro/site/bro-pdns/bro_pdns.py serve

and then query for a record via curl

curl http://localhost:8081/dns/www.cudeso.be

{"records": [{"count": 2, "last": "2016-09-05 23:11:04", "ttl": 3600, "answer": "92.243.8.142", "query": "www.cudeso.be", "type": "-", "first": "2016-09-05 23:11:04"}]}

Conclusion

The above process describes how to gather passive DNS data from the DNS queries in your environment but it still has some rough edges.

The processing of the logs is not something that you’d like to do manually. So ideally you run the process from cron. You can put it in a cron job. One note on delay. If you do a query on a machine with less resources it might take some time (1 / 2 seconds) before it shows up in the DNS log of Bro. This is something to take into account if you are doing live debugging. You should allow Bro the necessary time to process the request and output the log file.

The JSON output is ideal for further processing, it’s an easy to parse format. If you are using MISP you should be aware of its MISP module feature (see https://github.com/MISP/misp-modules) where you can enrich information of attributes in MISP with external information. One of the next steps that you could take is write a module that queries your local passive DNS database to check if a domainname attribute from MISP is seen in your queries.

Use Certificate Transparency for OSINT and passive reconnaissance

The Dark Side of Certificate Transparency

SANS ISC recently posted an article on The Dark Side of Certificate Transparency.

Certificate transparency means that participating certificate authorities will publish all certificates that they issue in a log. This information is public, meaning that you can search it at will.

The article already touches one of the side effects of having this information publicly available. By publishing the information organizations can disclose hostnames they’d rather not be known on the internet.

Passive reconnaissance

There are many ways to conduct passive reconnaissance. As a reminder, passive reconnaissance means that you collect information on a target without actually sending one bit to the target infrastructure.

Penetration testers can use this information to sketch a picture of the network layout or provided services without giving away their intentions.

Typically hosts protected with an SSL certificate might contain something “useful”. Adding a certificate often means that an organization is aware that the host in question is valuable, or at least that it requires some extra attention from their IT department. Of course, there’s always a chance an organization uses these hosts as a decoy.

Note that SSL transparency isn’t a bad thing. It’s similar to having host names registered in the DNS, this is how things work. The information that is in the SSL certificates can be put to use for open source intelligence or passive reconnaissance. Of course, security by obscurity doesn’t work well but you don’t have to make it to easy for attackers to create a footprint of your organization.

The post at ISC got me started on building a Python script to collect the information that is available at Censys on certificates. My main goal was to collect some statistics on what certificates (and host information) was available. But at the same time you can use the similar approach to jump start a penetration test.

Collect SSL information from Censys

I wrote a Python script that collects the SSL transparency information that is available at Censys. The script fetches the information for your query and then puts everything in a sqlite database.

Get the code from cudeso/censys-certif-crawl

You will need to get a Censys API key and put that into the configuration file. The database scheme is straightforward and self-explanatory.

SSL Certificate Transparency Statistics

I ran the query on Censys searching for “.be” data. I stopped the query before it finished because I had retrieved a dataset that was large enough to get some conclusions. Note that although you might expect to see only certificates related to the “.be” space, this dataset also contained other certificates. This was due to the fact the the query also returned results for the certificate authority and not only for .be hostnames.

Number of certificates

The script stored 147900 items for issuer_dn and subject_dn. This resulted in 286058 different DNS names discovered in dns_names. These numbers indicate that 147900 certificates were retrieved, matching up for 286058 alternative DNS names.

For info the issuer specifies the entity that issued the certificate whereas the subject specifies the owner of the certificate, the one who holds the private key.

Top certificate issuer

The top certificate issuer was GlobalSign.

Top organization in certificate issuer

In the database scheme I split the data field by the different fields that were available. This allowed me to retrieve the O, C and CN field. Sorting by O (Organization) field this returned Global sign as the top entry. Some certificates did not had a O field defined.

Top subject certificate information

Next to the certificate issuer the dataset also contained the subject_dn. The subject field in the certificate in general lists the owner of the certificate.

Top organization in certificate subject

Similar to the issuer data, I can also split the subject data per field. When organized per O field found in the subject_dn entry we get this data.

The majority (114981 out of 147900 or 78%) of the certificates did not have an O field set.

The overview also shows that two motor companies, Ford and BMW, issued a lot of certificates with a subject_dn belonging to their organization.

Alternative DNS hostnames

Another statistics that could be draw from the subject_dn field is the number of alternative DNS names that were provided in the certificate. Below is an overview of the sum of how many alternate DNS names were included per certificate. To clarify, this is the query used to generate the statistics

select sum(dns_names_count) as qt, subject_cn from subject_dn group by subject_cn order by qt asc;

Wildcard statistics

Out of 286058 hostnames found there were 31644 that included a wildcard (for example *.myhost.mydomain.com).

Analyzing alternative DNS names in certificates

I started this post with describing how you could use the hostname information from the published certificates. What are the hosts you’d typically be looking for?

These are some of the strings I queried for (notice the dots . , I used this to focus on the more interesting stuff ) :

This set of hosts already provide a good starting point to map the interesting hosts of your potential target when doing a penetration test.

But there’s more information that can be found than only the hostnames. The list above already shows that some of these hostnames might refer to internal hosts. Some certificate data also contained the internal IP addresses of hosts. The certificate information shows that the certificate applies for an external (DNS) address and for an internal (IP) address. This can become very useful in a second stage, after gaining access to the network. Below is an example (hash and domainname edited) of two such certificates.

c274c18a38dc548349148...|remote.___.be
c274c18a38dc548349148...|autodiscover.___.be
c274c18a38dc548349148...|mail.___.be
c274c18a38dc548349148...|owa.___.be
c274c18a38dc548349148...|10.68.1.2
c274c18a38dc548349148...|10.68.1.254
c274c18a38dc548349148...|FW1.___.local
c274c18a38dc548349148...|SRV1.___.local

5aba235ae894907c1f27d...|remote.___.be
5aba235ae894907c1f27d...|srv1
5aba235ae894907c1f27d...|srv1.___.local
5aba235ae894907c1f27d...|192.168.11.2

Conclusion

Certificate transparency is a good initiative that can make it possible to detect SSL certificates that have been mistakenly issued by a certificate authority or have been maliciously acquired. It also makes it possible to identify certificate authorities that have gone rogue and are maliciously issuing certificates.

You just need to be aware of it existence and the information that it contains. Publicly available information can be used for good but, but when used without caution, can also have unwanted side effects.

Understanding the SPF and DKIM Spam Filtering Mechanisms

I published an article on the SPF and DKIM spam filtering mechanisms on IBM Security Intelligence : Understanding the SPF and DKIM Spam Filtering Mechanisms.

The article covers the basic details of these mechanisms but also explains some of the possible pitfalls for filtering spam with SPF and DKIM.