Yahoo Transparency Report – All Requests from Belgium rejected

Yahoo released its Transparency report covering the number of government requests for user data.

Requests from Belgium to Yahoo

In 2014 the Belgian government requested 5 times user data from Yahoo for 17 accounts. All these requests were rejected by Yahoo.

  • 5 “Government Data Request”, meaning a government agency seeking information about Yahoo accounts. These are generally made in connection with criminal investigations.
  • 17 “Government Specified Accounts”, meaning the number of Yahoo accounts, users, or other unique identifiers.
  • Yahoo “Rejected” all 5 requests.
  • Yahoo returned 0 replies or “No Data Found” because no responsive data could be found.

The rejected cases were either because no data was found because of a defect, because the request was not legal or because the request was withdrawn. See further down this post for a complete definition.

Netherlands, France, Germany and United Kingdom

All the requests coming from the Netherlands were rejected. France and Germany had above 60% of their requests rejected and 53% of the requests coming from the United Kingdom were rejected.

Globally

Compared to the rest of the world 49% of the requests from Europe were rejected. The numbers for the United States do not include emergency requests and U.S. national security requests.

Other countries

Yahoo did not receive requests from Luxembourg. Yahoo received 4814 requests for 7952 accounts from Taiwan and only 281 requests were rejected.

The number of requests for Taiwan is high if you compare this to the number of internet users. There are 18,687,942 internet users as of Dec 31, 2013 in Taiwan. The same source returns 582,441,059 users in Europe and 277,436,130 users in the United States.

Emergency requests

Yahoo received 88 emergency requests in the first part of 2014 and 147 emergency requests in the second part of 2014. In total Yahoo received 235 emergency requests for 305 accounts.

Yahoo definitions

No Data Found: Yahoo produced no data in response to the Government Data Request because no responsive data could be found (i.e., the account didn’t exist or there was no data for the date range specified by the request).

Rejected: Yahoo may have possessed data responsive to the Government Data Request, but none was produced because of a defect or other problem with the Government Data Request (e.g., the government agency sought information outside its jurisdiction or the request only sought data that could not be lawfully obtained with the legal process provided). This category also includes Government Data Requests that were withdrawn after being received by Yahoo. We carefully review Government Data Requests for legal sufficiency and interpret them narrowly in an effort to produce the least amount of data necessary to comply with the request.

NCD: Non-content data such as basic subscriber information including the information captured at the time of registration such as an alternate e-mail address, name, location, and IP address, login details, billing information, and other transactional information (e.g., “to,” “from,” and “date” fields from email headers).

Content: Data that our users create, communicate, and store on or through our services. This could include words in a communication (e.g., Mail or Messenger), photos on Flickr, files uploaded, Yahoo Address Book entries, Yahoo Calendar event details, thoughts recorded in Yahoo Notepad or comments or posts on Yahoo Answers or any other Yahoo property.

Government Data Request: Legal process to a Yahoo entity from a government agency seeking information about Yahoo accounts and/or the activity of Yahoo users within Yahoo products. The Government Data Requests reflected in this report are generally made in connection with criminal investigations.

Government Specified Accounts: The number of Yahoo accounts, users, or other unique identifiers listed in a Government Data Request. This number is typically larger than the number of users and accounts actually involved because: 1) a single account may be included in more than one Government Data Request; 2) an individual user may have multiple accounts that were specified in one or more Government Data Requests; and 3) if a Government Data Request specified an account that does not exist, that nonexistent account would nevertheless be included in our count of Government Specified Accounts.

How STIX, TAXII and CybOX Can Help With Standardizing Threat Information

I had a post published on IBM Security Intelligence : How STIX, TAXII and CybOX Can Help With Standardizing Threat Information.

How to share malware with a security team?

Share malware with a security team

With the recent increase of notifications of cryptolocker malware I was wondering if this dropped malware was always the same version or if the attackers used different versions. I was also curious if the delivery path (e-mail route or otherwise) was different. This raised the question : “How to share malware with a security team?”.

Some teams have a service where you can upload samples. If they do not have an upload service then you will have to use more traditional methods.

Sharing workflow

Ideally you notify the team, either before sending the sample or with a separate message, that you are going to share a sample. Smart virus scanners might block the message with your sample and the receiving part might never know you wanted to share something.

You can also use the prior notification to verify that you are sending the notification to the correct recipients. Some teams can have a dedicated mailbox for receiving malware samples.

You should also let them know what feedback you are expecting. Are you sharing the malware for “information only” or do you expect an analysis and feedback?

The accompanying message for sharing the sample should contain context, impact and delivery route.

  1. Set context.
    • What is your organization type?
    • What is the volume of detected malware?
    • What is the typical user environment (OS, software installed)?
    • Do you have server based protections (firewall, anti-virus, IDS) that triggered or that failed?
    • Are there host based protections that triggered or that failed?
  2. Define impact
    • Did the malware execute?
    • If the malware did not execute, why do you suspect this to be malicious?
    • What was the impact (host infected, server infections)?
    • Is the incident ongoing or did you contain it?
  3. Delivery route
    • How was the malware delivered (e-mail, USB, website)?

Sharing the sample

You can not just “send” the sample via e-mail or share it via an online file sharing platform. If it is recognized malware then it’s certain to be blocked either in transit or at the receiving part. So how do you share?

The easiest way is not technologically challenging : use a password protected ZIP file.

  1. Create a new ZIP file;
  2. Add the sample to the ZIP file;
  3. If delivered by e-mail, add the source or the entire message to the ZIP file;
  4. Set a password (easiest: ‘infected‘) on the ZIP file.

Do not forget to inform the receiving team of the password that you used to protect the ZIP file.

CIRCL.lu mentioned that nowadays a lot of mail providers brute-force ZIP passwords. An alternative for a ZIP with ‘infected’ could be to either use GPG encryption with a symmetric key or use your own customised password.

If you want to verify the integrity of the file then do an MD5 sum of the original files (the malware, not the ZIP file) and include that in your notifications. Digitally signing your messages is also a good idea.

If your company policies allow you to share logs then including e-mail, fileserver or firewall logs (possibly anonimized) can also help the security team for doing the analysis and providing feedback on the possible impact.

VMRay automated malware analysis for CERTs

Malware analysis, signatures and CERTs

CERTs have to provide their constituency early warnings and alerts about new threats.

A typical example is a new form of malware being distributed by e-mail. It takes a while before anti-virus vendors include the new signature to recognise the malware. This means that there’s a time window where the malware is not filtered and users in your constituency can get infected.

To protect your constituency you can provide them your own signature with indicators of compromise describing what the malware does exactly, how to detect it and possibly prevent it from weaponizing further. The process of getting these indicators from a binary is malware analysis.

Doing it manually can be time consuming, difficult and not always feasible. By the time you have finished your analysis there’s already a new mutated form of the malware.

Automated malware analysis

An automated analysis saves you time. You feed it the presumably malicious file and once the analysis is done you have a basic set of IOCs (Indicator of Compromise) that you can distribute to your constituency (possibly via a malware information sharing tool).

Automated analysis also allows you to analyse the behaviour of the malware in different configurations. Think of situation where you have to support multiple versions of Microsoft Office or Adobe Acrobat Reader.

There are several malware analysis sandboxes and services that can examine malware automatically but in this post I focus on one product : VMRay Analyzer.

VMRay

Some of the features of VMRay Analyzer are

  • it covers different windows flavors;
  • process creation, code injection, and driver installation methods are tracked and detected;
  • analysis of contemporary 64-bit kernel rootkits;
  • the client-server-architecture allows distribution of jobs.

VMRay got my attention because it claims to be impossible to evade, to be fast and to be reliable. Also I was searching for something similar to CWSandbox. The author of CWSandbox is the CEO of VMRay.

I requested and received a 30-day evaluation account to test the product.

VMRay technology

The first generation of malware analysis platforms used emulation. This delivers good results but can quickly become very slow. The second generation used hooks. This is faster but comes at a price. Hooks can be detected and can allow malware to prevent the analysis.

VMRay positions itself as the third generation of malware analysis because of its microprocessor functionality and monitoring methodology. Malware would be oblivious of it being monitored. Of course it would still be able to detect that it’s being run in a virtualization environment but, because of the high adoption of virtualization, that’s for most malware not an issue.

VMRay runs on commodity hardware and you can interface with it via a web browser.

VMRay evaluation

VMRay provides you a hosted test environment. In a production environment you can (or should) have the solution hosted in your premises. This limits the exposure that you give to “sensitive” malware. You still have the possibility to share your information with a community.

After logging in to the secured website you get the dashboard with an overview of your latest samples, analysis and submissions.


vmray-intro

Submitting a sample is straightforward with one-click. You can provide a password (for archives) or extra command line options. A check box allows you to choose if you want to share the sample. Basically you just have to add the file and click submit to get it working. The sample type is automatically detected but you can also preset it to the different PE flavors, Word, Powerpoint, Excel, Flash, ….

vmray-submitsample2

The analysis is done by a set of rules. The overview of these rules gives you an idea of what is supported in which specific configuration. These rules also allow you to better understand how the artifact behaves with different versions of the operating system or user applications.


vmray-rules

Once the analysis is done you get a notification e-mail.

And then the juicy part begins.

VMRay evaluation – analysis

The submissions get analyzed simultaneously in different environments / configurations. This is great because it allows you to easily compare the behavior in different setups. When the analysis is finished you can either download the report (as a zip) or view it online.


vmray-analysis1

The Overview tab lists what has happened. It lists the time it took to complete, a process tree, screenshots and details of dropped or created files. The screenshots and the process tree are valuable to quickly see how the sample behaved in that specific environment. From here you can also download the entire PCAP or the logfiles. Having access to the PCAP file is fun because it gives you access to the bare-metal network details and you can do your own statistics (and network analysis).


vmray-analysis2

The Behavior tab gives a detailed overview of what happened. The behavior is split out per process so you can exactly track the different stages of the sample.


vmray-analysis4

Test sample : a Word document

One of my test samples was a Word document that is recognized by Virustotal as a Trojan Downloader. The file arrived as an attachment to an e-mail. My test case was to quickly extract the IOCs for detecting infected machines.

The submitted file got analyzed with four different Windows configurations (Office 2003, Office 2007, Office 2010 and Office 2013). I downloaded the report for the analysis done with Office 2010.

The overview tab showed that the malware does two ICMP requests to a host in China and creates a number of local files. With the outgoing ICMP traffic and the list of dropped files and their MD5 I can start the IOC signature. I have MD5 checksums that can be used for detection by a host IDS and I have network addresses that should be monitored for ICMP traffic.


vmray-sample1

In the behavior tab I can see that next to the ICMP packets there are also a couple of HTTP requests. This allows me to extend the IOC signature with a list of network hosts to monitor.


vmray-analysis3

With the help of the automated analysis of this sample I was able to quickly extract useful IOC data. The process did not involve a lot of work, merely uploading the file, waiting for the notification e-mail and reading the report.

VMRay API

VMRay can be used via the web interface or via an API. The API allows you to submit new samples and download the reports. This allows further integration within your existing environment and extensive automation.

Think of a situation where you isolate a new piece of malware and submit it for analysis. Once the job is done you can extract the relevant IOCs (network information, file hashes) and push these to your threat intelligence for sharing and to your security solutions for further monitoring.

Conclusion

I love the ease of use and the flexibility of VMRay. It’s a great addition to the toolset of a CERT, without a lot of manual intervention. This is important because you do not want to spend your resources on babysitting your own lab for every analysis.

The access to the PCAP and log files allows you to analyse the network stream and build your own statistics.

Some of the samples were already manually analysed so I knew what to expect. As far as I could tell none of the automated analysis missed a pointer.

The support during the evaluation period was good. I got quick and detailed replies on my questions.

It is not immediately possible to extract IOCs. But the log files (in XML format) resulting from the analysis allow you to extract the necessary information with your own scripts. Future versions might include XML logfiles that include the high level details, this would make IOC extraction even much easier.

VMRay is currently focused on Windows environments but other platforms (ARM, OSX) might be integrated in the future.

VMRay gets its biggest strength from a lot of simultaneous analysis of malware running in a predefined set of configurations.

During my tests I did not encounter any functional issues. The few remarks that I had were quickly dealt with or I got a satisfying explanation. I’ve not been able to test it with complex malware families but as far as I could check it did its analysis job flawlessly.

Getting started with MISP, Malware Information Sharing Platform & Threat Sharing – part 2

MISP

My first post on MISP described how to get MISP installed and get it up and running. This post describes how you can use MISP to your benefit to share threat information with your community.

Basic usage of MISP

The basic features of MISP are described in detail in the documentation at INSTALL/documentation.pdf. I’ll describe the steps needed to create an event and add some useful data.

Create an event in MISP

You can add an event under Event actions, Add event. You’ll have to enter a date, distribution, threat level, analysis and an event description.


add_event

The distribution setting defines if you want to share this event with connected servers or only with the local instance.

Once you’ve entered the basic details you can start adding the event details.


add_event2

You can now add IOCs (IPs, hashes, comments, …) or attributes one-by-one (via 1), template based (via 2) or via free text (via 3).

When you add tags (via 4), for example indicating the TLP-code, you inform the receivers of the event how to process this information.

Once you are finished adding attributes you should publish (5) the event to make it available to your users.

If you want to add different attributes of the same kind then you should select Batch import. This allows you to enter a list of data, line-by-line, and have MISP process them separately. If you do not use Batch import then they will be considered as “one” piece of data. If you want to make the attributes available later for export you should check the option for Intrusion Detection System


add_event3

MISP allows you to use templates to quickly enter event types that occur often. You can find a list of templates under Event actions, List Templates.

Type of event information

The type of information that you put into MISP is entirely up onto you and depends on your intended audience. One use case of MISP is using it for collecting open source threat intelligence and using the network indicators for a simple “block” or “inspect” list for your customers. You can read all the freely available analysis documents and add that data manually but that is going to be a slow and tedious task.

There’s a tool to automate parts of this process : IOC Parser.

Use IOC Parser to feed MISP

IOC Parser is a tool to extract indicators of compromise from security reports in PDF format. IOC Parser is available on Github.

git clone https://github.com/armbues/ioc-parser.git

The output of IOC Parser returns all the useful IOC information from a PDF in an easy to read format. The APT Notes, Various public documents, whitepapers and articles about APT campaigns contains a repository of open source documents containing useful IOCs. The default output of IOC Parser is like this

./ioc-parser.py pdfs/Regin_Hopscotch_Legspin.pdf 
pdfs/Regin_Hopscotch_Legspin.pdf  1 MD5 6c34031d7a5fc2b091b623981a8ae61c
pdfs/Regin_Hopscotch_Legspin.pdf  1 MD5 42eaf2ab25c9ead201f25ecbdc96fb60
pdfs/Regin_Hopscotch_Legspin.pdf  2 Filename  dllhost.exe
...

I’m only interested in the IP or host information. To extract this data I combine the output of IOC Parser with some bash commands.

./ioc-parser.py pdfs/OperationDoubleTap.pdf | grep IP | cut -f 4 | uniq
192.157.198.103
192.184.60.229
198.55.115.71
210.109.99.64
192.184.60.229
104.151.248.173

./ioc-parser.py pdfs/OperationDoubleTap.pdf | grep Host | cut -f 4 | uniq
join.playboysplus.com
www.playboysplus.com
securitywap.com
www.securitywap.com

I can then use this output to complete a (batch import) of attributes into MISP. Because I want to provide the list of IPs and hosts for a block or inspect list I have to enable the for Intrusion Detection System setting when adding the attributes. If you do not enable this, the data will not be shown in the export. Do not forget to Publish the event afterwards

The only thing you then have to add is meta information about where you found the attributes and their impact.

Exporting the data

MISP can export the IOC data in a number of formats. Have a look under Event actions, Export to see what formats are available.

Newer versions of MISP require that you send the API-key (see your user profile) in the authorization header. The small script below sends the correct http request and will download Suricata events.

#!/usr/bin/python

import urllib2

MISP_HOST="http://misp."
API_KEY=""
EXPORT_DATA="events/nids/suricata/download"
OUTPUT_FILE="misp-suricata"

URL="%s/%s" % (MISP_HOST, EXPORT_DATA)
request = urllib2.Request(URL)
f = open(OUTPUT_FILE,'w')
request.add_header('Authorization', API_KEY)
data = urllib2.urlopen(request).read()
f.write(data)
f.close()

Running this script results in a file that is usable by suricata.

PyMISP

CIRCL published a tool PyMISP on Github that allows you to interact with the MISP REST API. You can use PyMISP to further automate adding attributes to events.

Conclusion

MISP is a very flexible tool to gather threat intelligence from different sources.

My use case of MISP with IOC Parser is limited to feeding IDSs with a block list but that’s only a small subset of its capabilities.

Getting started with MISP, Malware Information Sharing Platform & Threat Sharing – part 1

MISP

MISP or Malware Information Sharing Platform & Threat Sharing is an open source tool for sharing malware and threat information with the security community. It is available on Github and is used by a large number of CERTs and security teams.

This first post describes how to get MISP installed and get it up and running. The next post describes how you can use MISP to your benefit to share threat information with your community.

You’ll need a webserver with PHP enabled and a mysql database server. It also needs a mail server to send out notices (‘Satellite system’ when using Postfix). It is highly recommended to use a secure web connection (HTTPS).

Install

Make sure you have git installed. You need it for downloading MISP (and its subcomponents)

apt-get install git
git clone https://github.com/MISP/MISP.git

This will install git and download the latest version of MISP. Ideally you do this in /var/www.

The install documentation is located in the INSTALL directory. The user documentation can be found in INSTALL/documentation.pdf.

All the steps for Ubuntu are listed in the file INSTALL/INSTALL.ubuntu1404.txt. I highlight a couple of important steps below.

Basic configuration

The repository contains a number of sample configuration files (*.default.php). You can use these (copy them from x.default.php to x.php) to get sane defaults.

Database configuration

The database configuration of MISP is in MISP/app/Config/database.php. The mysql database create script can be found at MISP/INSTALL/MYSQL.sql.

Webserver configuration

The webserver should have the rewrite module enabled. This allows for rewriting to ‘pretty’ URLs.

I installed MISP in separate virtual hosts. I could not get it to work in a separate subdirectory (see the MISP issue #423)

Make sure you set the ownership and file permissions correct according to the install documentation

Do not forget to restart your webserver after enabling redis.

Extra modules

Some commands during the install of MISP require you to download and install additional PHP or Python modules (styx, cybox, …). Don’t forget to run the install command as the root user, otherwise the system-wide install will fail.

MISP configuration

The bulk of the configuration of MISP is done in the files in MISP/app/Config/.

Edit the file MISP/app/Config/config.php and change the baseurl (and optionally other relevant sections)

<?php
$config = array (
...
  ),
  'MISP' =>
  array (
    'baseurl' => 'http://192.168.1.1',

Do not forget to change the salt value in MISP/app/Config/config.php. Changing the value on a working system will invalidate all the passwords.

In the MISP/app/Config/bootstrap.php file you have to enable CakeResque to facilitate the background jobs. This is essential for having MISP working properly. Near the end of the file you should uncomment this section

CakePlugin::loadAll(array(
        'CakeResque' => array('bootstrap' => true)
));

and add a line

Configure::write('MISP.background_jobs', true);

Near the end of the file MISP/app/Config/core.php you should uncomment

require_once dirname(__DIR__) . '/Vendor/autoload.php';

Background workers

A couple of jobs are done by so called background workers. You can check if your setup is working properly with the command

MISP/app/Console/worker/start.sh

First login

You can now login to MISP with the default credentials username admin@admin.test and password admin. You’ll have to change the default password after logging in.

Mail notifications from MISP

MISP can send the users a mail notification when a change to an event has been published. Make sure that your mail server is properly configured and accepting and delivering e-mails.

“Reported by”

The Reported by field gets its value from the organisation set in the user profile. If you change the organisation after the creation of an event then that event will still belong to the old organisation to which the user belonged.

Prefix of e-mail subject

The prefix of the e-mail subject (the ‘organisation’) and the sender are defined in MISP/app/Config/config.php.

$config = array (
  ...
  ),
  'MISP' =>
  array (
    'org' => 'MyPrefix------------',
    'email' => 'mysender@mymisp.tld',    

Remember that if you change this configuration setting you’ll have to restart the workers with

MISP/app/Console/worker/start.sh

Synced MISP servers

One of the great things about MISP is that you can sync events between multiple servers. This means adding the events in one MISP server and having them appear in a number of connected servers. By setting the community with whom you want to share you can automatically transfer events from one server to other servers.

According to the documentation you have to make sure that the organisation set in your configuration file matches with the organisation identifier of the hosting organisation. During my tests this was not necessary. In any case, you can change the organisation setting in MISP/app/Config/bootstrap.php with

Configure::write('MISP.org','ADMIN');

Syncing can be done in two directions, either push or pullreceiving the events.

You can add the user under Administration, New user. Select Sync user as role and add a unique Nids Sid.

IMPORTANT : once the user is added, edit the user again and uncheck Change Password and check Terms accepted (see MISP Issue 432).

Take note of the authentication key, you’ll need it afterwards.


syncuser1

On the server that is “hosting” the events you now have to add the server to which you will push the data. The sync servers are listed under Sync actions, List servers.


syncservers1

Add the URL of the receiving server, select the organization (see earlier) and set the authentication key that you got when you created the sync user.

syncservers2

If you had background jobs enabled when you went through the install documentation you can now issue a push of the available events.

If things are not working out as expected I suggest you take a look at the log files of the webserver, the logs of MISP (in MISP/app/tmp/logs) or just do a network packet capture of the requests to verify the responses of both servers.

A read-only MISP

MISP benefits from a community effort where everyone contributes. There might be situations where you do not need feedback from your community. For example because you are the only one providing the data.

You can setup MISP in a read-only modus by limiting the database access. The Cake framework needs a couple of tables with write permissions and logging. Basically you can have the MISP database user set to read-only and then allow write permissions on the tables bruteforces, cake_sessions and logs.

GRANT SELECT , INSERT , UPDATE , DELETE ON  `misp`.`bruteforces` TO  'misp'@'localhost';
GRANT SELECT , INSERT , UPDATE , DELETE ON  `misp`.`cake_sessions` TO  'misp'@'localhost';
GRANT SELECT , INSERT , UPDATE , DELETE ON  `misp`.`logs` TO  'misp'@'localhost';

Using MISP

So far this post described how to get MISP up and running. The next post describes how you can use MISP to your benefit to share threat information with your community.

Recursive curl with Tor on Apple OSX

The Apple OSX TOR Bundle for Anonymous browsing

The Tor Apple OSX Tor Bundle is a stripped Firefox browser that uses a local SOCKS proxy to anonymize the requests.

The SOCKS proxy that is used is tor.real, located at /Applications//TorBrowser.app/TorBrowser/Tor/tor.real.

/Applications//TorBrowser.app/TorBrowser/Tor/tor.real

Mar 10 23:50:29.711 [notice] Tor v0.2.5.10 (git-13318a95ddfbbf8d) running on Darwin with Libevent 2.0.21-stable, OpenSSL 1.0.1l and Zlib 1.2.5.
Mar 10 23:50:29.711 [notice] Tor can't help you if you use it wrong! Learn how to be safe at https://www.torproject.org/download/download#warning
Mar 10 23:50:29.801 [notice] Configuration file "/home/ubuntu/install/etc/tor/torrc" not present, using reasonable defaults.
Mar 10 23:50:29.806 [notice] Opening Socks listener on 127.0.0.1:9050

SOCKS proxy

Anonymous browsing is good but I needed a command line tool to fetch a web page or web site. More specific, I want to recursively download a website from the command line. Ideally you use wget for this. Unfortunately wget does not support a socks server. The other command line tool that allows downloading a website is curl. Curl has SOCKS5 support. You can do this with

curl --socks5 127.0.0.1:9150 http://www.google.com

Unfortunately curl does not allow recursive downloading.

Recursive website download with curl

There is a perl script curlmirror.txt that allows recursive curl downloads. It’s written by Kjell Ericson. I adjusted the script to include socks support for a local Tor proxy (the -T option). You can download it from Github.

The usage is very simple

perl curlmirror.txt -T  http://www.google.be

This setup allows you to recursively download a website from an Apple OSX system with the Tor browser bundle installed.

Security conferences for CERTs in Europe

Computer security conferences are a great opportunity to exchange information with your peers and learn about new trends in the industry.

This is an overview of European security conferences and trainings that can be of use for CERTs. Note: Spending May in Amsterdam is a good idea!

NCSC One Conference
 
April, 13-14, 2015 The Hague, The Netherlands
Global Conference on CyberSpace 2015
 
April, 16-17, 2015 The Hague, The Netherlands
Cyber Security Summit Industry&Gov
 
April, 14-15, 2015 Prague, Czech Republic
TRANSITS I CSIRT Training
 
April, 23-24, 2015 Prague, Czech Republic
FIRST Technical Colloquium & Training
 
May, 4-6, 2015 Amsterdam, The Netherlands
ENISA CERT Workshop
 
May, 11-12, 2015 Riga, Latvia
OWASP AppSecEu
 
May, 19-22, 2015 Amsterdam, The Netherlands
TF-CSIRT meeting
 
May, 21-22, 2015 Poznan, Poland
HITBSecconf
 
May, 26-29, 2015 Amsterdam, The Netherlands
European Security Conference
 
June, 1-2, 2015 Lisbon, Portugal
BSIDES London
 
June, 3, 2015 London, UK
FIRST Conference
 
June, 14-19, 2015 Berlin, Germany
44Con
 
September, 9-11, 2015 London, UK
BruCon Training
 
October, 5-7, 2015 Gent, Belgium
BruCon
 
October, 8-9, 2015 Gent, Belgium
ENISA/EC3 Workshop
 
October, 8-9, 2015 The Hague, The Netherlands
NoSuchCon
 
November, 19-21, 2015 Paris, France
BlackHat Europe
 
November, 10-13, 2015 Amsterdam, The Netherlands
Botconf
 
December, 2-4, 2015 Paris, France

Use CryptoLocker to train your incident response team (part 3)

Train your incident response team

This is the third part in a post describing how to train your team for incident response and incident investigations.

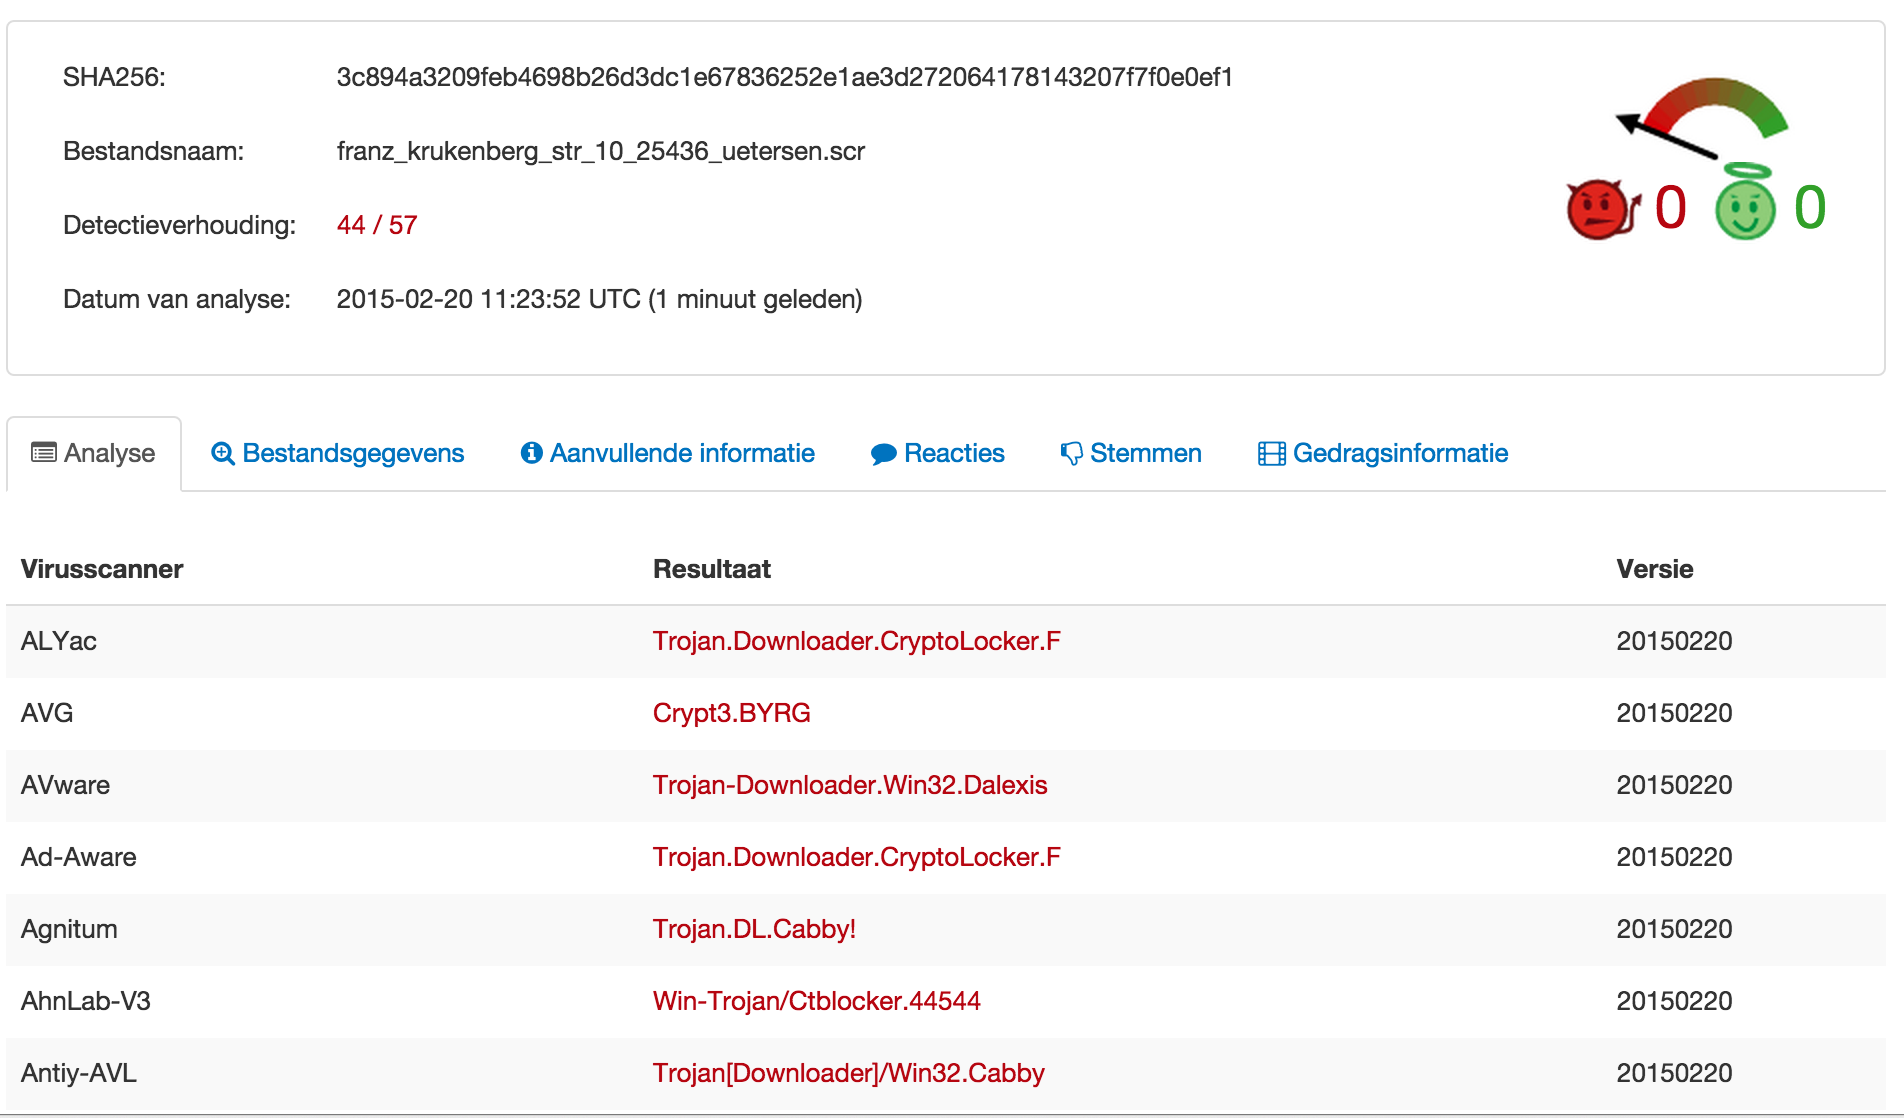
The first part for training incident response and incident investigations covered how to analyze the e-mail headers and information in a suspicious e-mail. The second part analyzed the attachment which turned out to be a CryptoLocker.F variant.

Networked VM

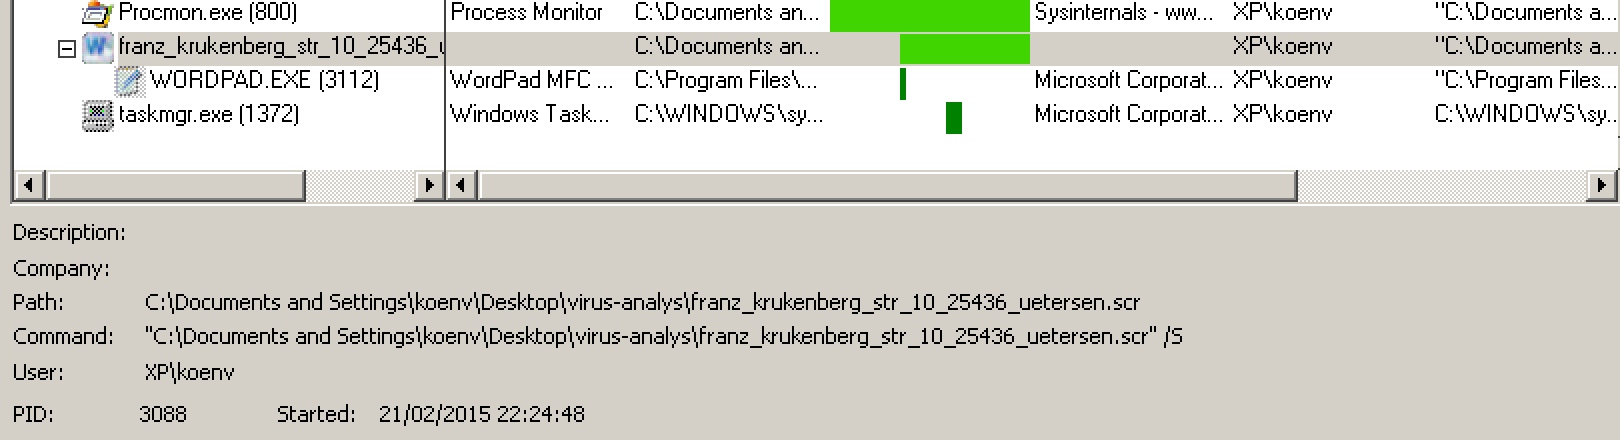
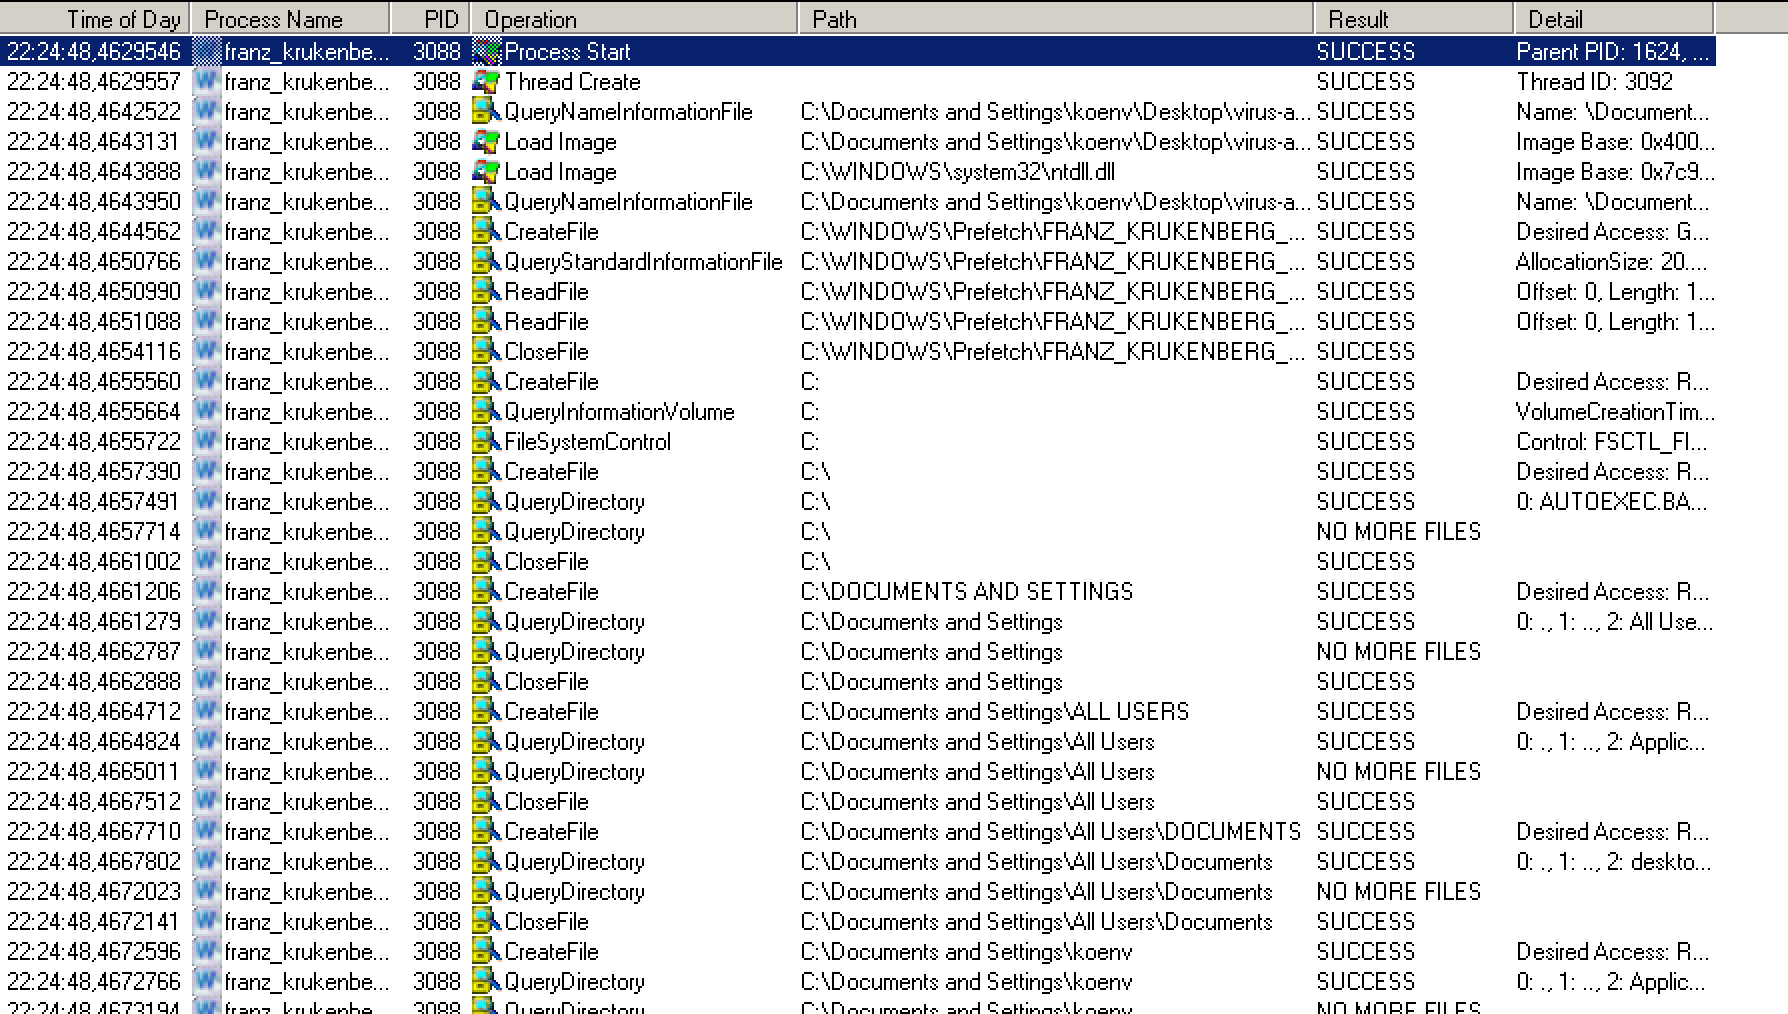
The last step of my analysis involved executing the CryptoLocker virus in a fully networked VM. After resetting the Windows XP virtual machine I enabled networking and started capturing the network packets.

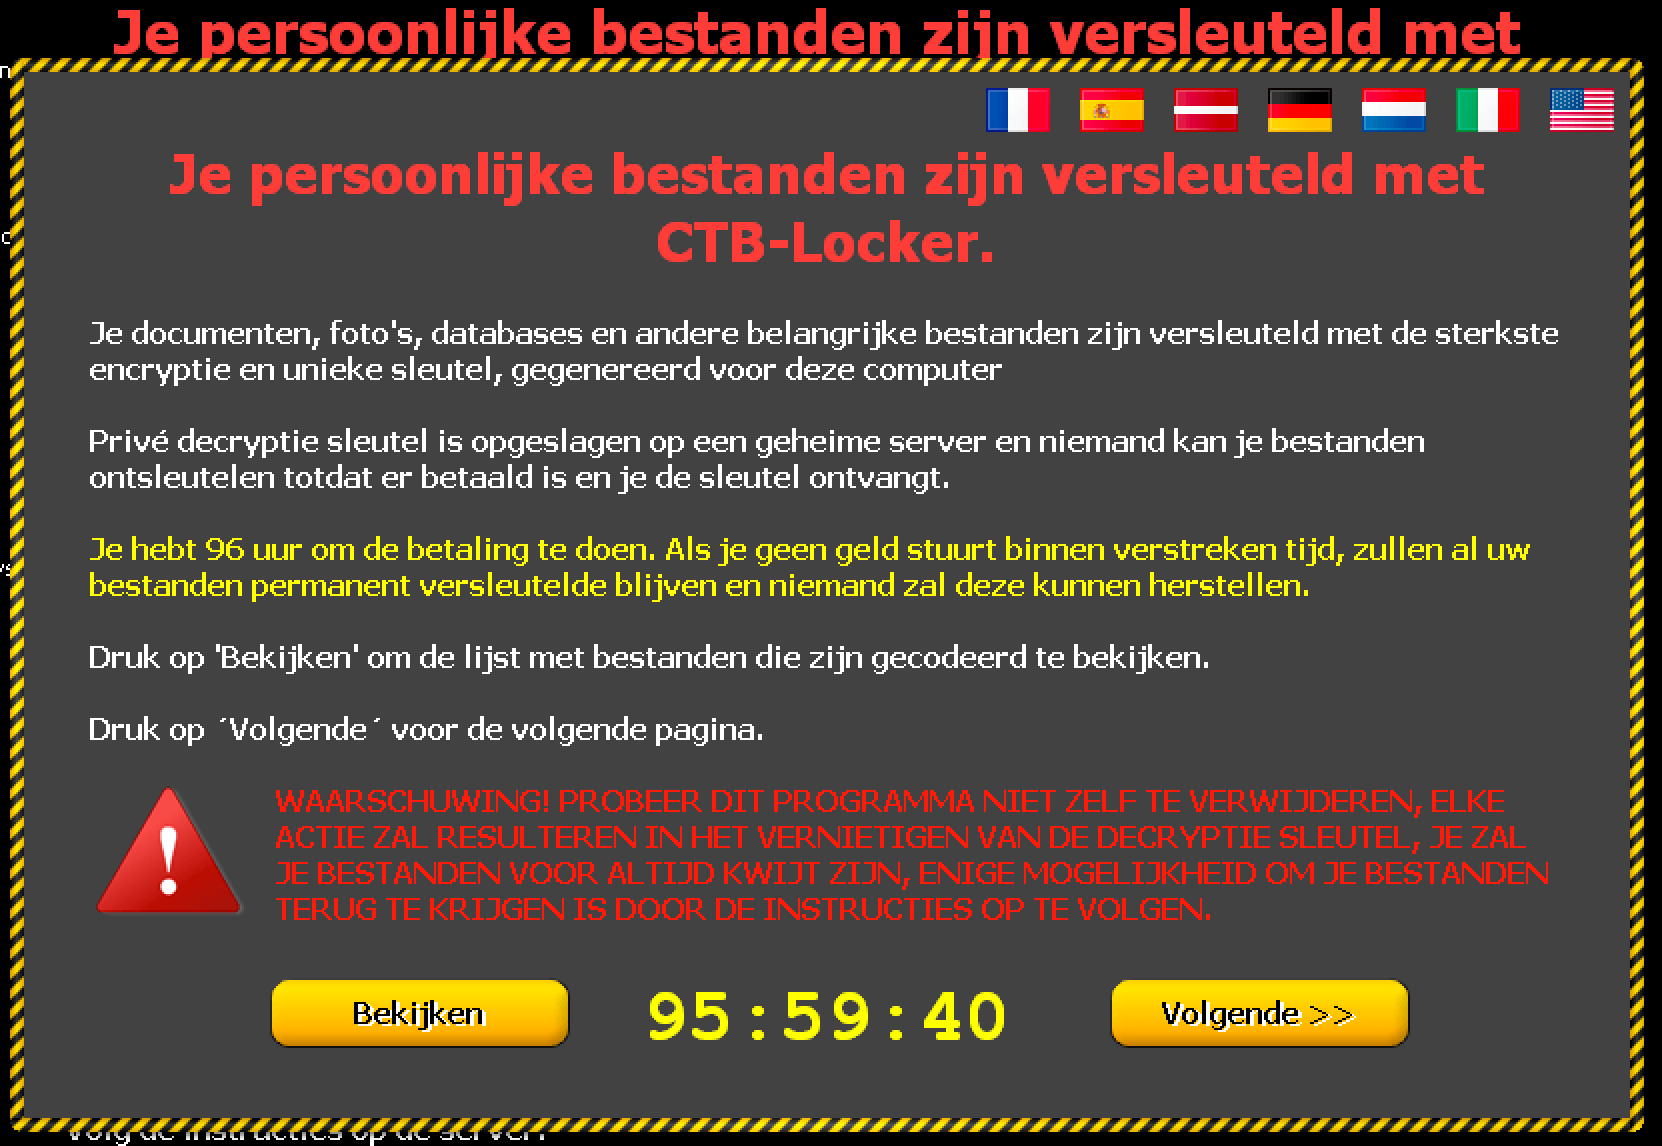
It took a couple of minutes before I started to notice unusual behavior but then this showed up in the virtual machine


win5

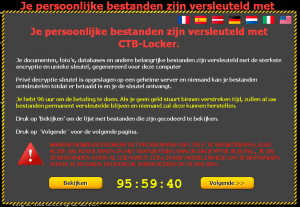
The notice is in Dutch, basically saying that your files are now locked and you have 96 hours to do a payment. This means the machine is now fully infected.

I do not know why the notice was in Dutch. Maybe because the analysis was done from an IP that is geo-located in Belgium (Flanders) or because of the fact that the malware was maybe specifically aimed at Dutch speaking users?

Network capture

The network traffic was captured in a pcap file. This allows me to have a detailed look at the connections without having the need of keeping the machine running. In the capture below, 192.168.171.146 is the infected Windows machine and 192.168.171.2 is the default route for that machine.

The first thing I noticed in the capture was a DNS query for the domain smartoptionsinc.com with a DNS response of 216.70.228.110 (both located in the US). Immediately after the DNS request, there was a request to 216.70.228.110 on tcp/443 (https). During the https conversation there was a request for the PTR record of 216.70.228.110 (110.228.70.216.in-addr.arpa). I’m not sure if the request for the PTR record was caused by the malware or because of normal operation of the Windows host.

19:21:10.265447 IP 192.168.171.146.1321 > 192.168.171.2.53: 23427+ A? smartoptionsinc.com. (37)
19:21:11.031868 IP 192.168.171.2.53 > 192.168.171.146.1321: 23427 1/13/0 A 216.70.228.110 (264)
19:21:11.033897 IP 192.168.171.146.1322 > 216.70.228.110.443: Flags [S], seq 3369729607, win 64240, options [mss 1460,nop,nop,sackOK], length 0
19:21:11.192678 IP 216.70.228.110.443 > 192.168.171.146.1322: Flags [S.], seq 1816156004, ack 3369729608, win 64240, options [mss 1460], length 0
...
19:21:11.542592 IP 216.70.228.110.443 > 192.168.171.146.1322: Flags [P.], seq 919:970, ack 261, win 64240, length 51
19:21:11.583938 IP 192.168.171.146.1323 > 192.168.171.2.53: 13061+ PTR? 110.228.70.216.in-addr.arpa. (45)
19:21:11.643981 IP 216.70.228.110.443 > 192.168.171.146.1322: Flags [P.], seq 919:970, ack 261, win 64240, length 51
...
19:21:11.925041 IP 192.168.171.2.53 > 192.168.171.146.1323: 13061 1/6/0 PTR 216-70-228-110.static-ip.telepacific.net. (211)

Downloading the certificate information revealed this might be a Synology device.

openssl s_client -connect 216.70.228.110:443

subject=/C=TW/ST=Taiwan/L=Taipei/O=Synology Inc./OU=FTP Team/CN=synology.com/emailAddress=product@synology.com
issuer=/C=TW/ST=Taiwan/L=Taipei/O=Synology Inc./OU=Certificate Authority/CN=Synology Inc. CA/emailAddress=product@synology.com

There have been reports of SynoLocker Ransomware Affecting Synology DiskStation. I could not confirm if this was the case for this host but it does not seem to be unlikely. Also remember that in the previous part I noticed that the website of smartoptionsinc.com (hosted at 216.70.228.110) was in an abandoned or at least in a “not finished” state. This makes it more likely to be a target.

19:21:12.468442 IP 216.70.228.110.443 > 192.168.171.146.1322: Flags [P.], seq 970:1558, ack 442, win 64240, length 588
19:21:12.470807 IP 216.70.228.110.443 > 192.168.171.146.1322: Flags [FP.], seq 1558:1624, ack 442, win 64240, length 66
19:21:12.471526 IP 192.168.171.146.1322 > 216.70.228.110.443: Flags [.], ack 1625, win 64240, length 0
19:21:12.472408 IP 192.168.171.146.1322 > 216.70.228.110.443: Flags [R.], seq 442, ack 1625, win 0, length 0

Subsequent similar network behavior

The network communication with smartoptionsinc.com consisted of

  • Doing a DNS query for the domain
  • Receiving the DNS reply
  • Starting a connection on tcp/443 (https) to the IP
  • Requesting the PTR record for the IP

Having a look at the other three listed domains revealed the same network pattern.

ppc.cba.pl

19:21:17.479276 IP 192.168.171.146.1327 > 192.168.171.2.53: 24966+ A? ppc.cba.pl. (28)
19:21:17.517892 IP 192.168.171.2.53 > 192.168.171.146.1327: 24966 1/13/0 A 95.211.144.65 (255)
19:21:17.519091 IP 192.168.171.146.1328 > 95.211.144.65.443: Flags [S], seq 3421975270, win 64240, options [mss 1460,nop,nop,sackOK], length 0
19:21:17.545014 IP 95.211.144.65.443 > 192.168.171.146.1328: Flags [S.], seq 3198389694, ack 3421975271, win 64240, options [mss 1460], length 0
...
19:21:17.615556 IP 192.168.171.146.1329 > 192.168.171.2.53: 56835+ PTR? 65.144.211.95.in-addr.arpa. (44)

The certification information was as follows

subject=/OU=Domain Control Validated/OU=PositiveSSL/CN=cba.pl
issuer=/C=GB/ST=Greater Manchester/L=Salford/O=COMODO CA Limited/CN=PositiveSSL CA 2

cargol.cat

19:21:22.649647 IP 192.168.171.146.1330 > 192.168.171.2.53: 15239+ A? cargol.cat. (28)
19:21:22.803797 IP 192.168.171.2.53 > 192.168.171.146.1330: 15239 1/13/0 A 217.149.7.213 (255)
19:21:22.804598 IP 192.168.171.146.1331 > 217.149.7.213.443: Flags [S], seq 3319478930, win 64240, options [mss 1460,nop,nop,sackOK], length 0
19:21:22.858941 IP 217.149.7.213.443 > 192.168.171.146.1331: Flags [S.], seq 1829101853, ack 3319478931, win 64240, options [mss 1460], length 0
...
19:21:23.560461 IP 192.168.171.146.1332 > 192.168.171.2.53: 37378+ PTR? 213.7.149.217.in-addr.arpa. (44)
19:21:23.622886 IP 192.168.171.2.53 > 192.168.171.146.1332: 37378 1/6/0 PTR vm7213.filnet.es. (186)

The -expired- certificate had this information

subject=/C=ES/ST=Catalunya/L=Barcelona/O=Tirabol Produccions
issuer=/C=ES/ST=Catalunya/L=Barcelona/O=Tirabol Produccions

bikeceuta.com

19:21:28.061769 IP 192.168.171.146.1333 > 192.168.171.2.53: 57220+ A? bikeceuta.com. (31)
19:21:28.090268 IP 192.168.171.2.53 > 192.168.171.146.1333: 57220 1/13/0 A 91.142.215.77 (258)
19:21:28.090787 IP 192.168.171.146.1334 > 91.142.215.77.443: Flags [S], seq 1209465814, win 64240, options [mss 1460,nop,nop,sackOK], length 0
19:21:28.160456 IP 91.142.215.77.443 > 192.168.171.146.1334: Flags [S.], seq 4167533275, ack 1209465815, win 64240, options [mss 1460], length 0
...
19:21:28.299664 IP 192.168.171.146.1335 > 192.168.171.2.53: 53762+ PTR? 77.215.142.91.in-addr.arpa. (44)

The certificate had this information

subject=/C=US/ST=Virginia/L=Herndon/O=Parallels/OU=Parallels Panel/CN=Parallels Panel/emailAddress=info@parallels.com
issuer=/C=US/ST=Virginia/L=Herndon/O=Parallels/OU=Parallels Panel/CN=Parallels Panel/emailAddress=info@parallels.com

The requests for the PTR requests of the IPs belonging to the command and control domains resulted in an extra set of domains to watch : 216-70-228-110.static-ip.telepacific.net, cba.pl, vm7213.filnet.es and ns1.evs23.com.

(smartoptionsinc.com)
  110.228.70.216.in-addr.arpa domain name pointer 216-70-228-110.static-ip.telepacific.net. 
(ppc.cba.pl)
  65.144.211.95.in-addr.arpa domain name pointer cba.pl.
(cargol.cat)
  213.7.149.217.in-addr.arpa domain name pointer vm7213.filnet.es.
(bikeceuta.com)
  77.215.142.91.in-addr.arpa domain name pointer ns1.evs23.com. 

Details of the network capture

I used tshark to get statistics on the TCP conversation. Note that in the output below I omited the traffic that had to do with normal Windows network behavior.

tshark -r xp.pcap -q -z conv,tcp
================================================================================
TCP Conversations
Filter:<No Filter>
                                               |       <-      | |       ->      | |     Total     |    Relative    |   Duration   |
                                               | Frames  Bytes | | Frames  Bytes | | Frames  Bytes |      Start     |              |
192.168.171.146:1334 <-> 91.142.215.77:443        533    796640     107      6331     640    802971   424.351847000         1.2458
192.168.171.146:1328 <-> 95.211.144.65:443         10      4705       8       978      18      5683   413.780151000         0.1197
192.168.171.146:1322 <-> 216.70.228.110:443         9      2164       8       881      17      3045   407.294957000         1.4385
192.168.171.146:1331 <-> 217.149.7.213:443          8      1602       7       805      15      2407   419.065658000         0.2508

This output of tshark proofs that the communication consisted of

  1. the first 9 frames with smartoptionsinc.com
  2. then 10 frames with ppc.cba.pl
  3. then 8 frames with cargol.cat
  4. and finally 533 frames with bikeceuta.com

In total there was a download of approx. 800 KBytes from the Spanish host bikeceuta.com. That’s more than enough room for a decent payload!

I could not see network traffic to other hosts.

What was downloaded?

Because the traffic was https it is not immediately obvious to see what was downloaded.

One way you can solve this is by setting up an HTTPS-proxy and basically performing a MiTM attack (with a fake certificate for the four command and control sites). I did not do this but used Google search to verify if I could find references for ‘https’ and any of the four sites.

Based on the information at urlquery.net for bikeceuta.com and urlquery.net for cargol.cat there were requests found for bikeceuta.com/templates/nero.tar.gz, cargol.cat/IESABP/hello.tar.gz and cargol.cat/IESABP/nero.tar.gz. So nero.tar.gz and hello.tar.gz is something to keep an eye on. Be warned, “nero” is also an app for KDE. It’s not a very popular package so blocking it will not cause that many issues but it’s something to take into account when reviewing alerts.

Conclusion

The initial goal was to describe a thought process for extracting IOCs for an ongoing incident. This was relatively easy by analysing the e-mail source, using basic Linux commands and having the malware run in a non-networked virtual machine and capture the outgoing network activity. Additional behavior analysis was afterwards done with running the malware in a networked virtual machine.

Uploading the file to Virustotal for further analysis is a quick way for getting extra information but sometimes this is not possible or advisable. By uploading the file you are basically giving away to the “bad guys” that you are doing an investigation, for some malware samples this is not the right thing to do.

Remarks

The message was received early February (4-February 2015). On the date of the analysis (about 20 days later) it was still possible to activate the ransomware via one of the hardcoded command and control domains.

Use CryptoLocker to train your incident response team (part 2)

Train your incident response team

This is the second part in a post describing how to train your team for incident response and incident investigations.

The first part covered how to analyze the e-mail headers and information in a suspicious e-mail.

Attachment

The e-mail contained one attachment : koen.vanimpe@c.d.zip. Unzipping the file resulted in a .scr file.

-rw-rw-r--  1 koenvanimpe  staff   49152 Feb  4 16:45 franz_krukenberg_str_10_25436_uetersen.scr
-rw-rw-r--  1 koenvanimpe  staff   32761 Feb  4 16:45 franz_krukenberg_str_10_25436_uetersen.zip

The sha1 is

99920e112a522e2d1b409e00330022f705c2fec7  franz_krukenberg_str_10_25436_uetersen.scr
630c00846a0242e524d1c17507bf4db47c33b8bb  franz_krukenberg_str_10_25436_uetersen.zip

MD5 is

e4b72ce8ea569b12eabf0aef6ed81615  franz_krukenberg_str_10_25436_uetersen.scr
a0adb2ccf18f65a102c1c975e7e4baec  franz_krukenberg_str_10_25436_uetersen.zip

I uploaded the scr file to Virustotal for further analysis. So far (22-Feb) no-one else submitted a similar sample.


virustotal

According to Virustotal the file gets recognized by most anti-virus vendors as a CryptoLocker virus.

Symantec describes CryptoLocker.F as :

Trojan.Cryptolocker.F is a Trojan horse that encrypts files on the compromised computer and then prompts the user to purchase a key in order to decrypt them.

CryptoLocker is known as ransomware. The timing in the post by F-Secure describing a rise in CTB-Locker infections corresponds with the time the e-mail was received.

With the use of the Linux command strings I could see that it uses a number of DLLs

 
cmpbk32.dll
KERNEL32.dll
SHLWAPI.dll
msimg32.dll
user32.dll
certcli.dll
WTSAPI32.dll

The certcli.dll file is a Microsoft DLL that provides communications between a client or intermediary application and certificate services.

The WTSAPI32.dll file is a Microsoft DLL that contains the application programming interface (API) functions that enable application programs to (1) manage terminal services, (2) set and retrieve user configuration information that is specific to terminal services, (3) use terminal services virtual channels, and more, in a terminal services environment.

The SHLWAPI.dll is a Microsoft DLL that is a library which contains functions for UNC and URL paths, registry entries, and color settings.

The file cmpbk32.dll is a Microsoft DLL file which is responsible for a component to Microsoft Connection Manager Phonebook.

With this information we now know that this application has capabilities for

  • working with a certificate service
  • managing remote services
  • working with UNC and URL paths
  • working with registry settings
  • connecting with the Microsoft Connection Manager Phonebook

These capabilities are confirmed in the remainder of the strings output with calls to

PhoneBookEnumCountries
PhoneBookCopyFilter
CreateNamedPipe
GetCurrentDirectory
GetComputerName
CreateDirectory
UrlCanonicalize
CAEnumNextCA
CADeleteCA
WTSLogoffSession
WTSSendMessage

Strings also revealed the use of a library ddi32.dll. As far as I could verify this is a library that helps with drawing. It’s most probably used to build up the notice for the end user that they have a “problem”.

Information before executing the file

When I copied the files to a Windows machine I immediately noticed that the icon of the file mimics to be a Word document. This is done to lure the user into opening the file.


win1

Windows Sandbox – XP

I then decided to execute the file in a virtual machine, a Microsoft Windows XP-SP2. The first step would be to execute it in a VM without external network connectivity. I captured all the network traffic with /Applications/VMware Fusion.app/Contents/Library/vmnet-sniffer in a pcap file.

./vmnet-sniffer -w xp.pcap vmnet1

Opening the file reveals indeed a Word document with the title MARITIME ARCHIVES & LIBRARY Information Sheet 15 ELDER DEMPSTER & COMPANY.


win2

This is a document from the National Museums of Liverpool in the United Kingdom.

After opening the Word document nothing seems to happen. I did not see any network activity at first. After closing the document there was a process that kept running in the background.


win3


win4

It took a couple of minutes before I could see any “unusual” network requests.

Although Dshell from the US Army provides an easy interface for tracking network activity in a pcap file I decided to use tshark to brush up my knowledge on tshark expressions.

Network capture

There are only two obvious ways network connections from basic malware can happen. Either it connects directly to a hardcoded list of IPs or it does a DNS lookup for a list of hardcoded domains. When I looked at the pcap data I could not see any connections to “unsual” IPs. So I ran tshark against the pcap file to extract the DNS requests and sort them.

tshark -r ../xp.pcap -Y "dns.flags.response == 0" -T fields -e dns.qry.name | sort | uniq -c

Note that on some Linux flavors you have to use -R instead of -Y.

This resulted in a number of domains mostly involving normal Windows operations. Some of the domains however had nothing to do with the network behavior of a normal Windows computer. In this case the domains bikeceuta.com, cargol.cat, ppc.cba.pl and smartoptionsinc.com are queried several times.

  25 bikeceuta.com
  29 cargol.cat
  30 ppc.cba.pl
   9 smartoptionsinc.com  

According to Symantec, the CryptoLocker virus downloads its message from a number of command and control servers. I assumed that the domains bikeceuta.com, cargol.cat, ppc.cba.pl and smartoptionsinc.com were used by this version of CryptoLocker to download its additional information.

The domains are listed in a number of malware analysis by Sophos : Troj/Agent-ALLW and Troj/Agent-ALMD. The detection date is in line with the date the infected e-mail was received.

The domain bikeceuta.com is registered to somone in Spain. At the time of writing, it resolved to 91.142.215.77. This is an IP in Spain. The website of bikeceuta.com returns a page (in Spanish) of a sports bicycle vendor.


web_bikeceuta

Domain Name: BIKECEUTA.COM
Updated Date: 2011-05-03T12:58:28.00Z
Creation Date: 2011-05-03T20:58:00.00Z
Registrant Name: ERNESTO VALERO MORONTA
...
bikeceuta.com has address 91.142.215.77
...
inetnum:        91.142.208.0 - 91.142.215.255
netname:        ES-AXARNET-NET
descr:          AXARNET, Nodo en Madrid
country:        ES

The domain cargol.cat is registered to somone in Spain. At the time of writing, it resolved to 217.149.7.213. This is an IP in Spain. It’s no longer possible to access the website at cargol.cat. You now get a 403 “You don’t have permission to access / on this server.” message.

Domain Name: cargol.cat
Created On: 2006-06-23 17:26:54 GMT
Last Updated On: 2014-06-23 09:28:04 GMT
Registrant Name: Marc
...
cargol.cat has address 217.149.7.213
...
inetnum:        217.149.4.0 - 217.149.7.255
netname:        FILNET-2
descr:          Filnet static IP addresses for Internet servers
country:        ES

The domain ppc.cba.pl is registered via a registrar in Belize. At the time of writing, it resolved to 95.211.144.65. This is an IP in Holland (belonging to Leaseweb). The webserver of ppc.cba.pl now returns a page with “Page is blocked”. This is a good indication the hoster is aware of the problem.

created:               2005.01.14 14:36:58
last modified:         2015.02.16 11:45:46
renewal date:          2016.03.15 14:36:58
...
REGISTRAR:
Abc Hosting Ltd.
#7B Neal Pen Road,
Belize City
Belize
email:domeny@cba.pl
...
ppc.cba.pl has address 95.211.144.65
...
inetnum:        95.211.142.144 - 95.211.144.255
netname:        LEASEWEB
descr:          LeaseWeb

The domain smartoptionsinc.com is registered to somone in the US. At the time of writing, it resolved to 216.70.228.110. This is an IP in the US belonging to Job Options in California. According to the website www.smartoptionsinc.com it is a site of a subsidiary of Job Options Inc, a provider of commercial linen and laundry service for the hospital and healthcare industry. Because of the presence of the “widget area” and blocks I guess that the website is either not finished or abanded. The website is powered by WordPress and reading the HTML source with “/wp-includes/js/jquery/jquery.js?ver=1.6.1” indicate this might be an outdated version of WordPress. Vulnerable WordPress sites are often used in malware campaigns as command and control servers (see for example the CryptoPHP incident)


website_smartoptions

Registrant:
Status: clientUpdateProhibited http://www.icann.org/epp#clientUpdateProhibited
Updated Date: 23-dec-2014
Creation Date: 30-dec-2010
Expiration Date: 30-dec-2015
Agundis, Juan Carlos  jagundis@joboptionsinc.org
Job Options Inc.
3465 Camino Del Rio South Suite 300
San Diego, CA 92108
US
...
smartoptionsinc.com has address 216.70.228.110
...
CIDR    216.70.228.96/28
Name    JOB-OPTIONS

Out of these four domains, the Polish domain (ppc.cba.pl) has whois data that has been recently updated.

Similar to the information in the e-mail headers there are sources in different countries.

bikeceuta.com Spain
 
91.142.215.77 (bikeceuta.com) Spain
 
cargol.cat Spain (Catalunya)
 
217.149.7.213 (cargol.cat) Spain
 
ppc.cba.pl Poland
 
95.211.144.65 (ppc.cba.pl) Holland
 
smartoptionsinc.com United States
 
216.70.228.110 (smartoptionsinc.com) United States
 

Conclusions

My experiment so far described how this version of CryptoLocker works. I prevented it from actually starting what it is supposed to do by blocking the network access. The next steps involve having it run in a fully networked environment and observe what happens.

Blocking the network access to the command and control servers does not prevent CryptoLocker from starting but it prevents it from doing direct harm to your documents. This is a good reason for having a network setup that blocks outgoing connections to blacklisted domains. Everything depends of course on the quality of the blacklist. It certainly is not a perfect solution but an extra layer of defense.

Also note that some malware checks if it’s being run in a virtualization environment. This was not the case for this sample which made it easier for me to do the analysis.

If you only consider the geographical location and language then the source of this malware could be something Spanish or Central America based. This is highly speculative and it could also be rather a coincidence. Two command and control servers are located in Spain and registered with a Spanish or Catalonian TLD. The registration of one command and control server is in Belize (Central America). The sender IP is in Mexico. One of the IPs of a command and control server is in California (near Mexico).

IOCs

Based on the information from part 1 and this part we can deliver simple to use IOCs :

  • Filter attachments with a name similar to full.username@organisation.tld.zip
  • Reject SMTP connections from 132.248.193.220
  • Block network traffic to bikeceuta.com
  • Block network traffic to cargol.cat
  • Block network traffic to ppc.cba.pl
  • Block network traffic to smartoptionsinc.com

Run in a networked VM

The last part of this post describes the behavior of this virus an a networked VM.